Wearables, Week 1: Favorite Garment Tracking
I had a difficult time choosing my favorite garment. I don’t think much about my clothes (hence why most of them are black). I thought about doing an old shirt of my mom’s, but all of the evidence about where it came from has been rubbed away – though, to be fair I spent a lot of time today listening to the Planet Money podcasts about where a t-shirt comes from and learned a lot about cotton production, spinning yarn and Bangladeshi garment factories.
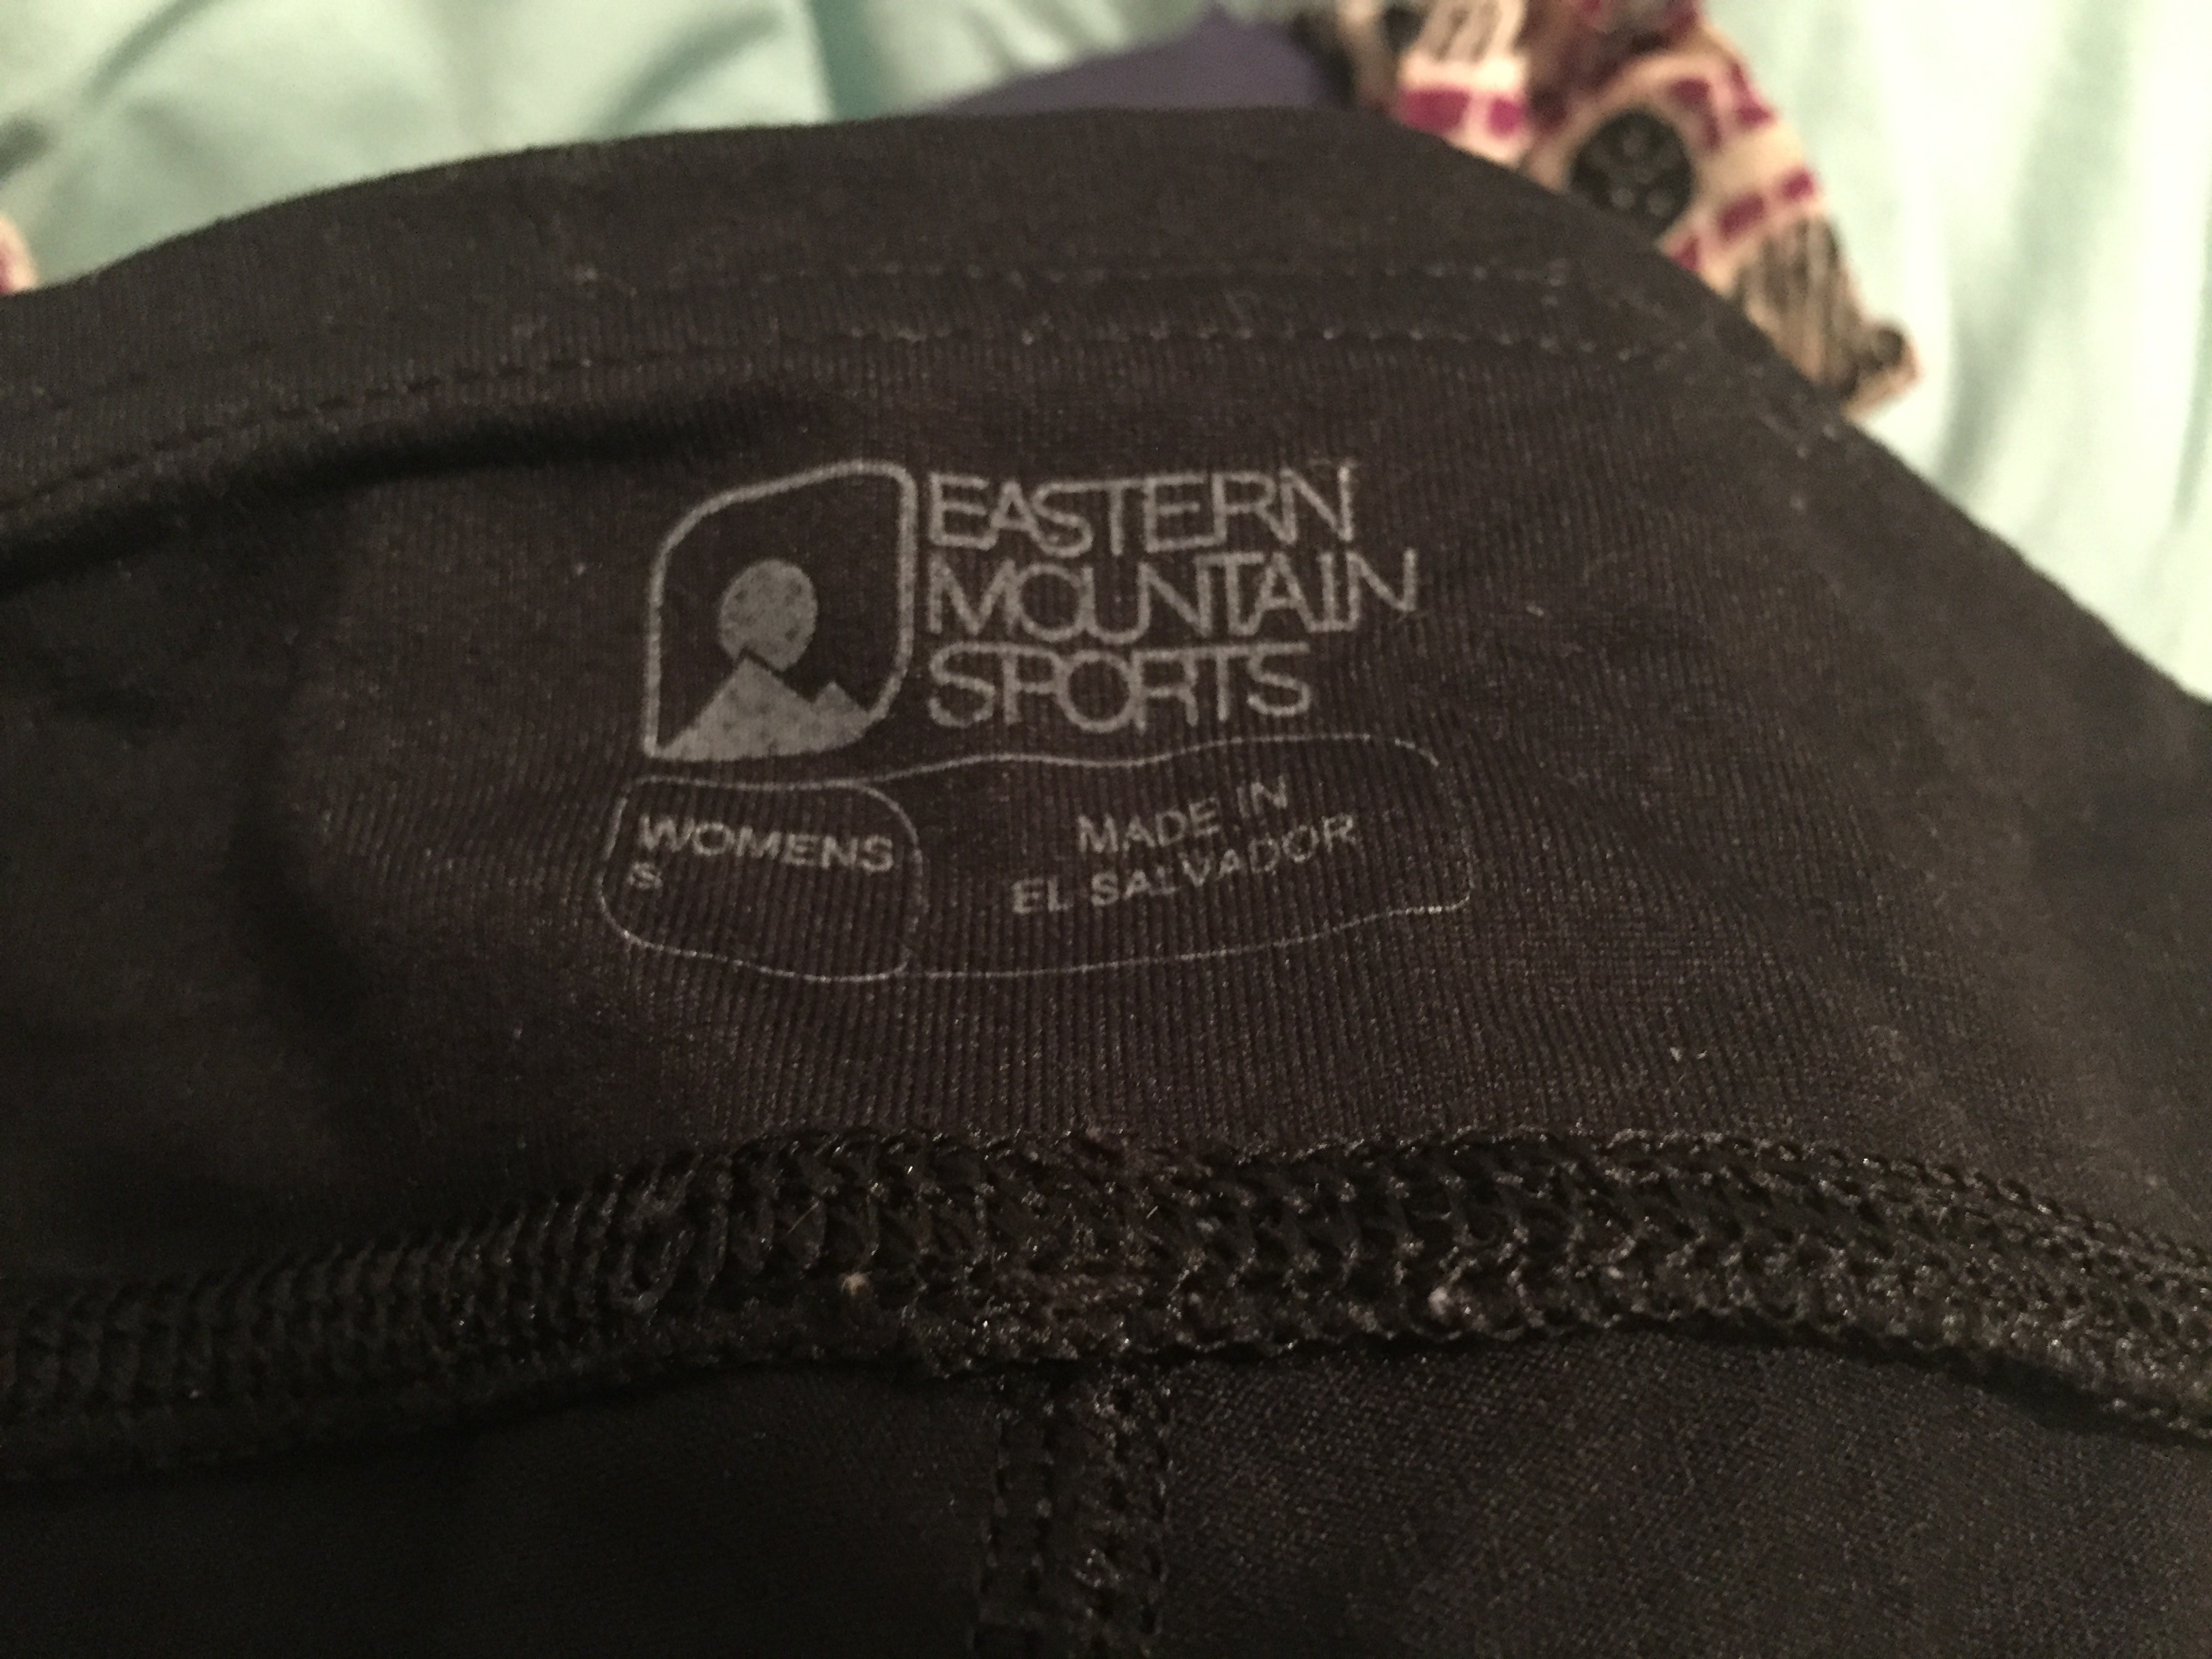
So I decided to go with my favorite pair of running tights, made by EMS. They’re long, black and keep me warm on my winter runs. As something more on the technical side, I wonder how it different form the t-shirt production narrative.
The garment is 86% nylon, 14% spandex. It’s from the Fall 2014 EMS line, style # F14W0291.
A description of EMS from their website:
“Founded in 1967 by two New England rock climbers and based in Peterborough, N.H., Eastern Mountain Sports is one of the nation’s leading outfitters of outdoor gear, clothing, footwear and accessories with 69 retail stores in 12 states. Eastern Mountain Sports designs and sells products for outdoor adventurers who participate in a variety of sports, such as mountaineering, backpacking, camping, hiking, adventure racing, climbing, kayaking, mountain biking and snow sports. More information is available at www.ems.com.” There isn’t any information about manufacturing on their website and external searches yield more information about business and merchandising than the EMS brand of clothing they sell in store.
I did a search on the garment industry in El Salvador. It looks like most clothing is manufactured in Asia because of cheaper costs, but that nation-states have banded together to protect their industries. El Salvador does both yarn, fabric and apparel production. Apparently is known for their production of synthetic fabrics such as the ones used in this garment. From a website about textile production in El Salvador:
El Salvador… since 2004, the country has been working on executing a strategy that has allowed the country’s textile and apparel industry to develop structural changes in factories and mills by engagement in capacity-building programs and by meeting international compliance and standards in labor and environmental regulations.
The goal was to develop virtual and vertical companies for both replenishment of commodity businesses and the development of niche products that promoted a strategic relationship between textile mills, garment factories and retailers that would reduce costs, increase efficiency and flexibility allowing El Salvador to take advantage of our geographic proximity to the United States. One of the results of executing this strategy was the establishment of a robust and vertically integrated synthetic-textile manufacturing cluster that has developed over the past several years. This synthetics cluster includes polyester and nylon yarn, narrow elastics, circular and warp-knit stretch fabrics and apparel manufacturers for markets such as athletic wear, sportswear, performance wear and swimwear.
source: http://www.tradegood.com/de/viewpoints/apparel-made-in-el-salvador.html

Apparently to give themselves an edge, El Salvador has been working on new technologies and pushing production of synthetics.
BWA is an example of a manufacturer of performance apparel. For BWA, textiles are designed in Portugal and employs highly technologically trained employees. They have strong mill partnerships in Europe, China, South Korea, and Taiwan.
According to wikipedia, artificial fibers are produced by extruding a polymer, through a spinneret into a medium where it hardens. Nylons involved melt spinning, where the extruded polymer is cooled in gas or air and then sets. After listening to the planet money episode, it’s interesting to see the contrast between manufacturing natural fibers vs artificial. Apparently spandex was original invented to replace rubber (http://www.madehow.com/Volume-4/Spandex.html). DuPont was involved in creating nylon, and combined spandex threads with nylon to make it more pliable.
On how spandex is made:
Two types of prepolymers are reacted to produce the spandex fiber polymer back-bone. One is a flexible macroglycol while the other is a stiff diisocyanate. The macro-glycol can be a polyester, polyether, polycarbonate, polycaprolactone or some combination of these. These are long chain polymers, which have hydroxyl groups (-OH) on both ends. The important feature of these molecules is that they are long and flexible. This part of the spandex fiber is responsible for its stretching characteristic. The other prepolymer used to produce spandex is a polymeric diisocyanate. This is a shorter chain polymer, which has an isocyanate (-NCO) group on both ends. The principal characteristic of this molecule is its rigidity. In the fiber, this molecule provides strength.
Read more: http://www.madehow.com/Volume-4/Spandex.html#ixzz3ytLxkRoz
The production process involves melt extrusion, reaction spinning, solution dry spinning, and solution wet spinning.
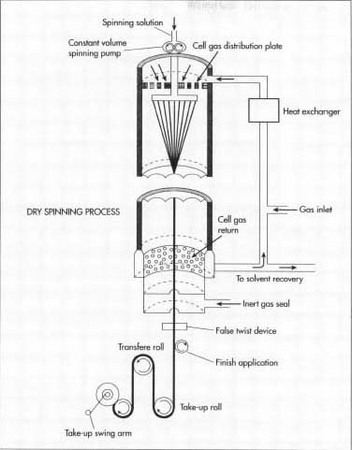
dry spinning process
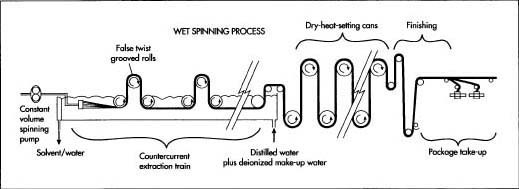
wet spinning process
I also learned that the name spandex is an anagram of expands. Clever inventors.
Honestly, from looking into this garment it seems that the industry is quite secretive. It was almost impossible to find anything specific from EMS and even though looking at similar types of manufacturers like REI, a company known for their transparency and commitment to social values. It makes me curious as to how people go about sourcing materials and workshops to produce their pieces.
ICM: Final Project Documentation
Over the course of the semester, I’ve been interested in investigating the ethereal language that we use to describe the internet, data, and other forms of technology and how this language masks the physical processes and material resources that construct said technology. From clouds to cyberspace, the way we talk about technology is misleading and potentially dangerous since it distracts us from the realities of environmental destruction and human labor.
I decided to tie together a couple of the sketches that I’ve been working on with some of these ideas in the form of an interactive, animated essay. Entitled, People are Real. Clouds are Not. the essay explores how the metaphorical terms we use hide important realities that need to be confronted and altered. The inspiration from the title comes from an article by GROUP in the e-flux publication, The Internet Does Not Exist, a collection of essays on the current state o technology and mythology of the internet. I was interested in this particular essay because they also mentioned data center water usage, particularly that of the NSA.
I used several sources, listed in the comments of my essay code as well as in specific endnotes that appear at the bottom of the page. I looked a lot into how data centers are built and are expanding as we increasingly consume data, as well as well-documented cases of labor-rights violations in the tech industry.
I did four animations/interactions, one for each section of the essay. The first looks at the idea of visualizing technology for what it is vs how we talk about it – wen you mouse over a landscape, clouds turn into servers and a stream becomes a data stream. The second shows a map of the world and the number of co-location data centers pops up when you hover over a continent. The third is a set of videos about different sets of tech workers who bring us the internet, from miners in the Congo to Google Data Center employees. The last visually imagines what it would be like to “grow” local community wifi networks, thinking about how community gardens revolutionized our relationship to food and wondering if such networks could do the same in our engagement and understanding of technology.
I used three different coding languages to put the essay together. All of the interactions were coded using p5.js and then uploaded online and embedded with iframe. The essay itself was coded in HTML/CSS.
I ran into some challenges when it came to each of the interactions. A lot had to do with sizing of images in relation to other aspects of the sketches and how they would appear in different online formats. With the data center map, I finally got a working json file after much re-writing, finagling and simplifying. The videos required a lot of DOM element research while the last one went from using complex image arrays to just repeated imagery and mousePressed functions.
I had to re-teach myself HTML and learn CSS for the project. Luckily I had started exploring Code Academy resources before the semester started, so I picked up where I left off and did some exercises and started delving into my own code. I also found the html and css book to be extremely helpful for quickly looking up topics and solutions. However I’m still struggling with getting that damn image in the header to be centered…
Overall, I’m pleased with the final result. I can’t escape the irony that I chose a program like ITP to make things instead of write about them but…this final showed me that I don’t need to forsake my interest in research and writing and that I can use my new skills to enhance my writing projects. I still want to further explore p5’s possibilities and have been intermittently following the kadenze course to give myself further practice.
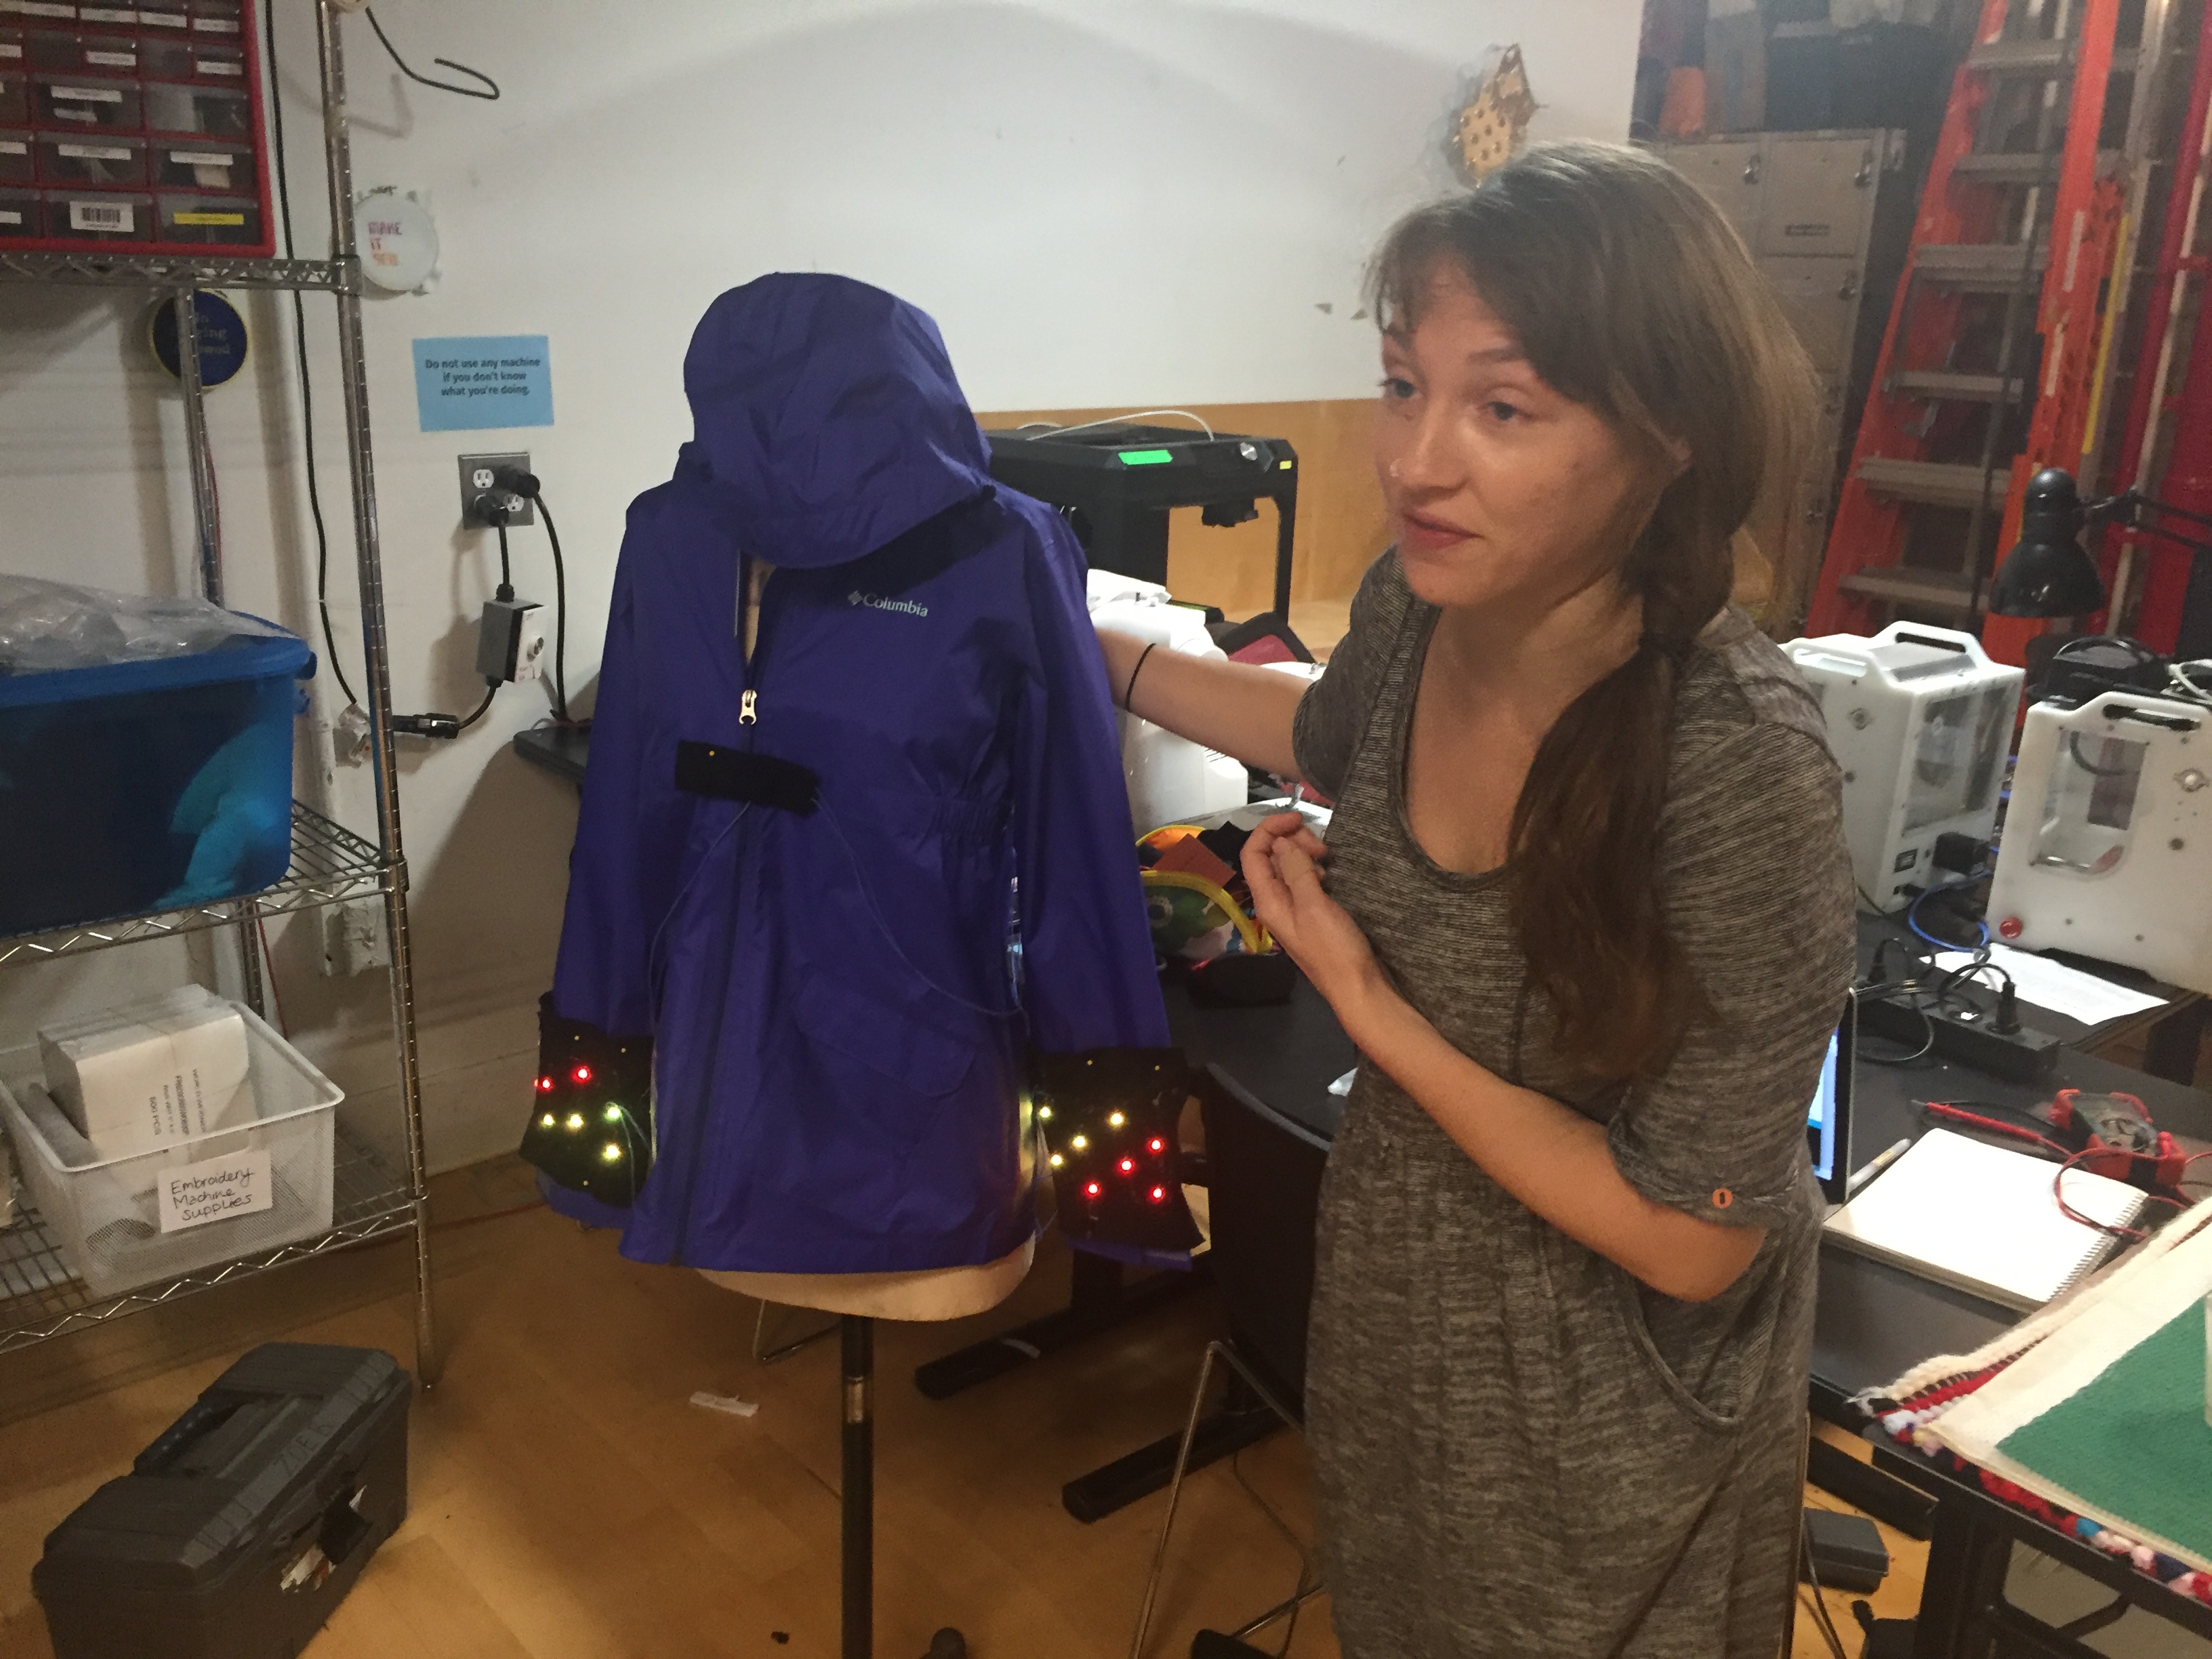
PComp, Wk 14: Semaphore Jacket – First Complete Prototype!
Now that I got one of my flag circuits to work, I went to work on the code. I used some of Adafruit’s StrandTest code and the neopixel library and the digital switch.
I struggled with the code and got error messages that I didn’t fully understand. Teresa, who has a lot of experience with neopixels, sat with me as we went through the code line by line. Rather than address individual pixels like I’d been trying to, we wrote conditional statements ‘if’ and ‘for’ loop statements so that the code would run through the entire strand, but only turn specific pixels red and the rest would be yellow. We played with a delay (which is commented out), so each pixel lit up one after the other. One interesting thing I learned about neopixels is that you can’t simply write it to turn on/off with a switch. So we had to write an additional if statement connecting it to the switch state to change the color to 0, 0, 0.
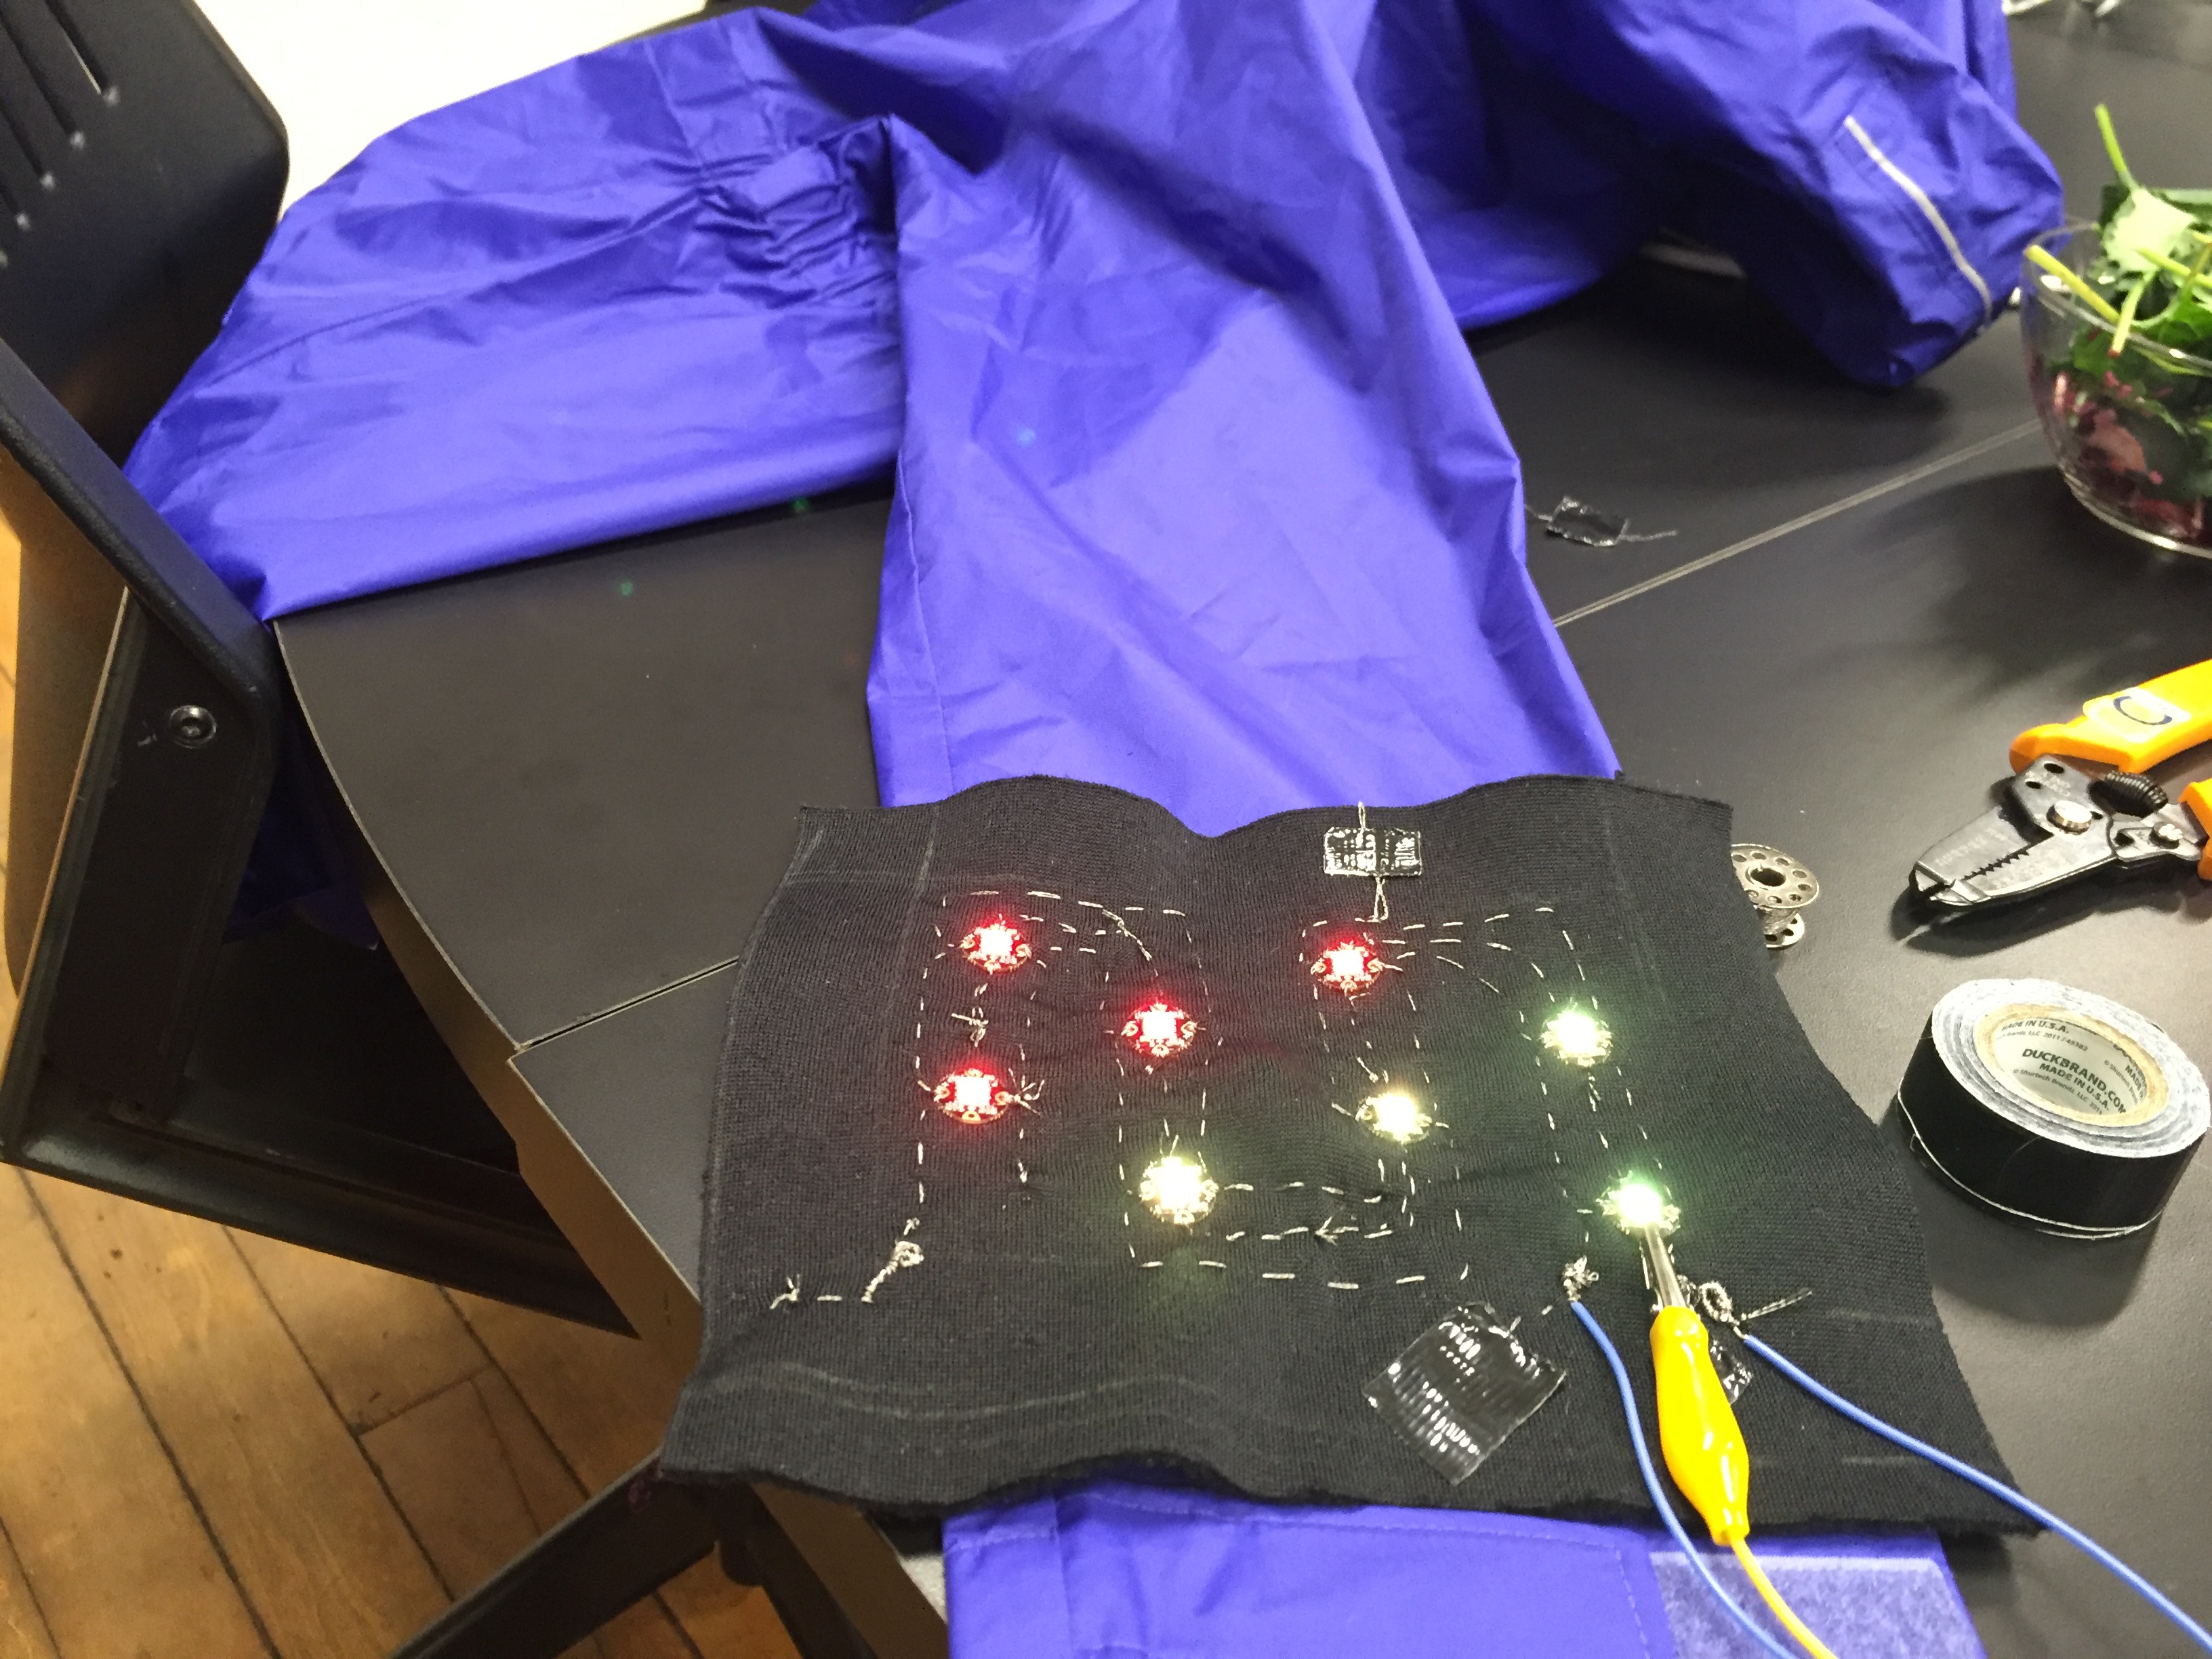
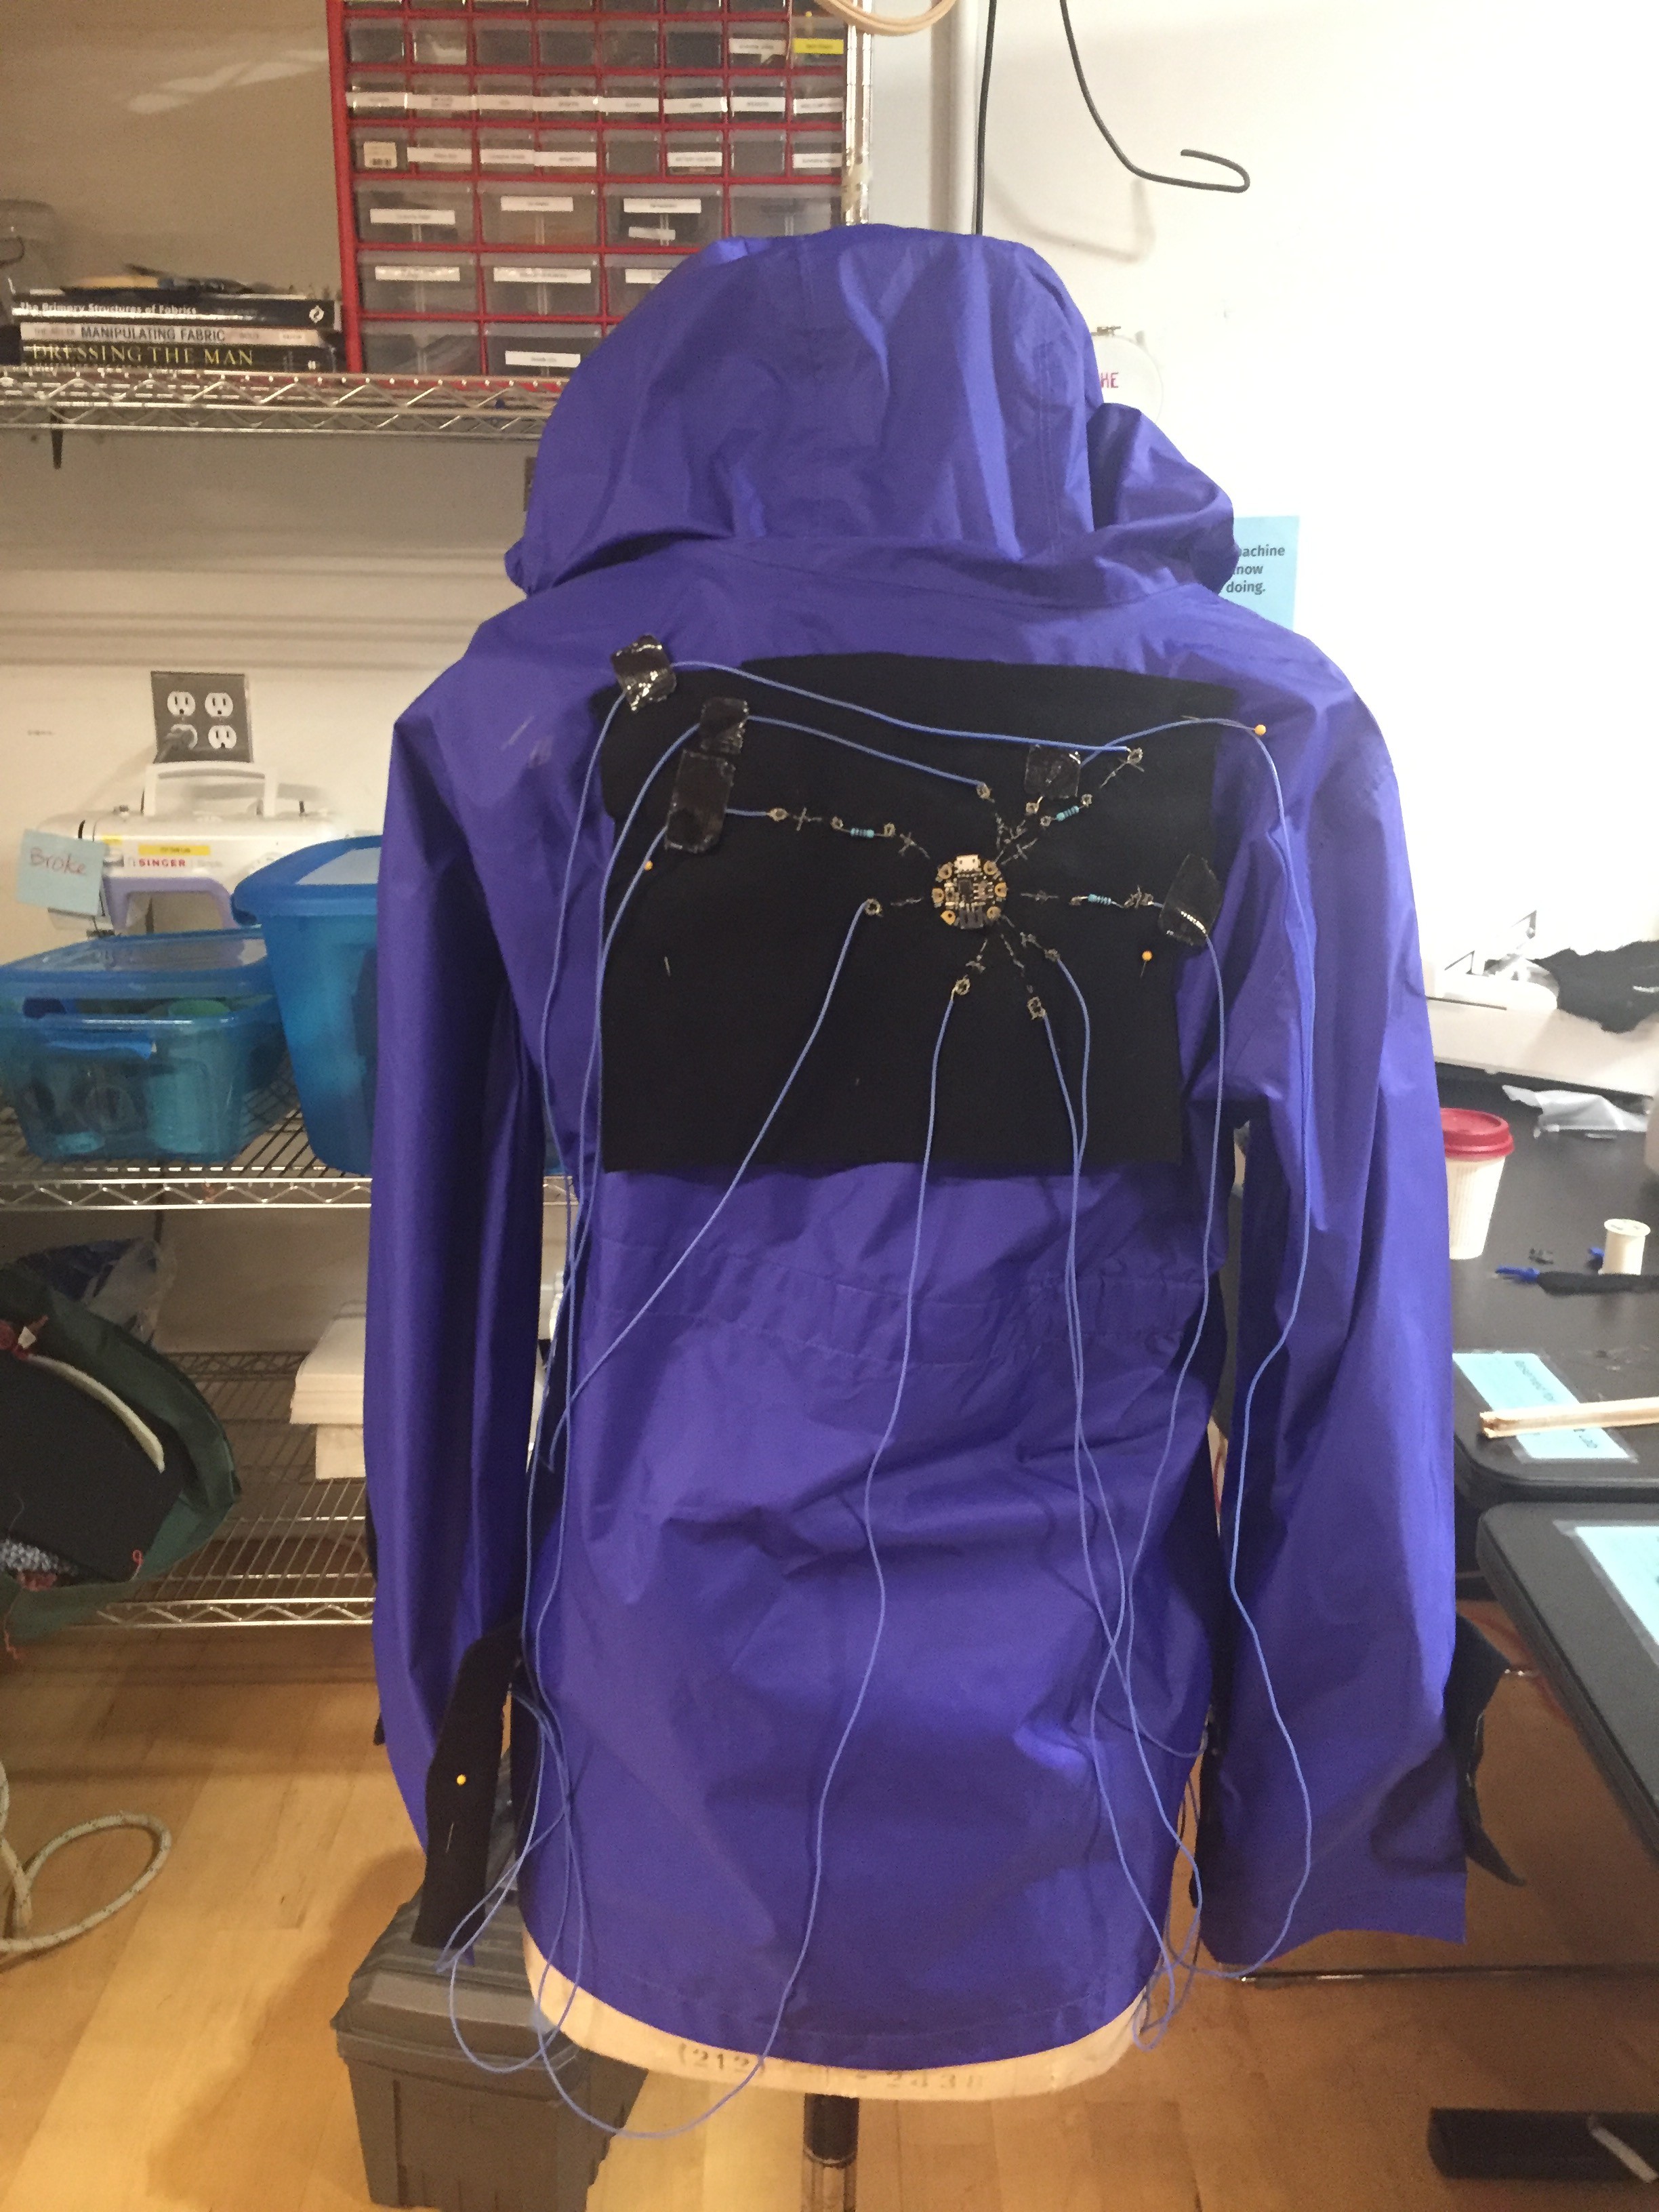
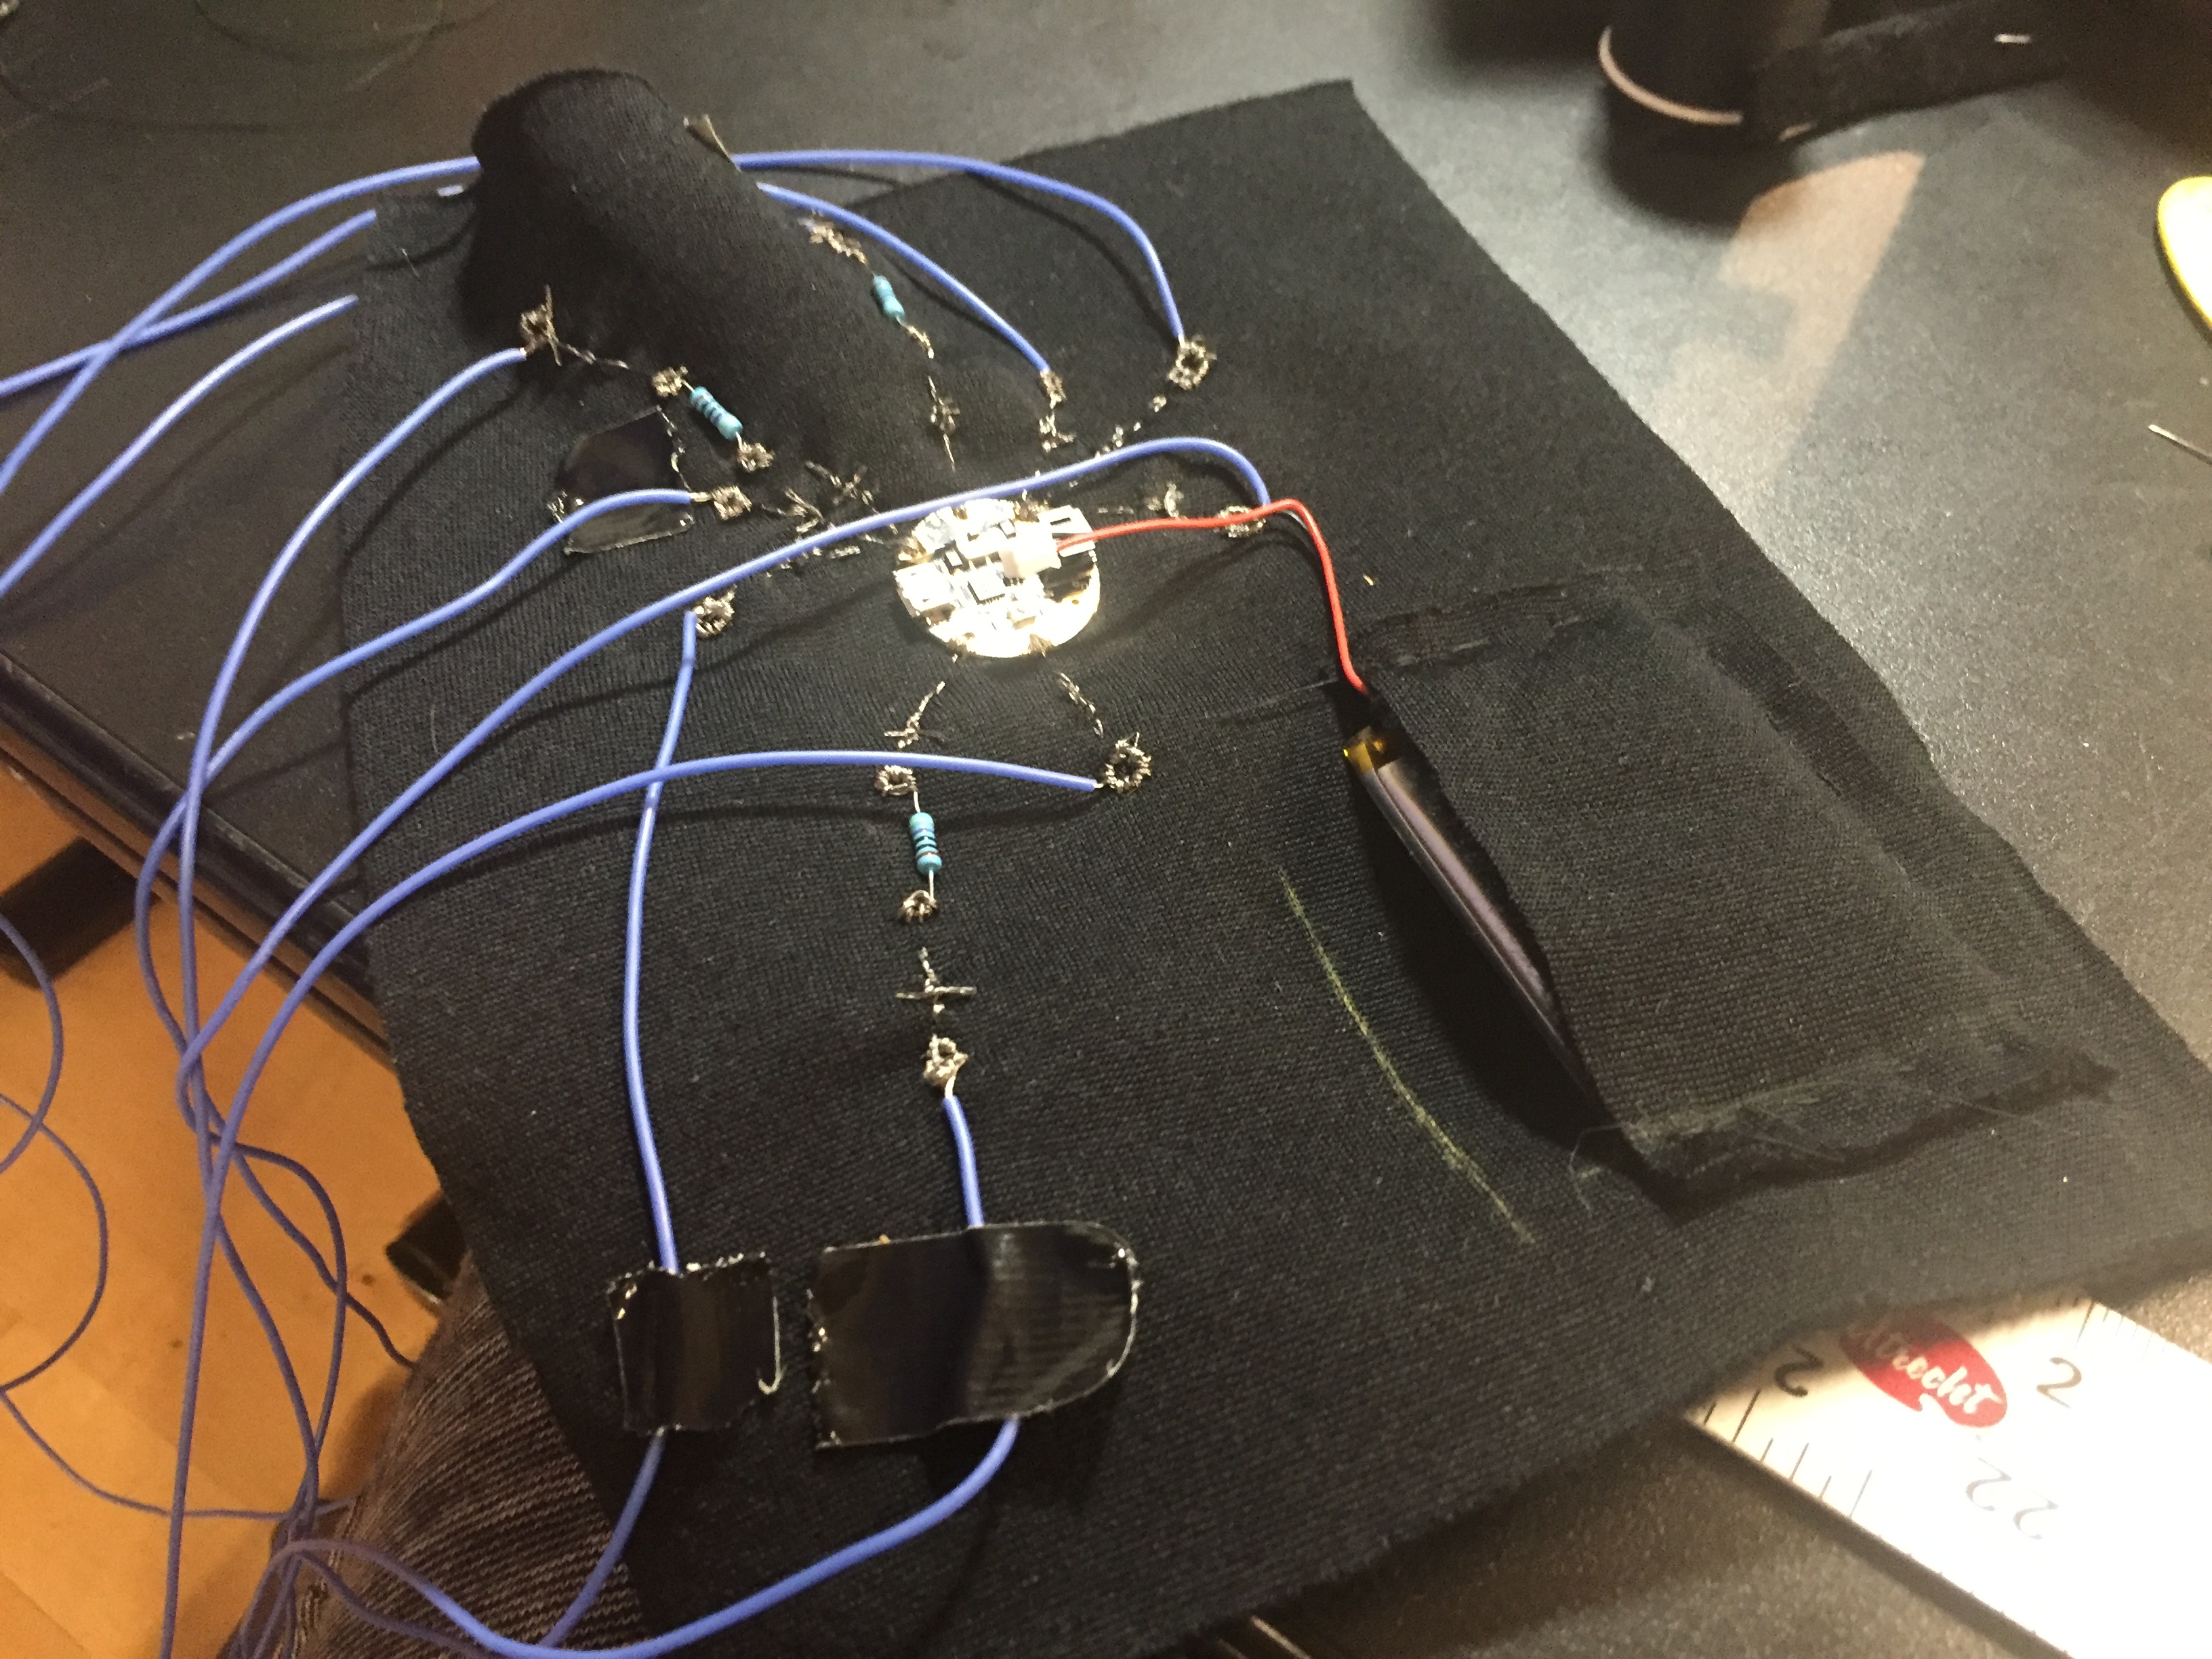
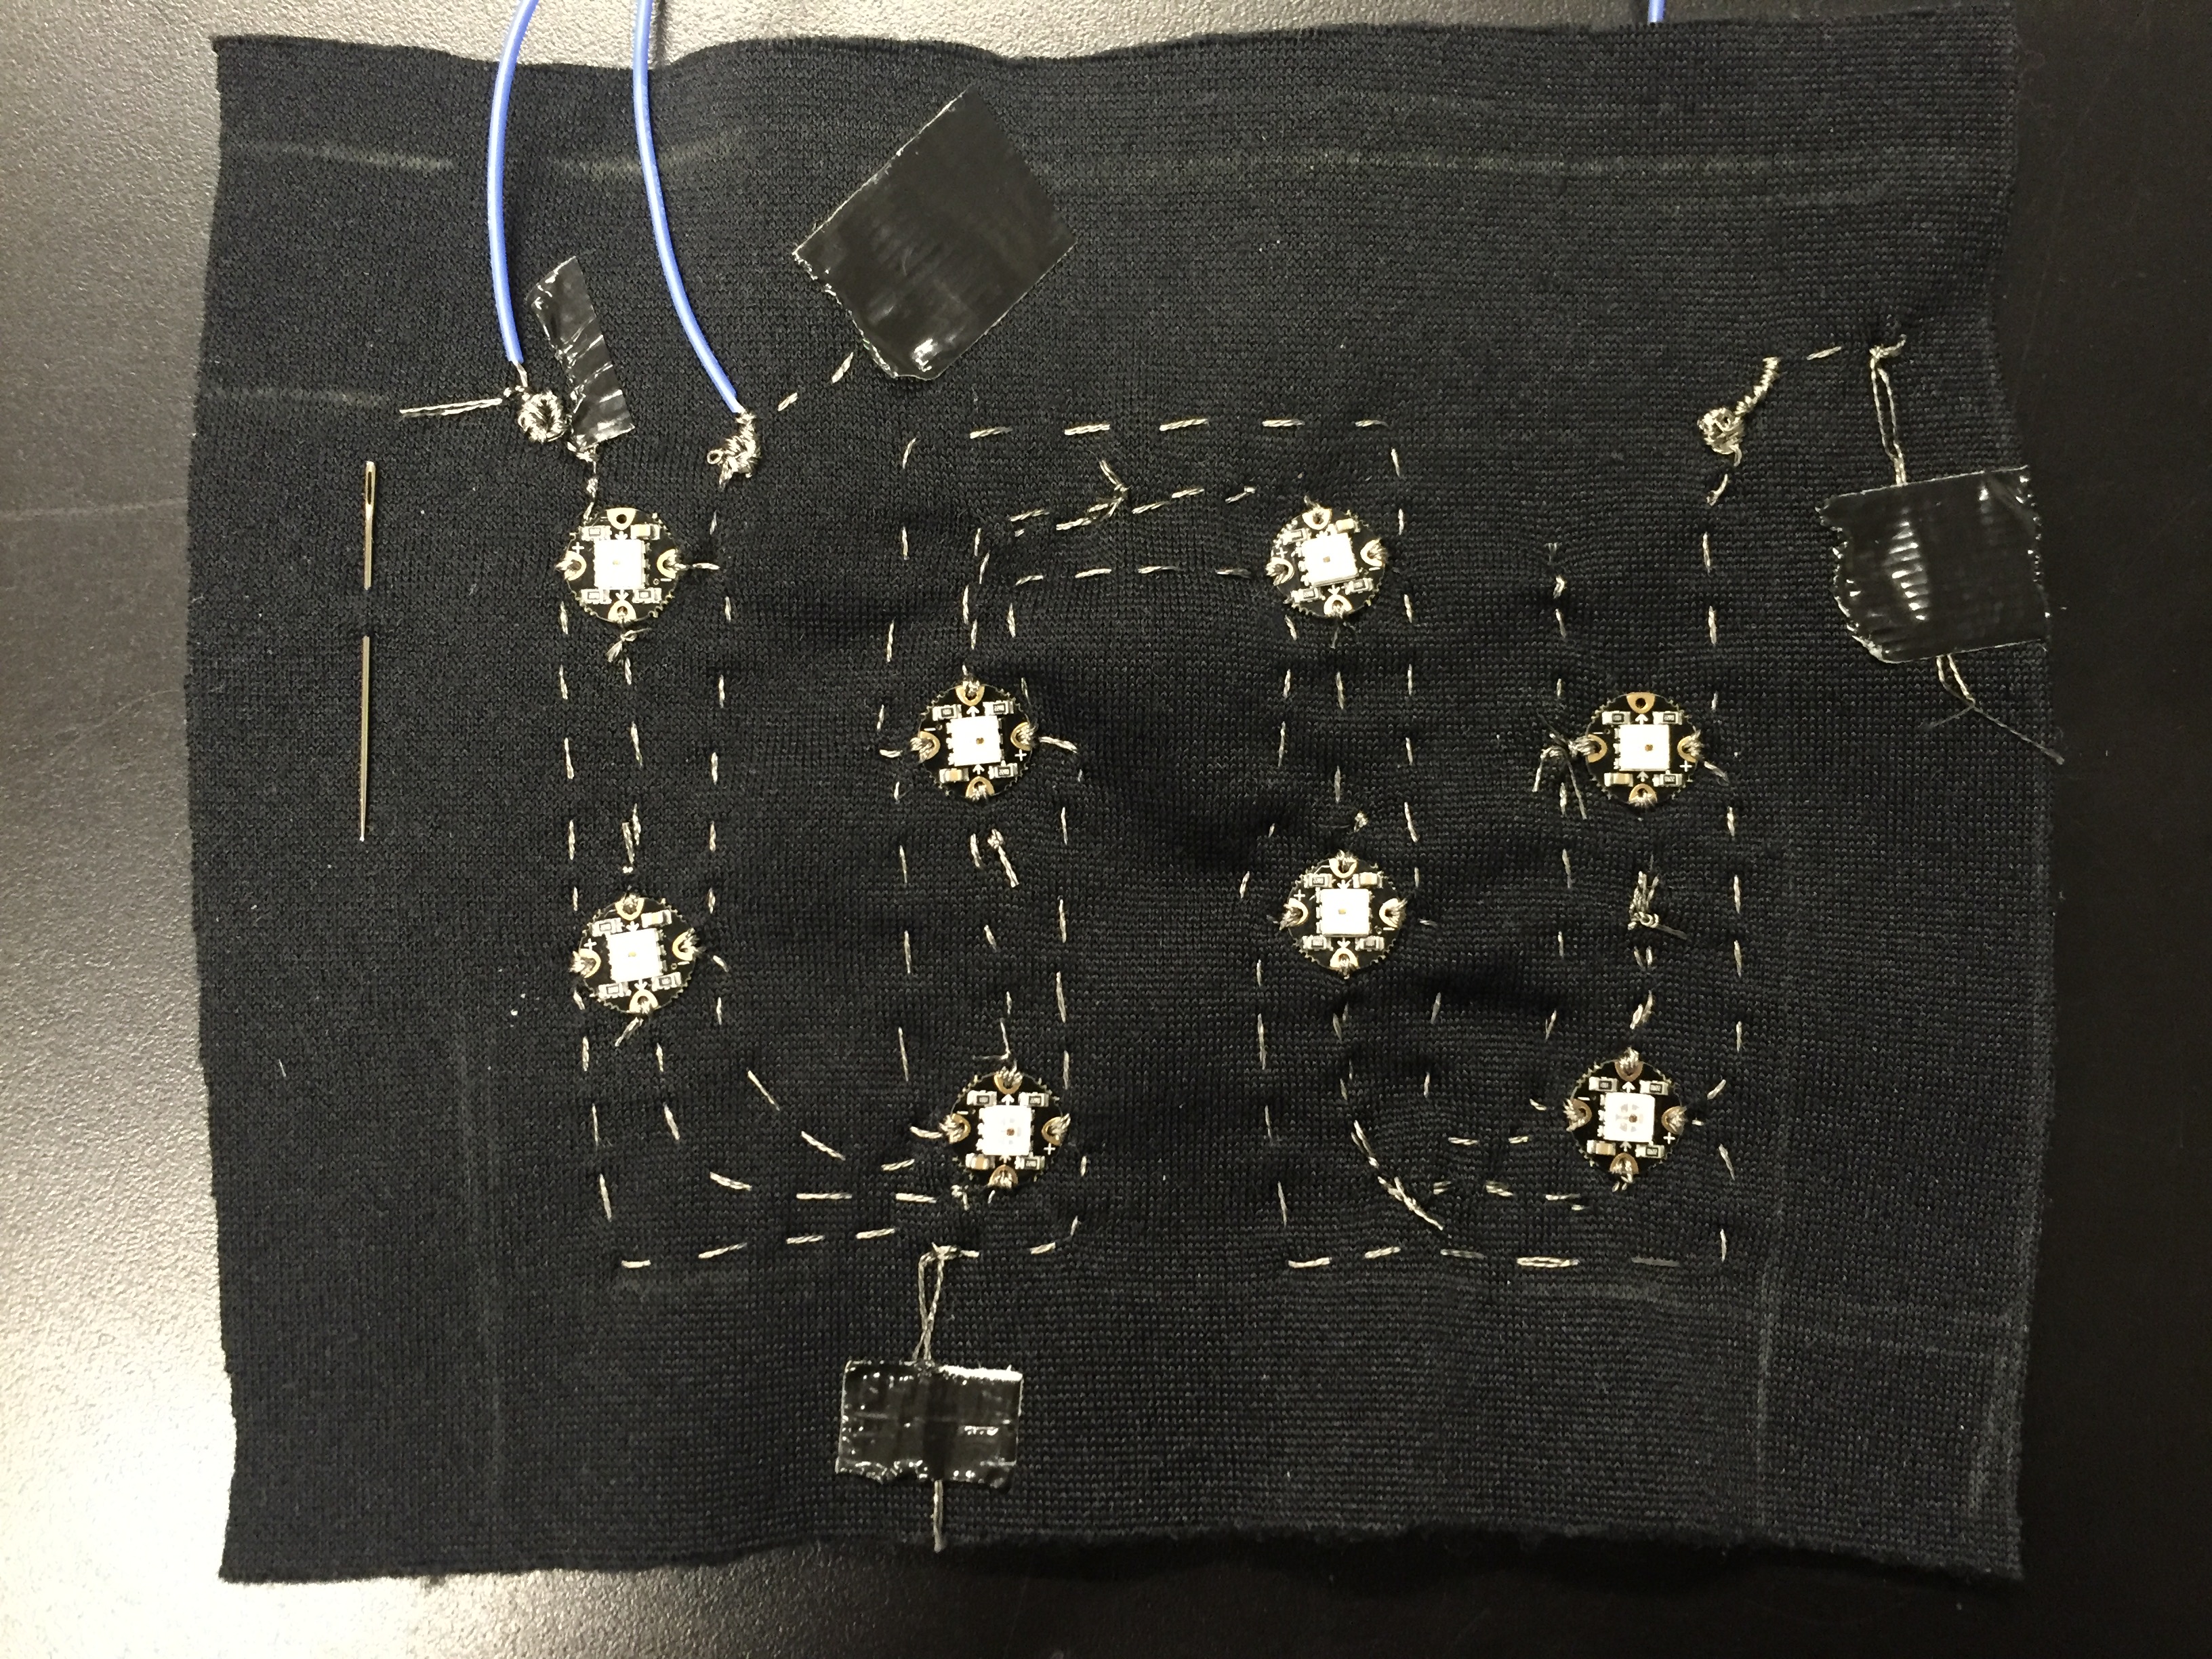
After I sewed the second circuit, I repeated the code, changing the pixel addresses and specifying a different data line. Here’s the complete circuit laid out:
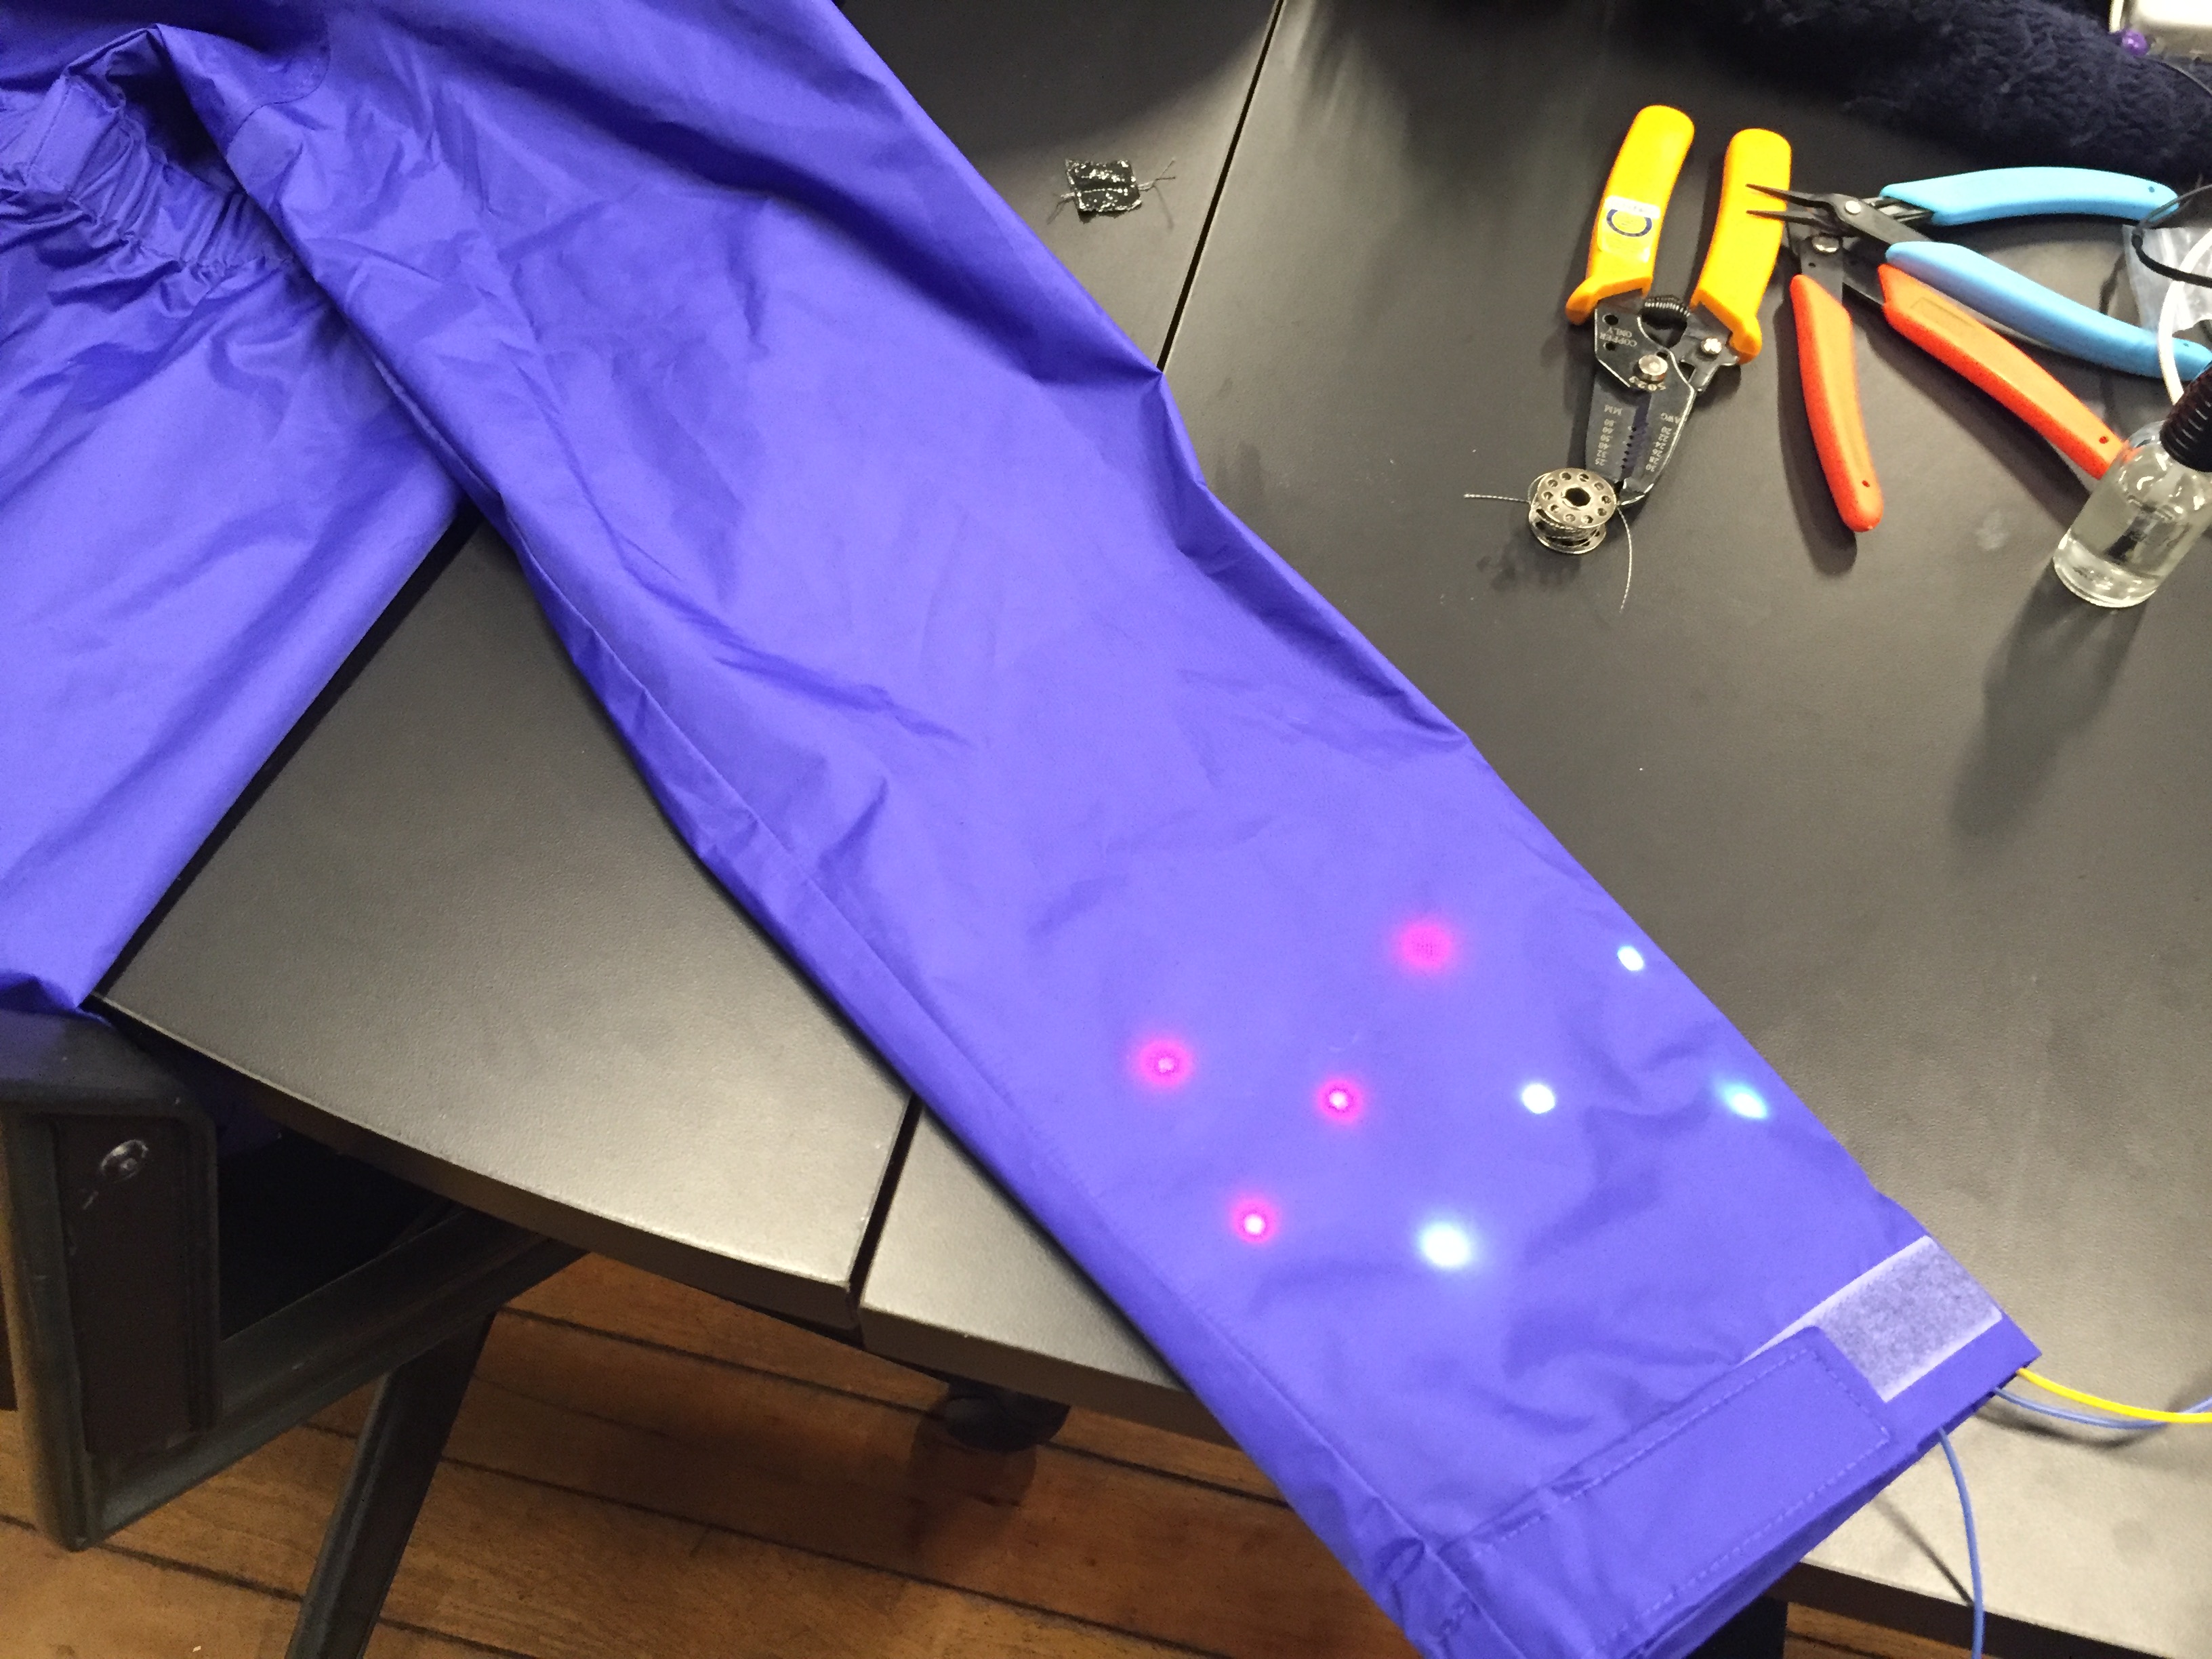
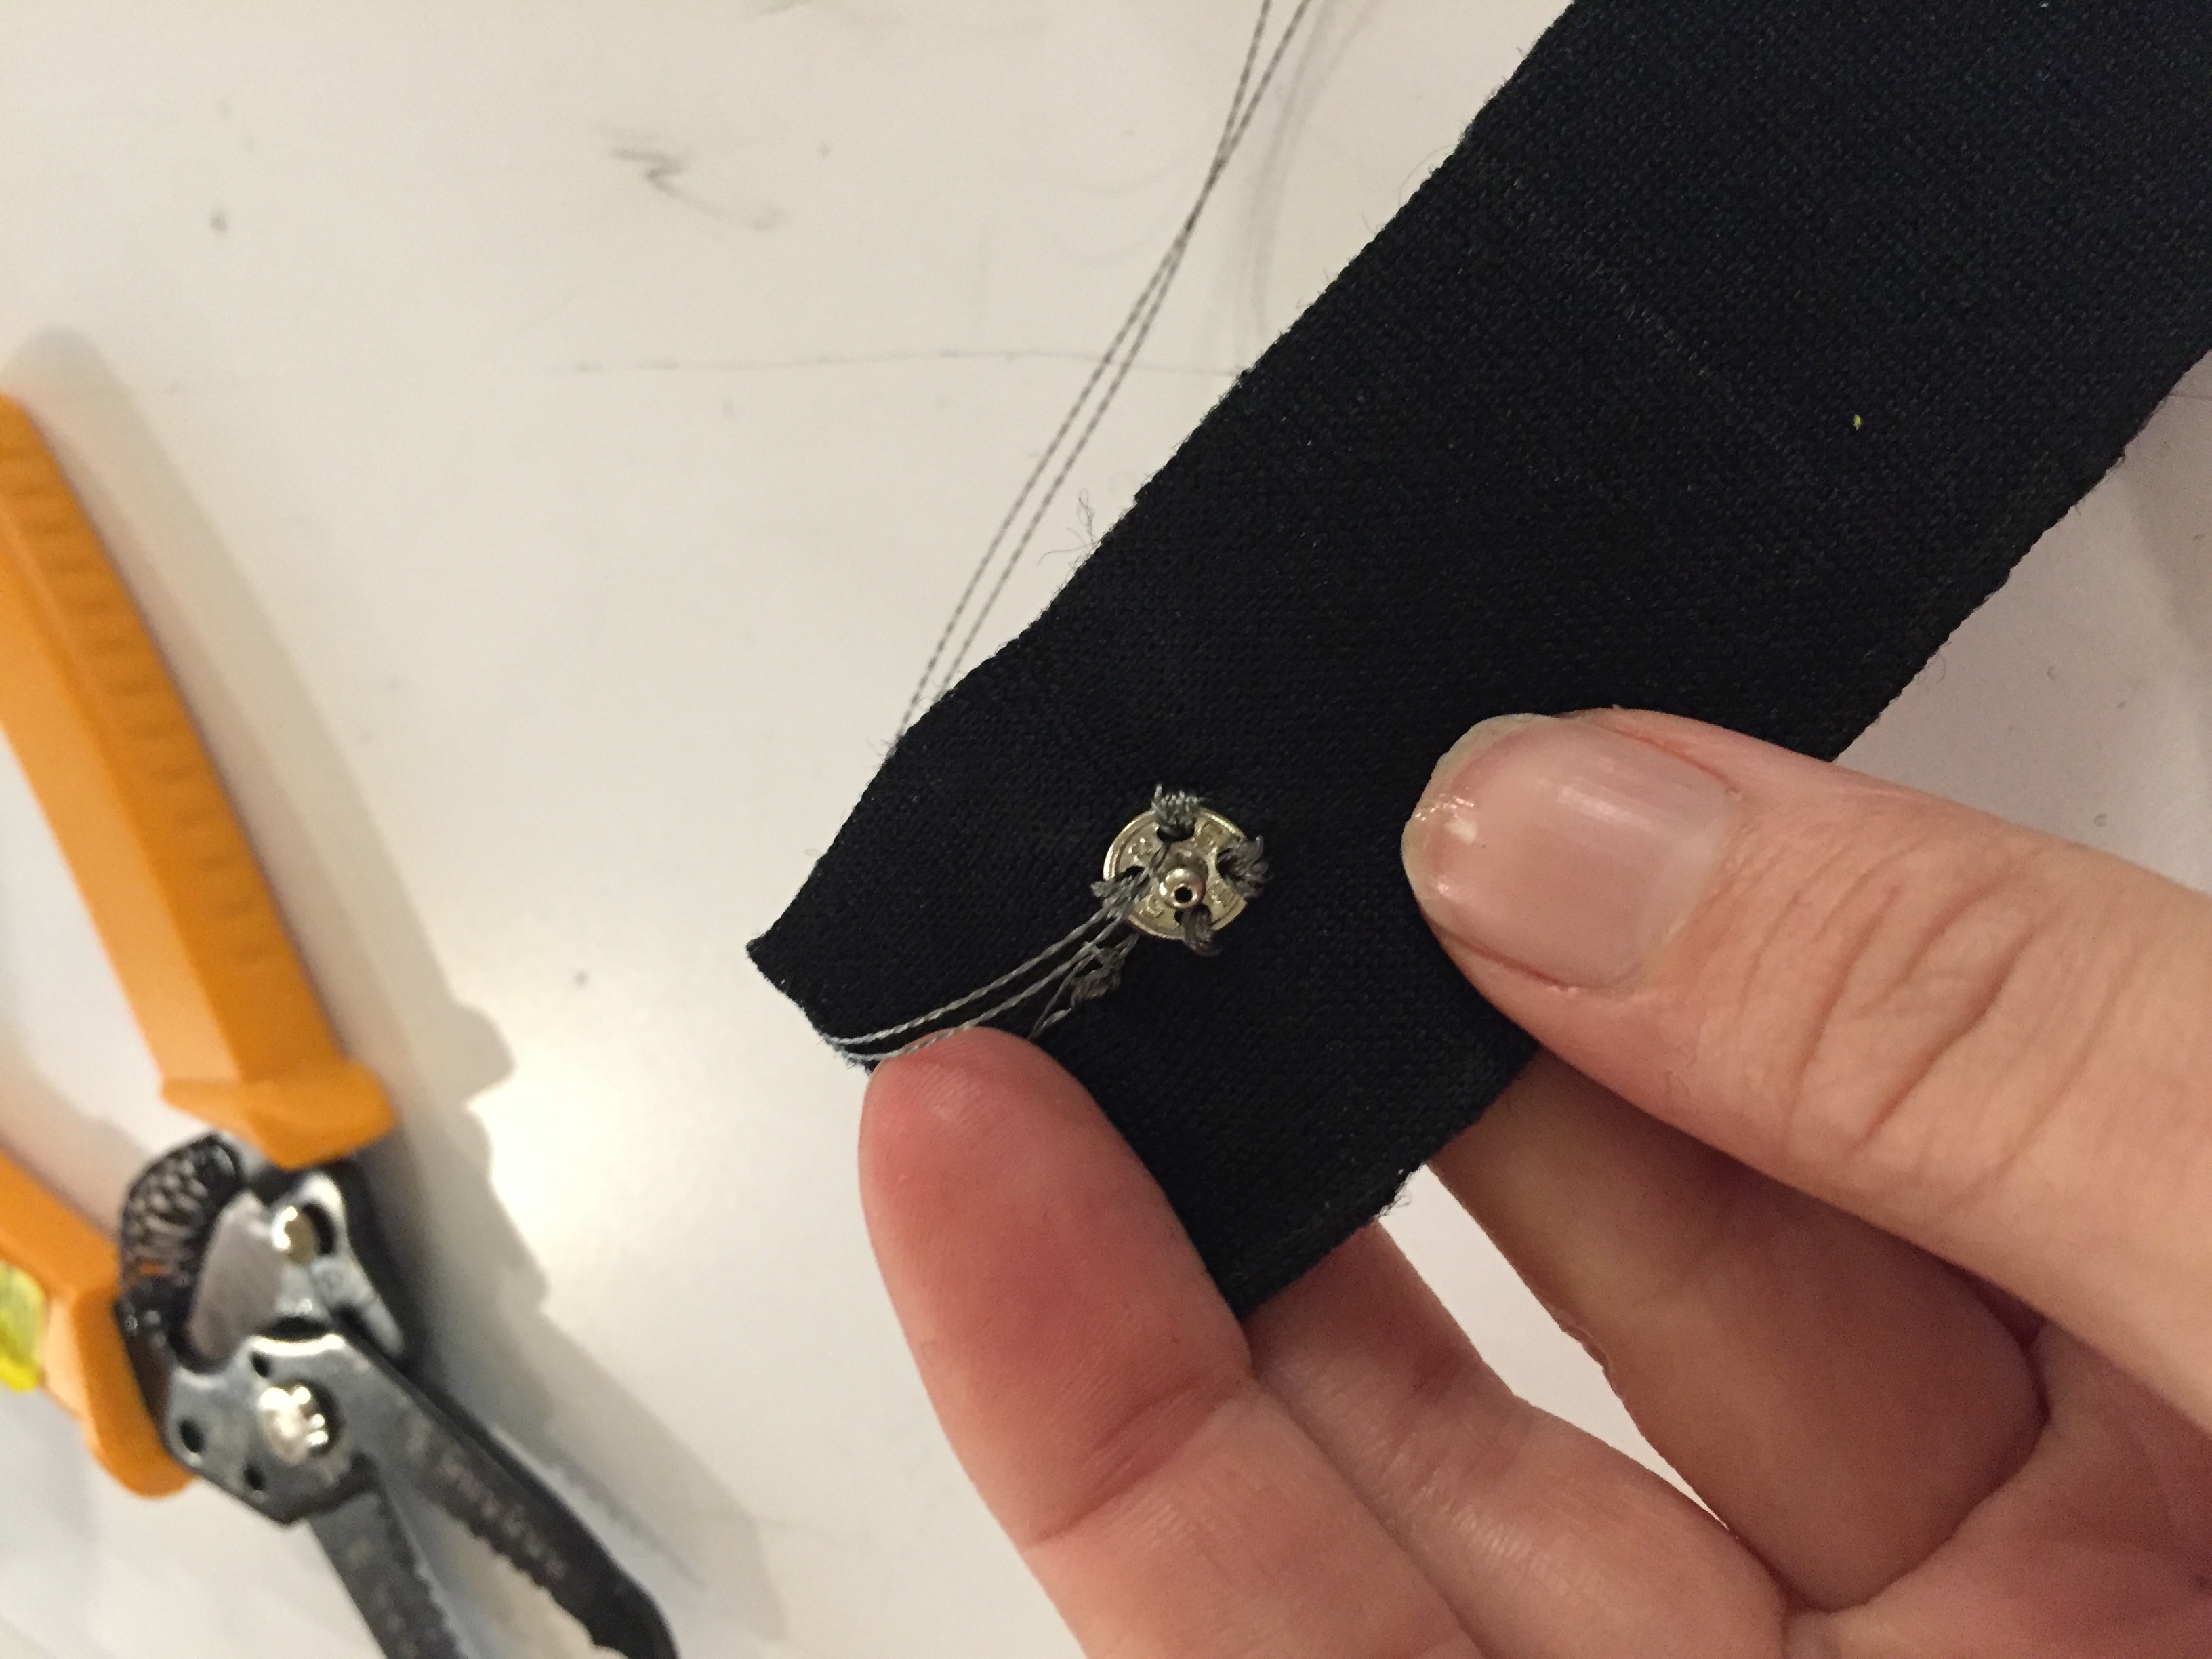
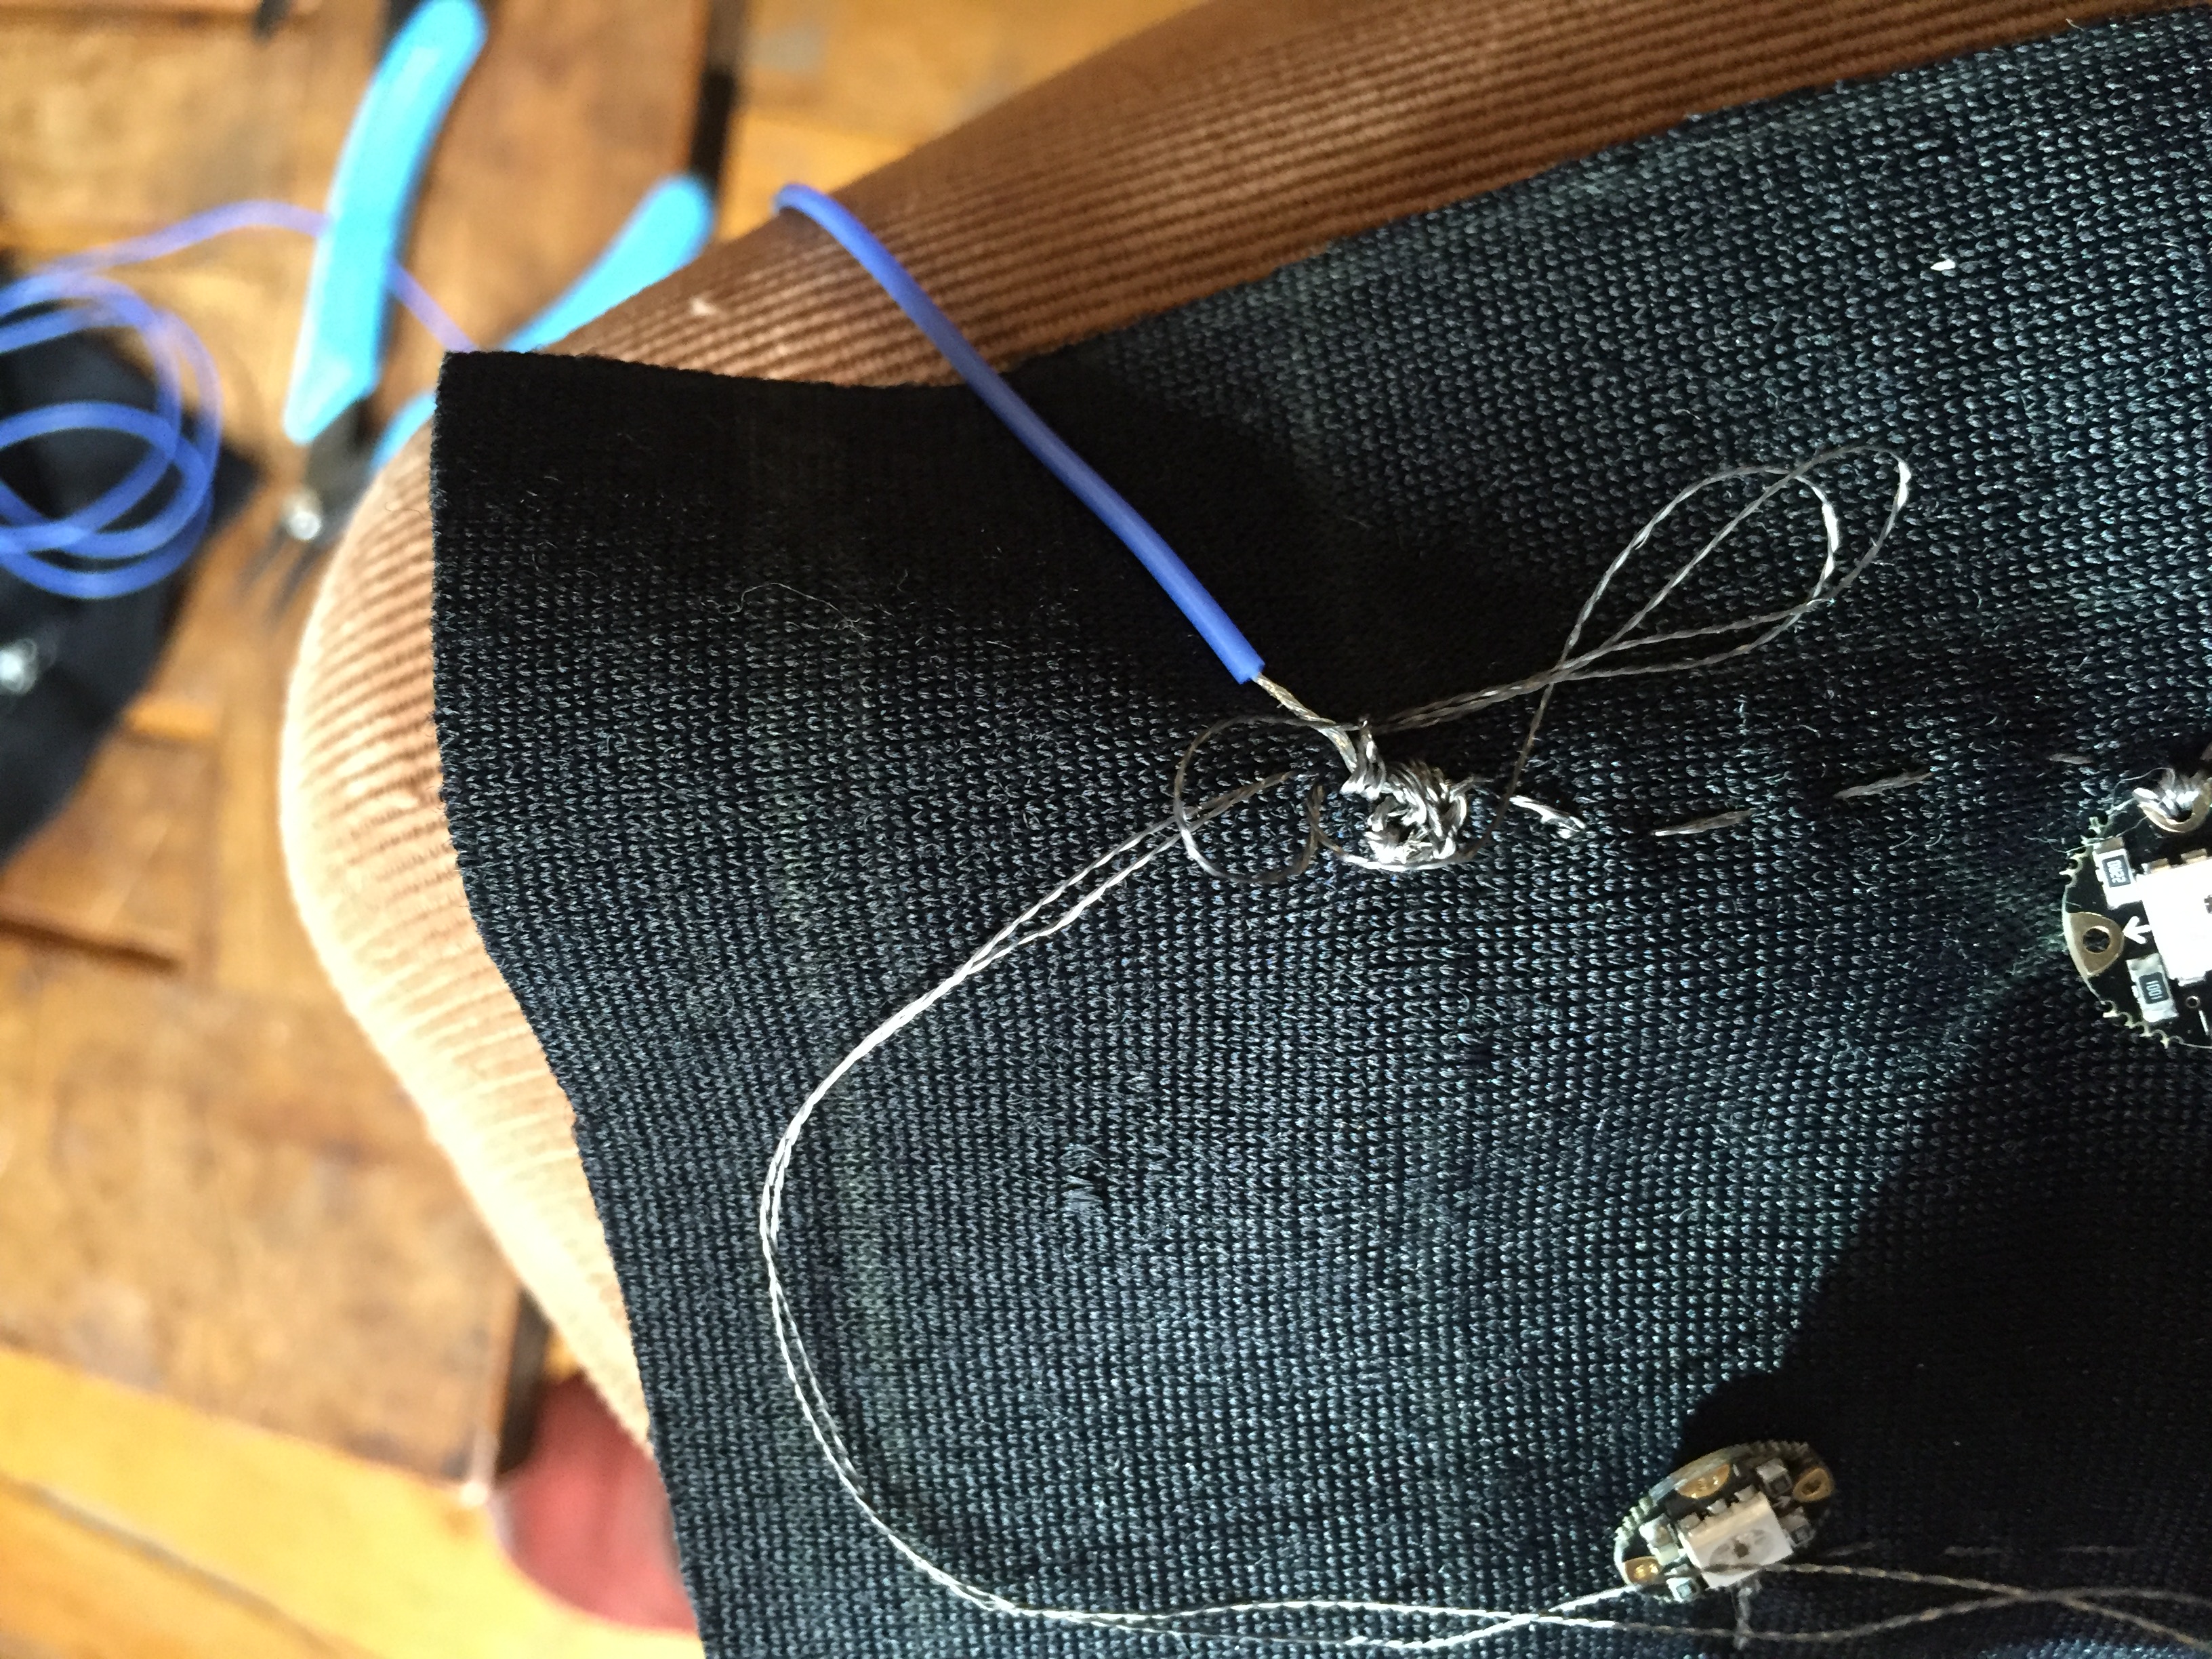
Now that my circuit was working, I had to sew the microcontroller connections and mount the circuit/components to the actual jacket. Sewing the connections was time-consuming and nerve-wracking. If they weren’t sewn correctly, the circuit would no longer work. Therefor I was really careful about my stitches. Each connection probably took 10-15 min to sew and there were 9 in total. I used many of the techniques I used on the flag circuit, like stripping, bending and sewing around the silicone-wrapped wire, and using needle-nose pliers to bend the legs of resistors. I put resistors on the two LED data lines and one on ground connecting the switch to create a pull-up resistor. I also had to stitch the data, power and ground lines onto the snap to make it into a switch.
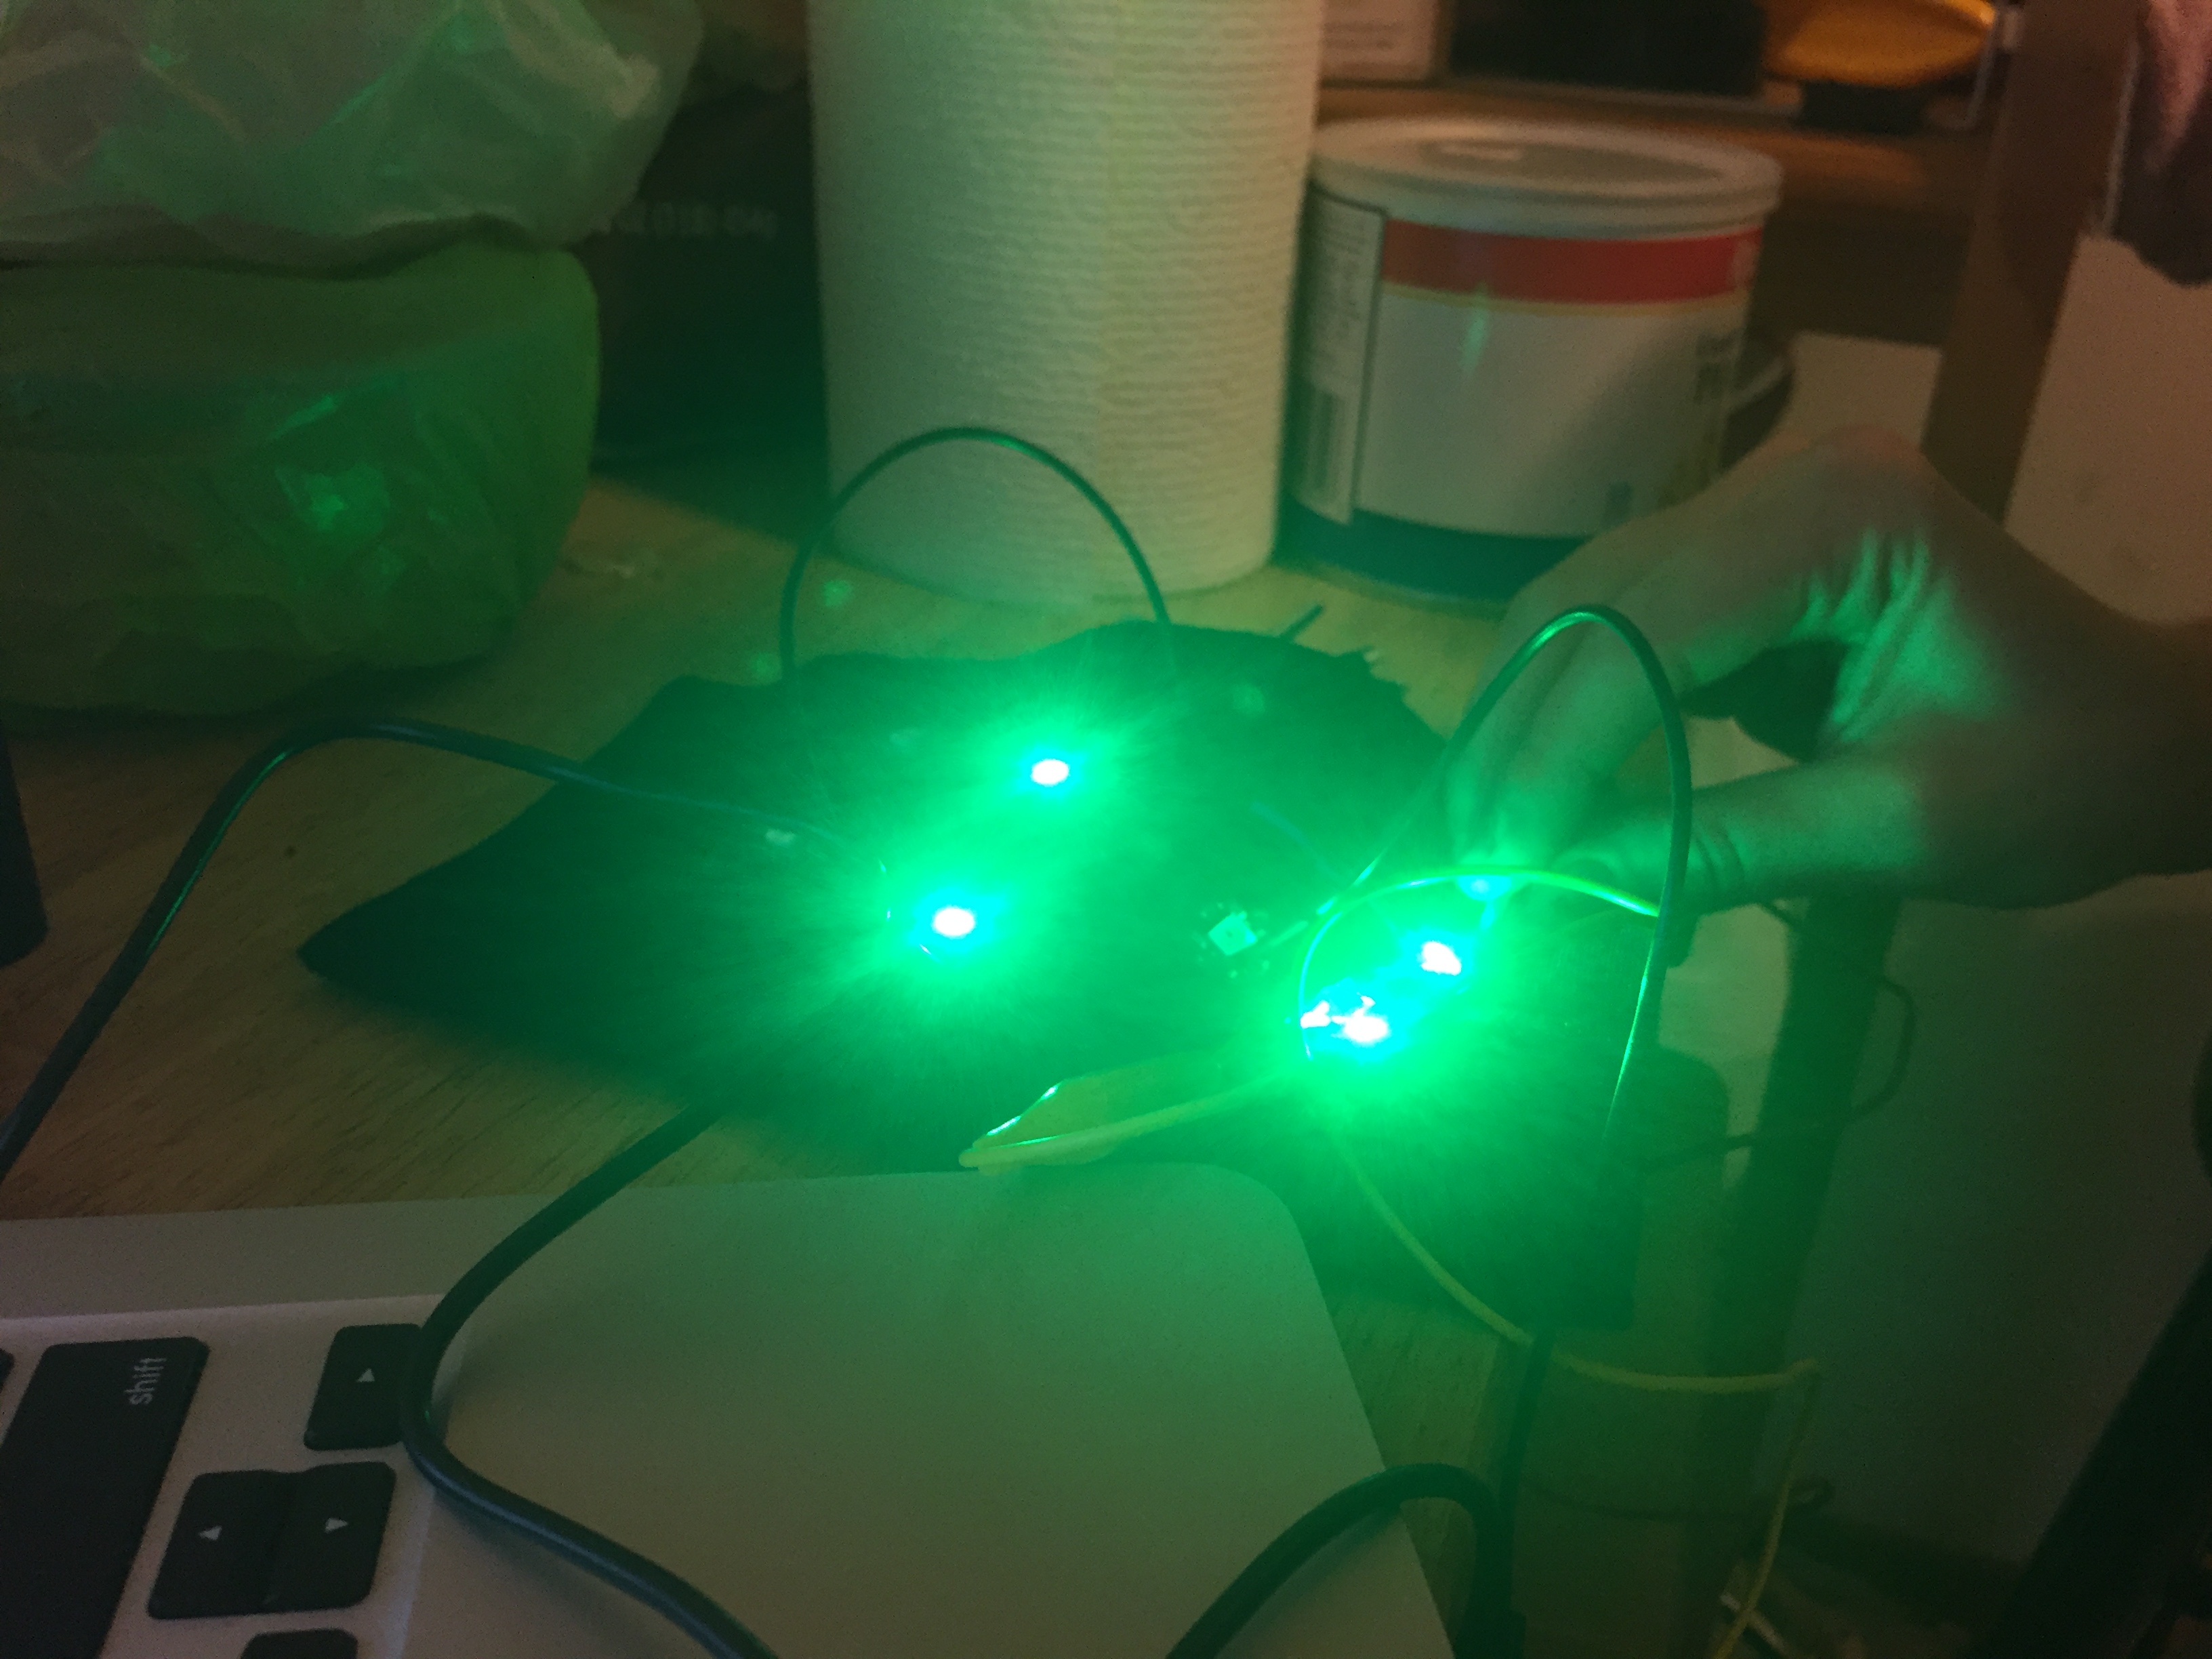
When I finished sewing, I pinned the various parts to the jacket and visually checked the entire circuit to make sure the wires were correcting the right points and that there were no frayed threads or potential for shorts. Then I used the multimeter to do connectivity tests, which told me that everything was in working order. I hooked up the battery, turned it on and it worked!
Next, I used non-conductive thread to stitch a battery pack pocket to the “backpack” storing the micro controller as well as create loops to bundle wires together.
Then I baste-stitched (pretty loose stitches that can be taken out easily) the different panels, because I was pretty sure the pins securing the panels electrocuted me when I tried the jacket on. Since its just a first prototype I didn’t want to stitch them very securely because I’m still not sure if I want to mount things to the exterior or put them inside.
NEXT STEPS:
– figure out a final design that either has the panels mounted on the exterior and covered by another piece of fabric or mounted on the inside, but protected.
– try out more interesting LED animations, possibly influenced by an accelerometer
– be more intentional about how the refugee crisis narrative relates to the physical project – an audio/storytelling component?
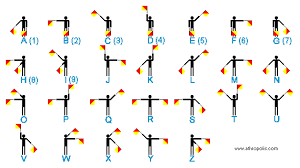
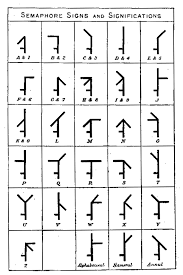
– make a pocket print-out of the semaphore alphabet
SPECIAL THANKS! to:
Benedetta, Kate Hartman and Teresa for assistance with circuit construction and coding!
PComp, Wk 13: Semaphore Jacket – Progress, Pt. 3
ok before I get started
I’ve been watching the “Great British Bake Off” as I work on my soft circuits and JUST as I was typing the title of this post I hear the word “semaphore” and I’m like, am I going crazy? BUT NO. Norman, a contestant on the show, KNOWS semaphore and one of the hosts asked him to spell out BAKE in SEMAPHORE.
http://www.buzzfeed.com/scottybryan/norman-really-likes-exotic-pesto?utm_term=.ttzzg7xNO&sub=3417565_3591391
See guys, it’s a real thing.
Anyways, on to the actual post…
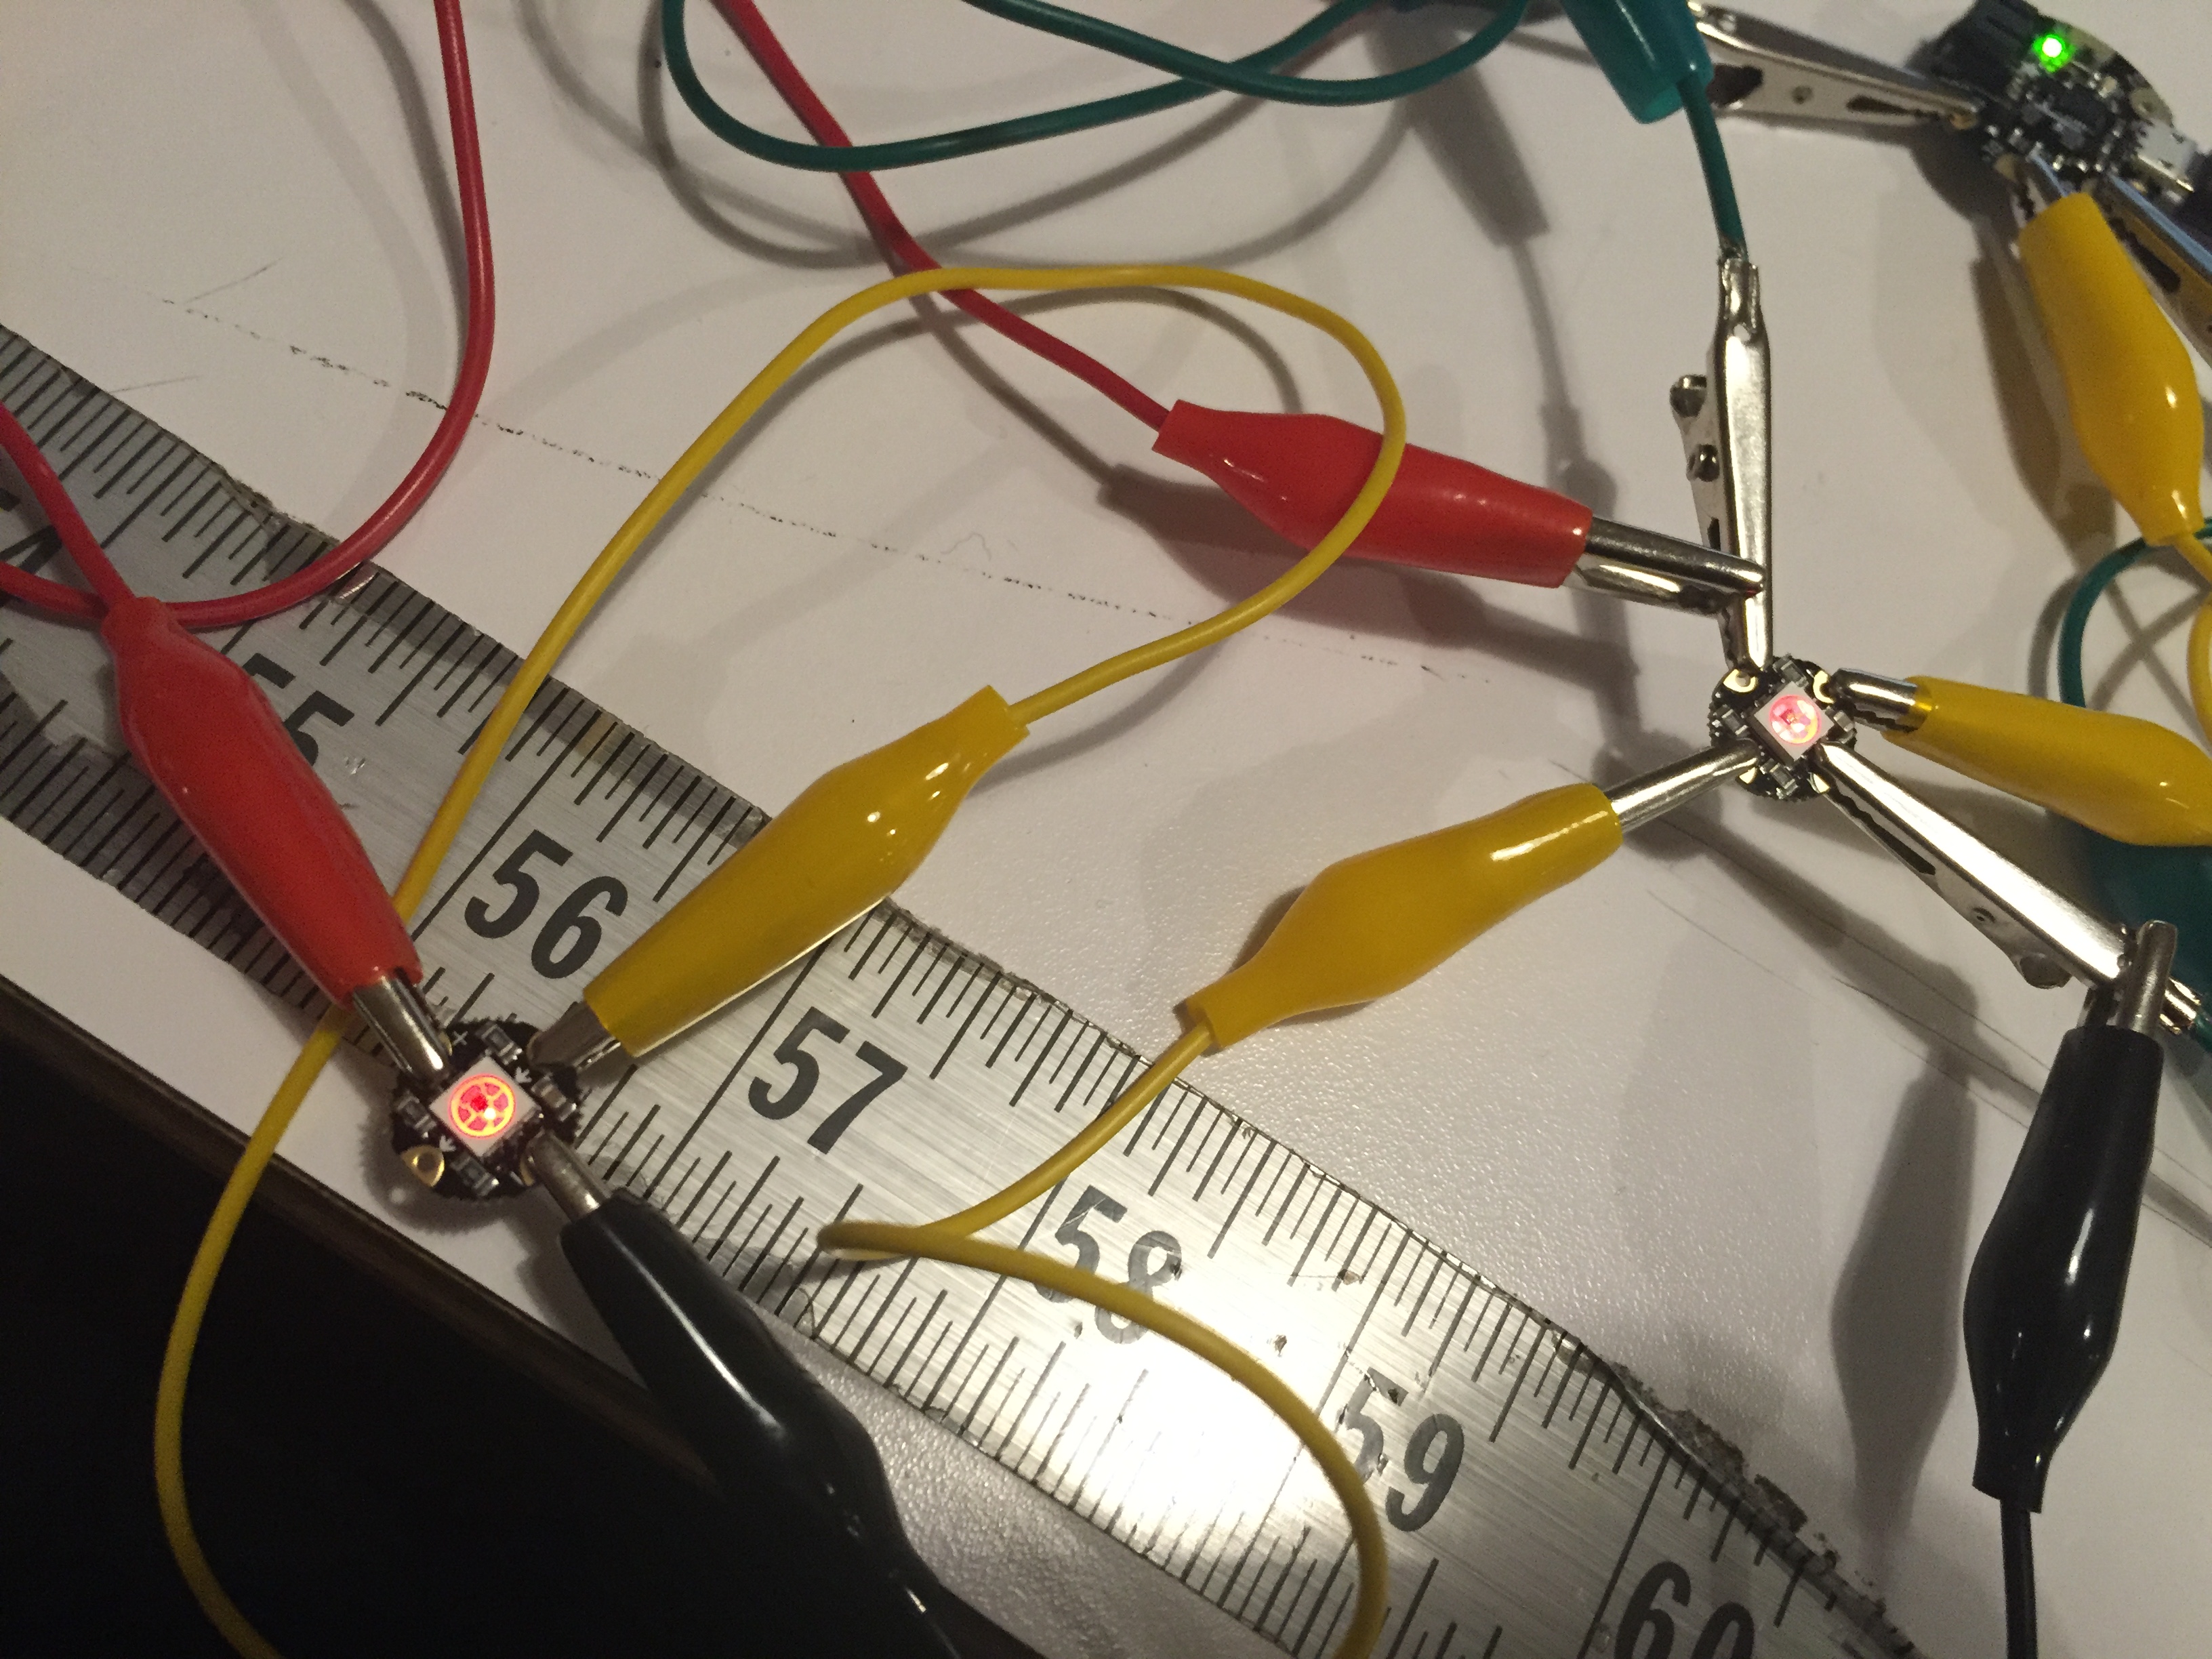
So, I was feeling stuck. My first circuit was a dud, my second circuit was a dude and so was my third. I couldn’t figure out what the heck was going on, so I started asking around. Joe helped me do some multimeter tests and while it said connectivity was totally good, when we plugged it into the microcontroller? Zip. Tried a regular arduino uno? Nada.
Joe being super helpful
At this point, Teresa came over. Her multimeter also said the connections were good, but nothing on her Gemma either. Then Teresa had a stroke of genius and realized that I sewed my neopixel data line incorrectly – instead of stopping and tying off between each point, I was carrying data through to the very end! (makes sense why the last one worked intermittently). >< oops. Well, I may have wasted almost 7 hours of sewing but I felt totally fine because now I knew what my problem was and I could keep going!
So, I ripped out my seams (not an easy task, I did a really good job sewing those connections) and set about cutting out two more squares.

I also made them a bit bigger than last time, just in case! Improvements.
So onto Iteration…8?
I re-sewed my circuit, making sure to really carefully read this page on how to sew neopixels and actually watch the video. If there’s anything that I’ve taken away from all of this is to REALLY read through all documentation first. But also that some lessons do need to be just learned through mistakes and practice practice practice.
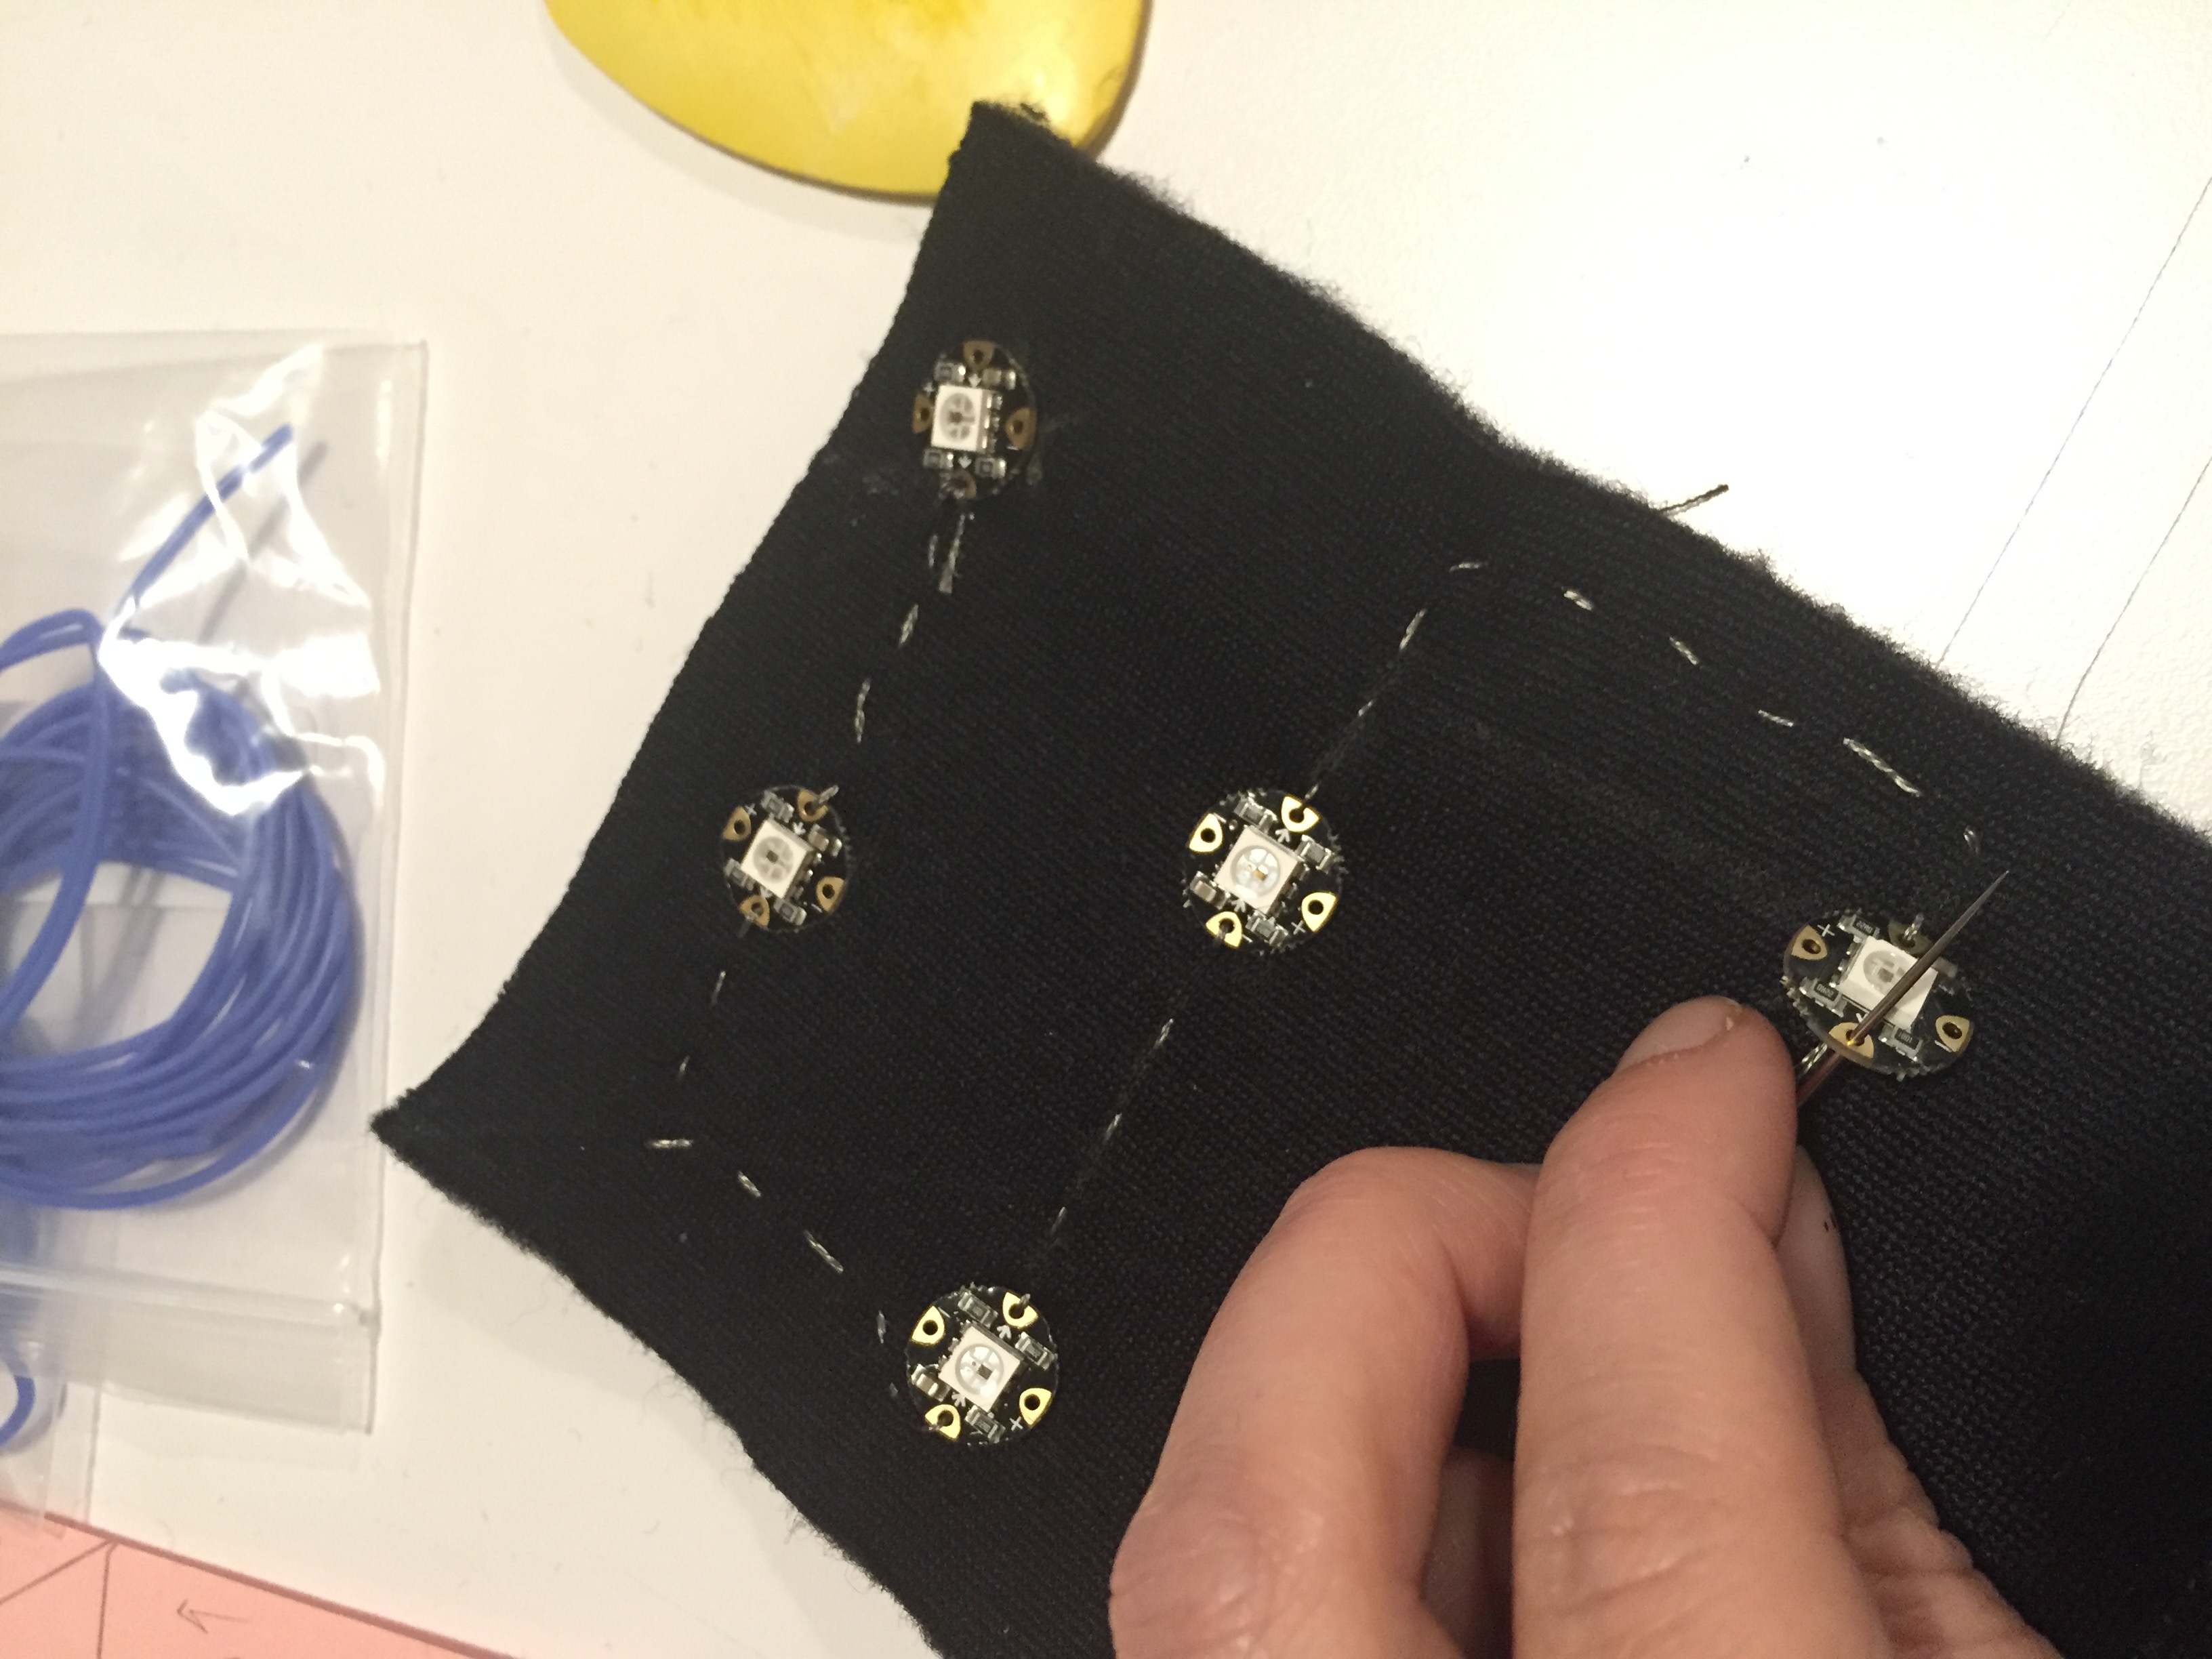
When I resewed it, instead of soldering the wires I actually bent and sewed them down like we’d done in soft lab:
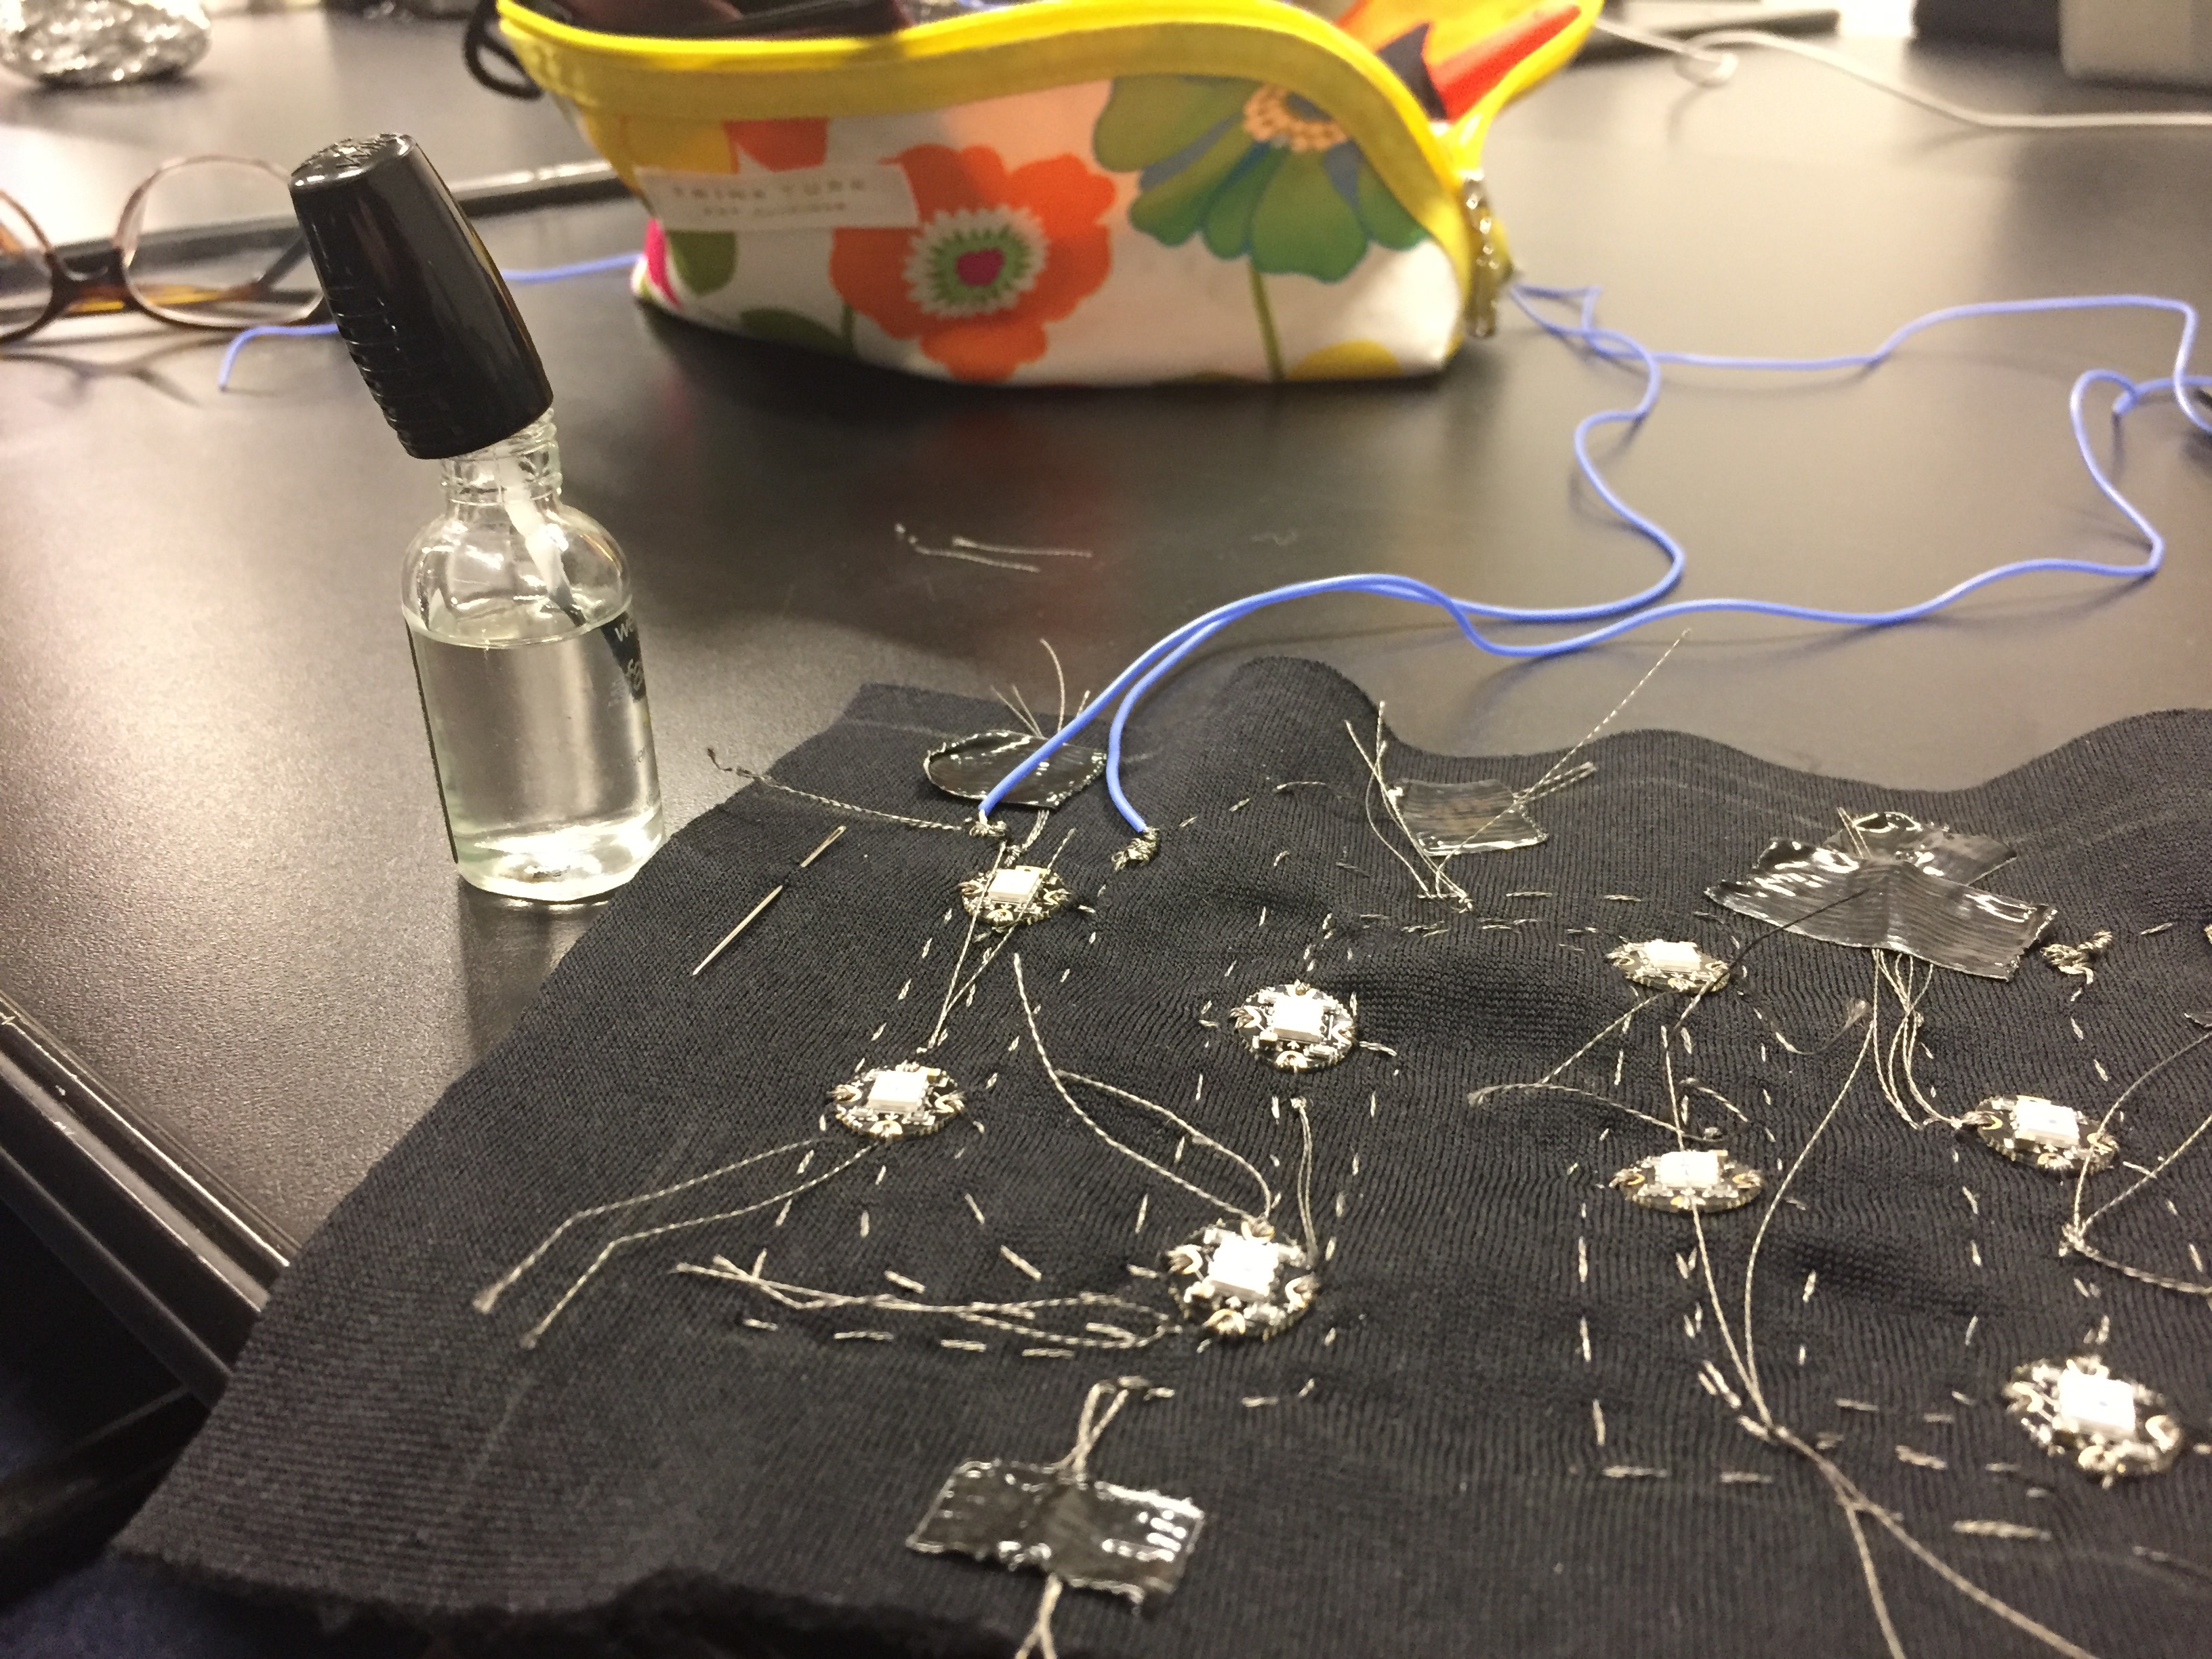
I also obsessively put clear nailpolish on all the end points/knots to ensure no-frays, crossed wires = shorts
So – 4 time was the charm! I tested it with Kate and she showed me how to thoroughly go through with a multi to make sure the things that touch do and those that shouldn’t don’t.
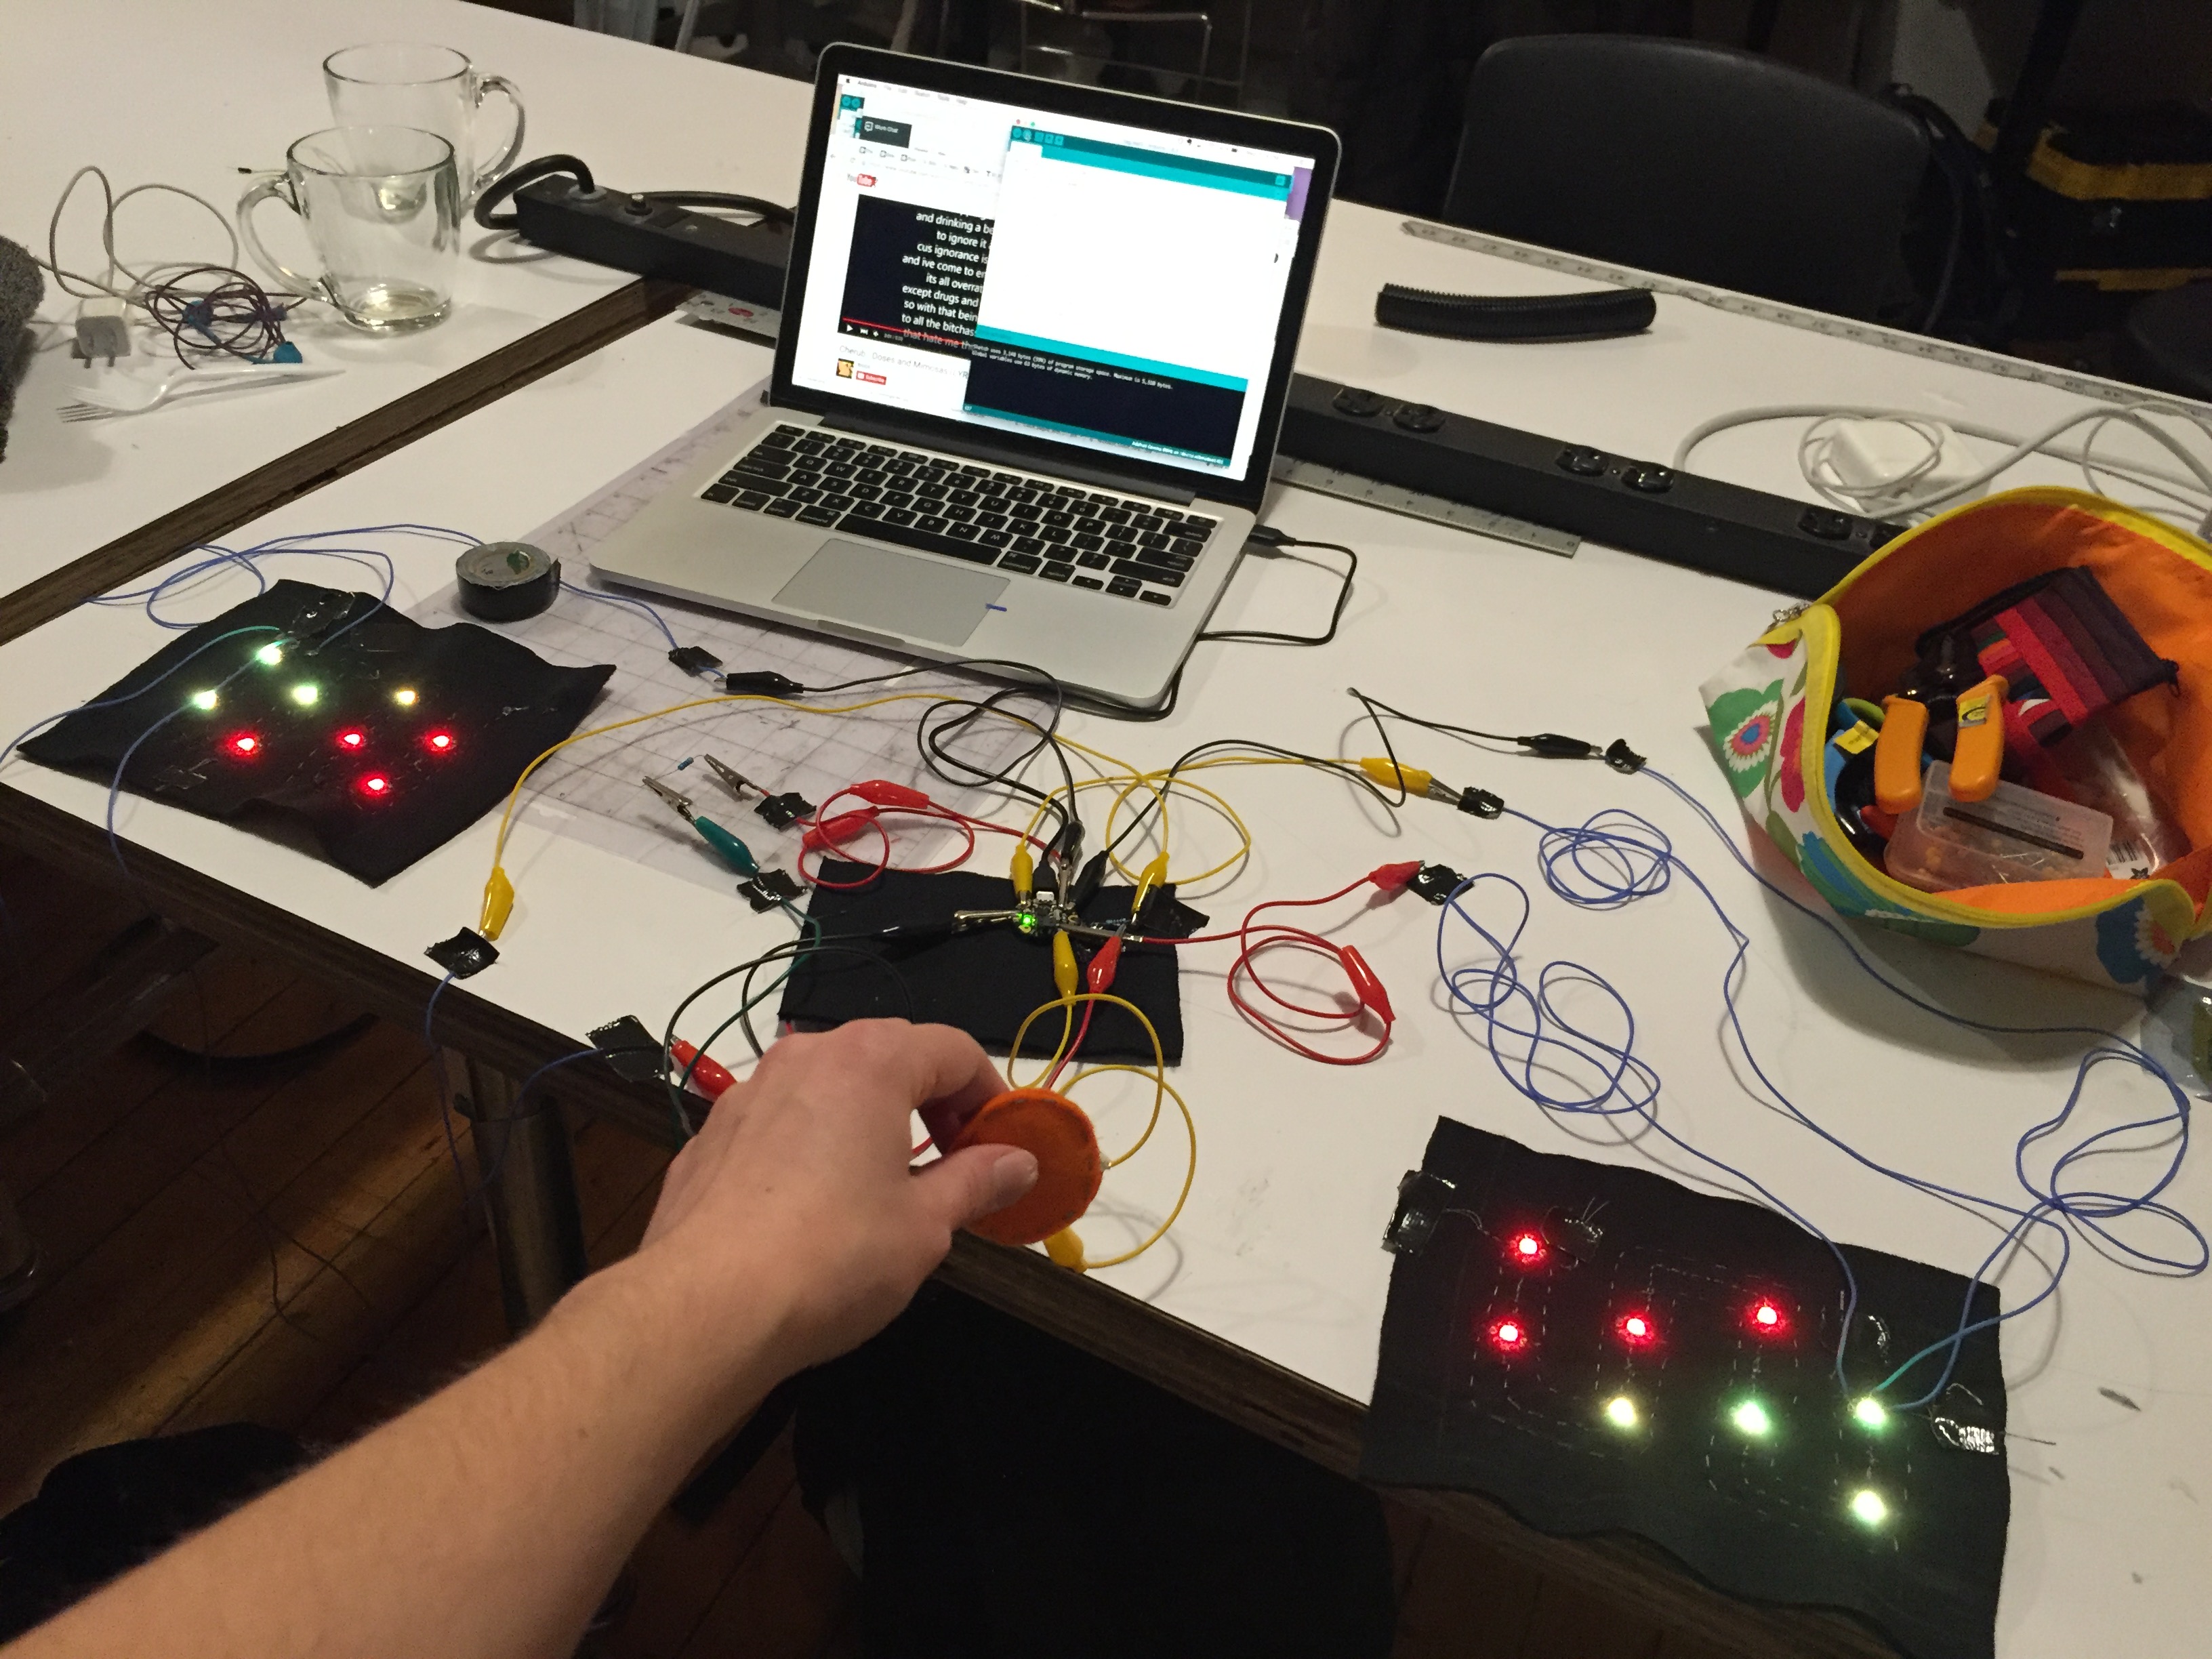
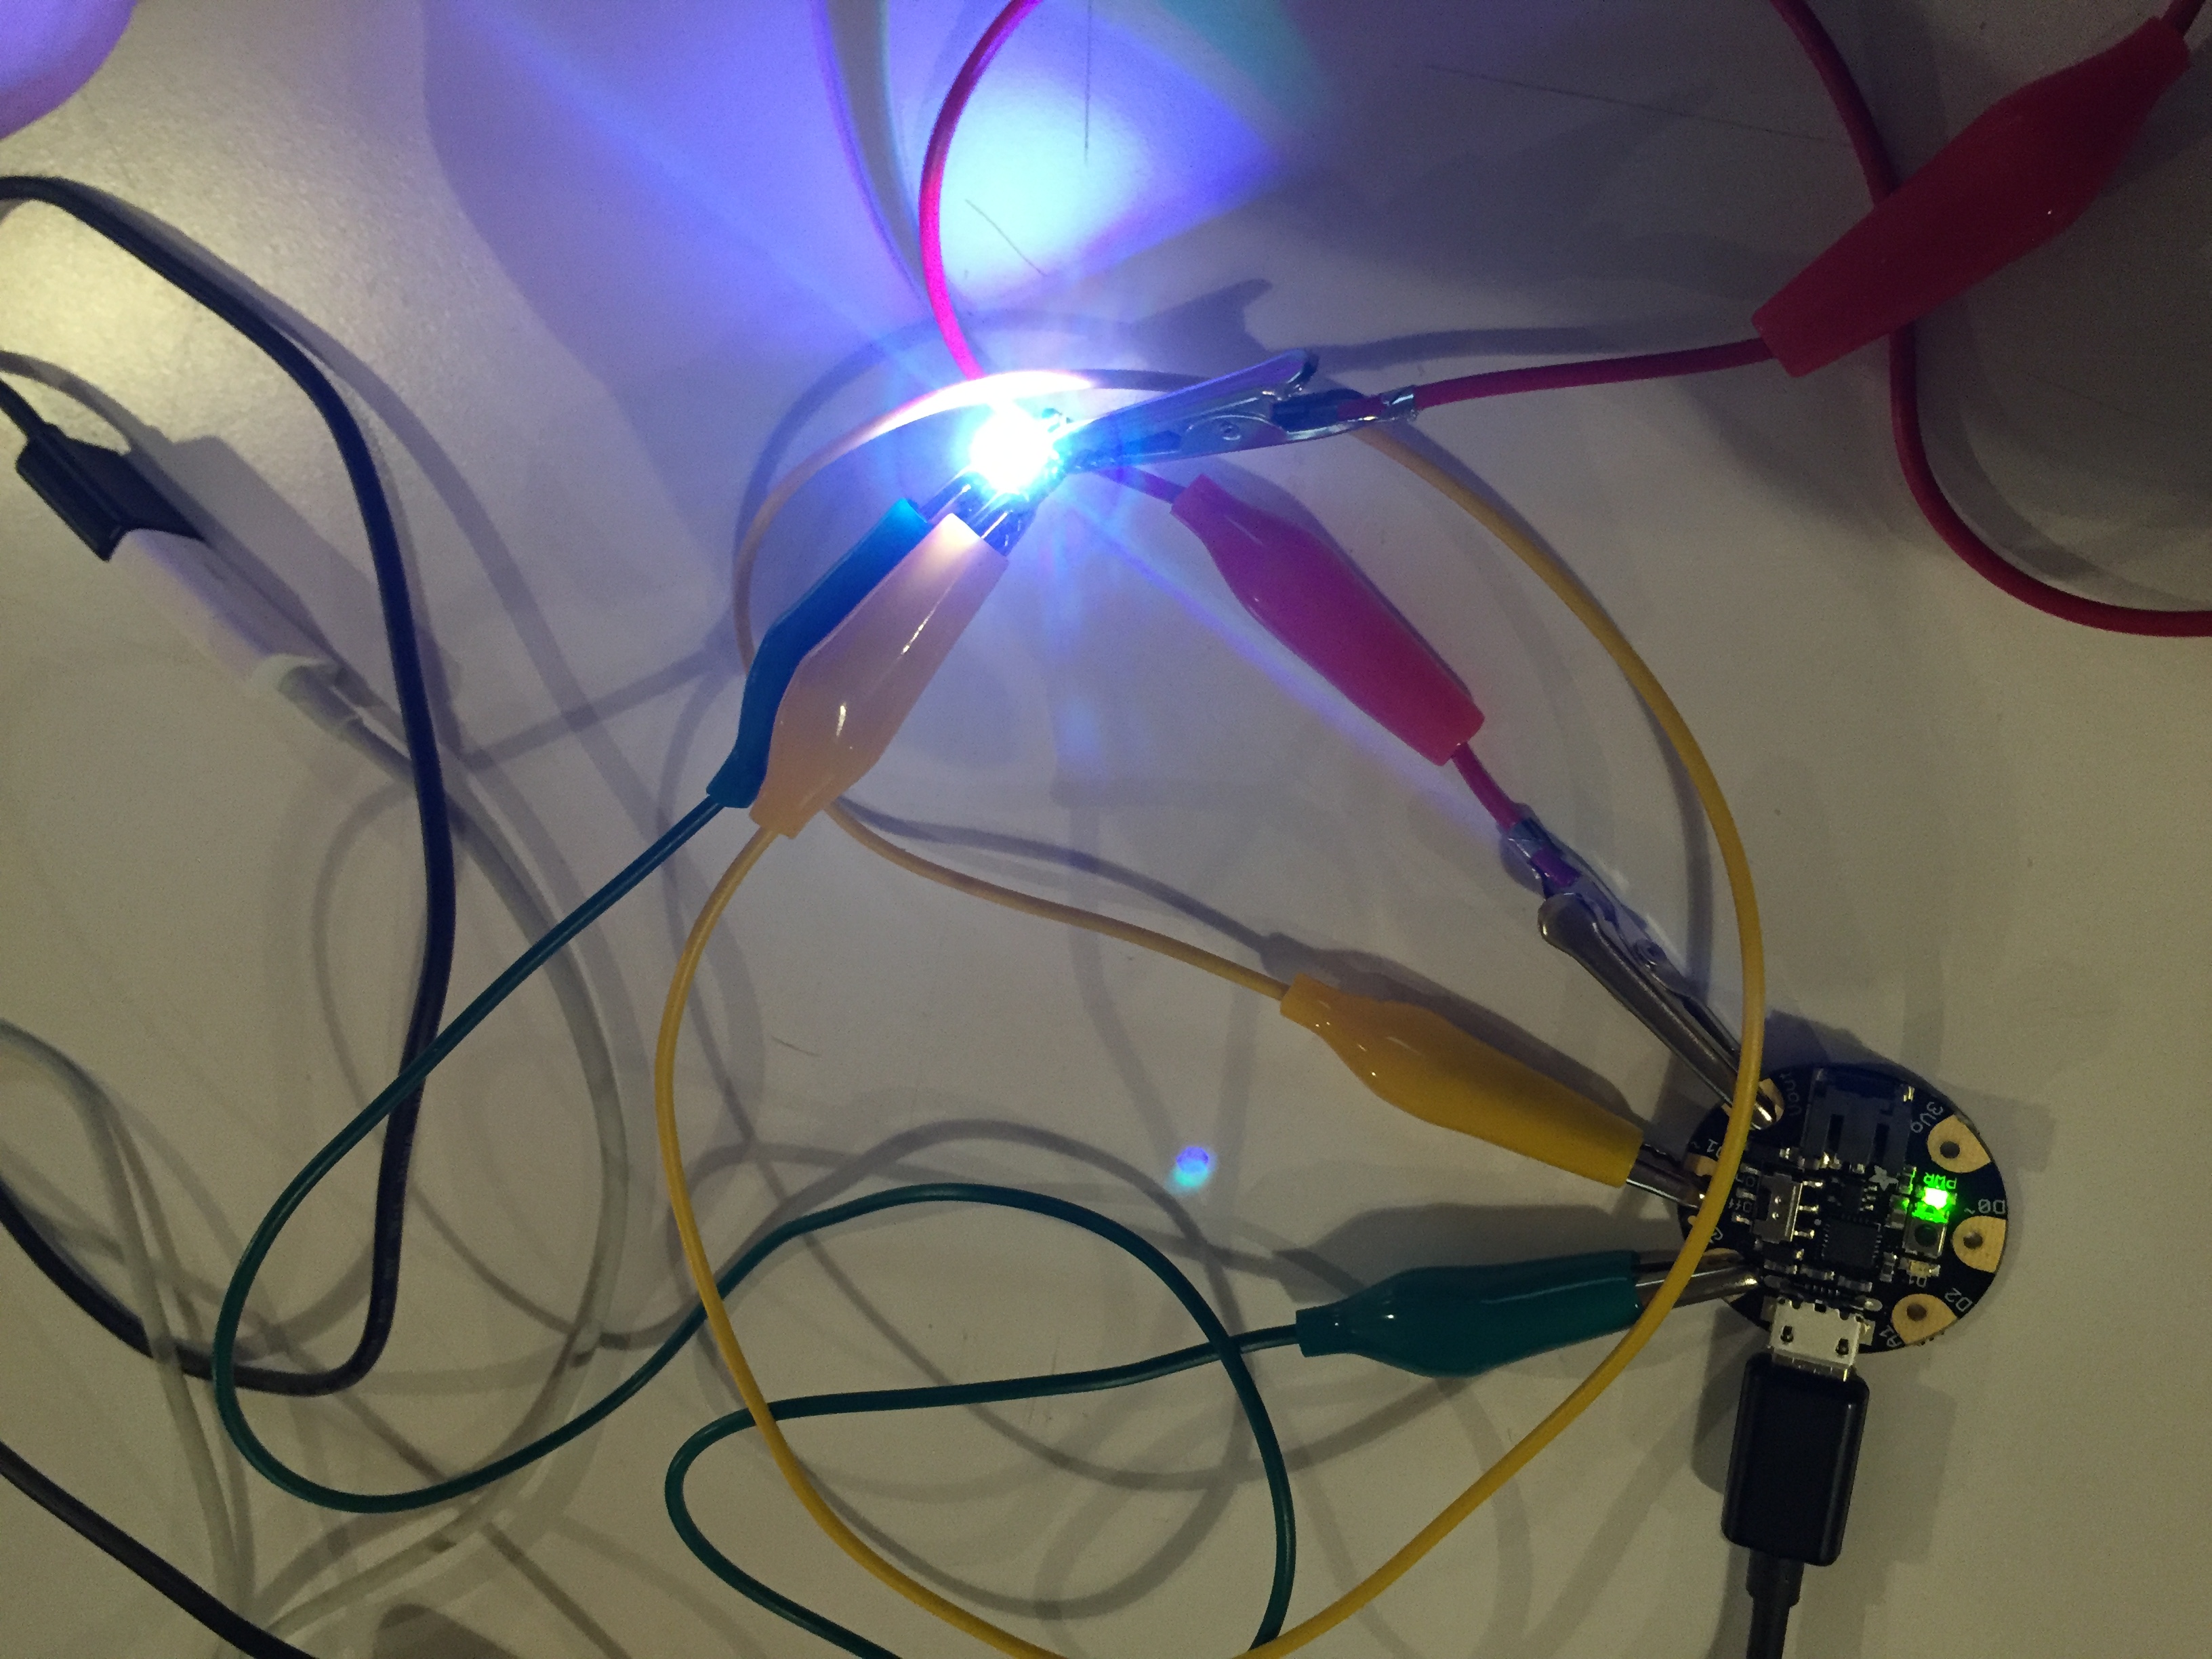
I took it home, hooked it up and was able to run the strand test!
I also tore apart my other circuit, then tested my neopixels and YES! did not burn any of them out. HOORAY! so now off to sew the second.
Also, tried to play around with code but so far not getting anything to work aside form the strand test.
PComp, Wk 13: Semaphore Jacket: – Progress, Pt. 2
After I got my components working, I started planning out how the LEDs would be arranged on the sleeves. I needed enough to get the idea across, but not too many. I laid out a couple and sketched out a design.

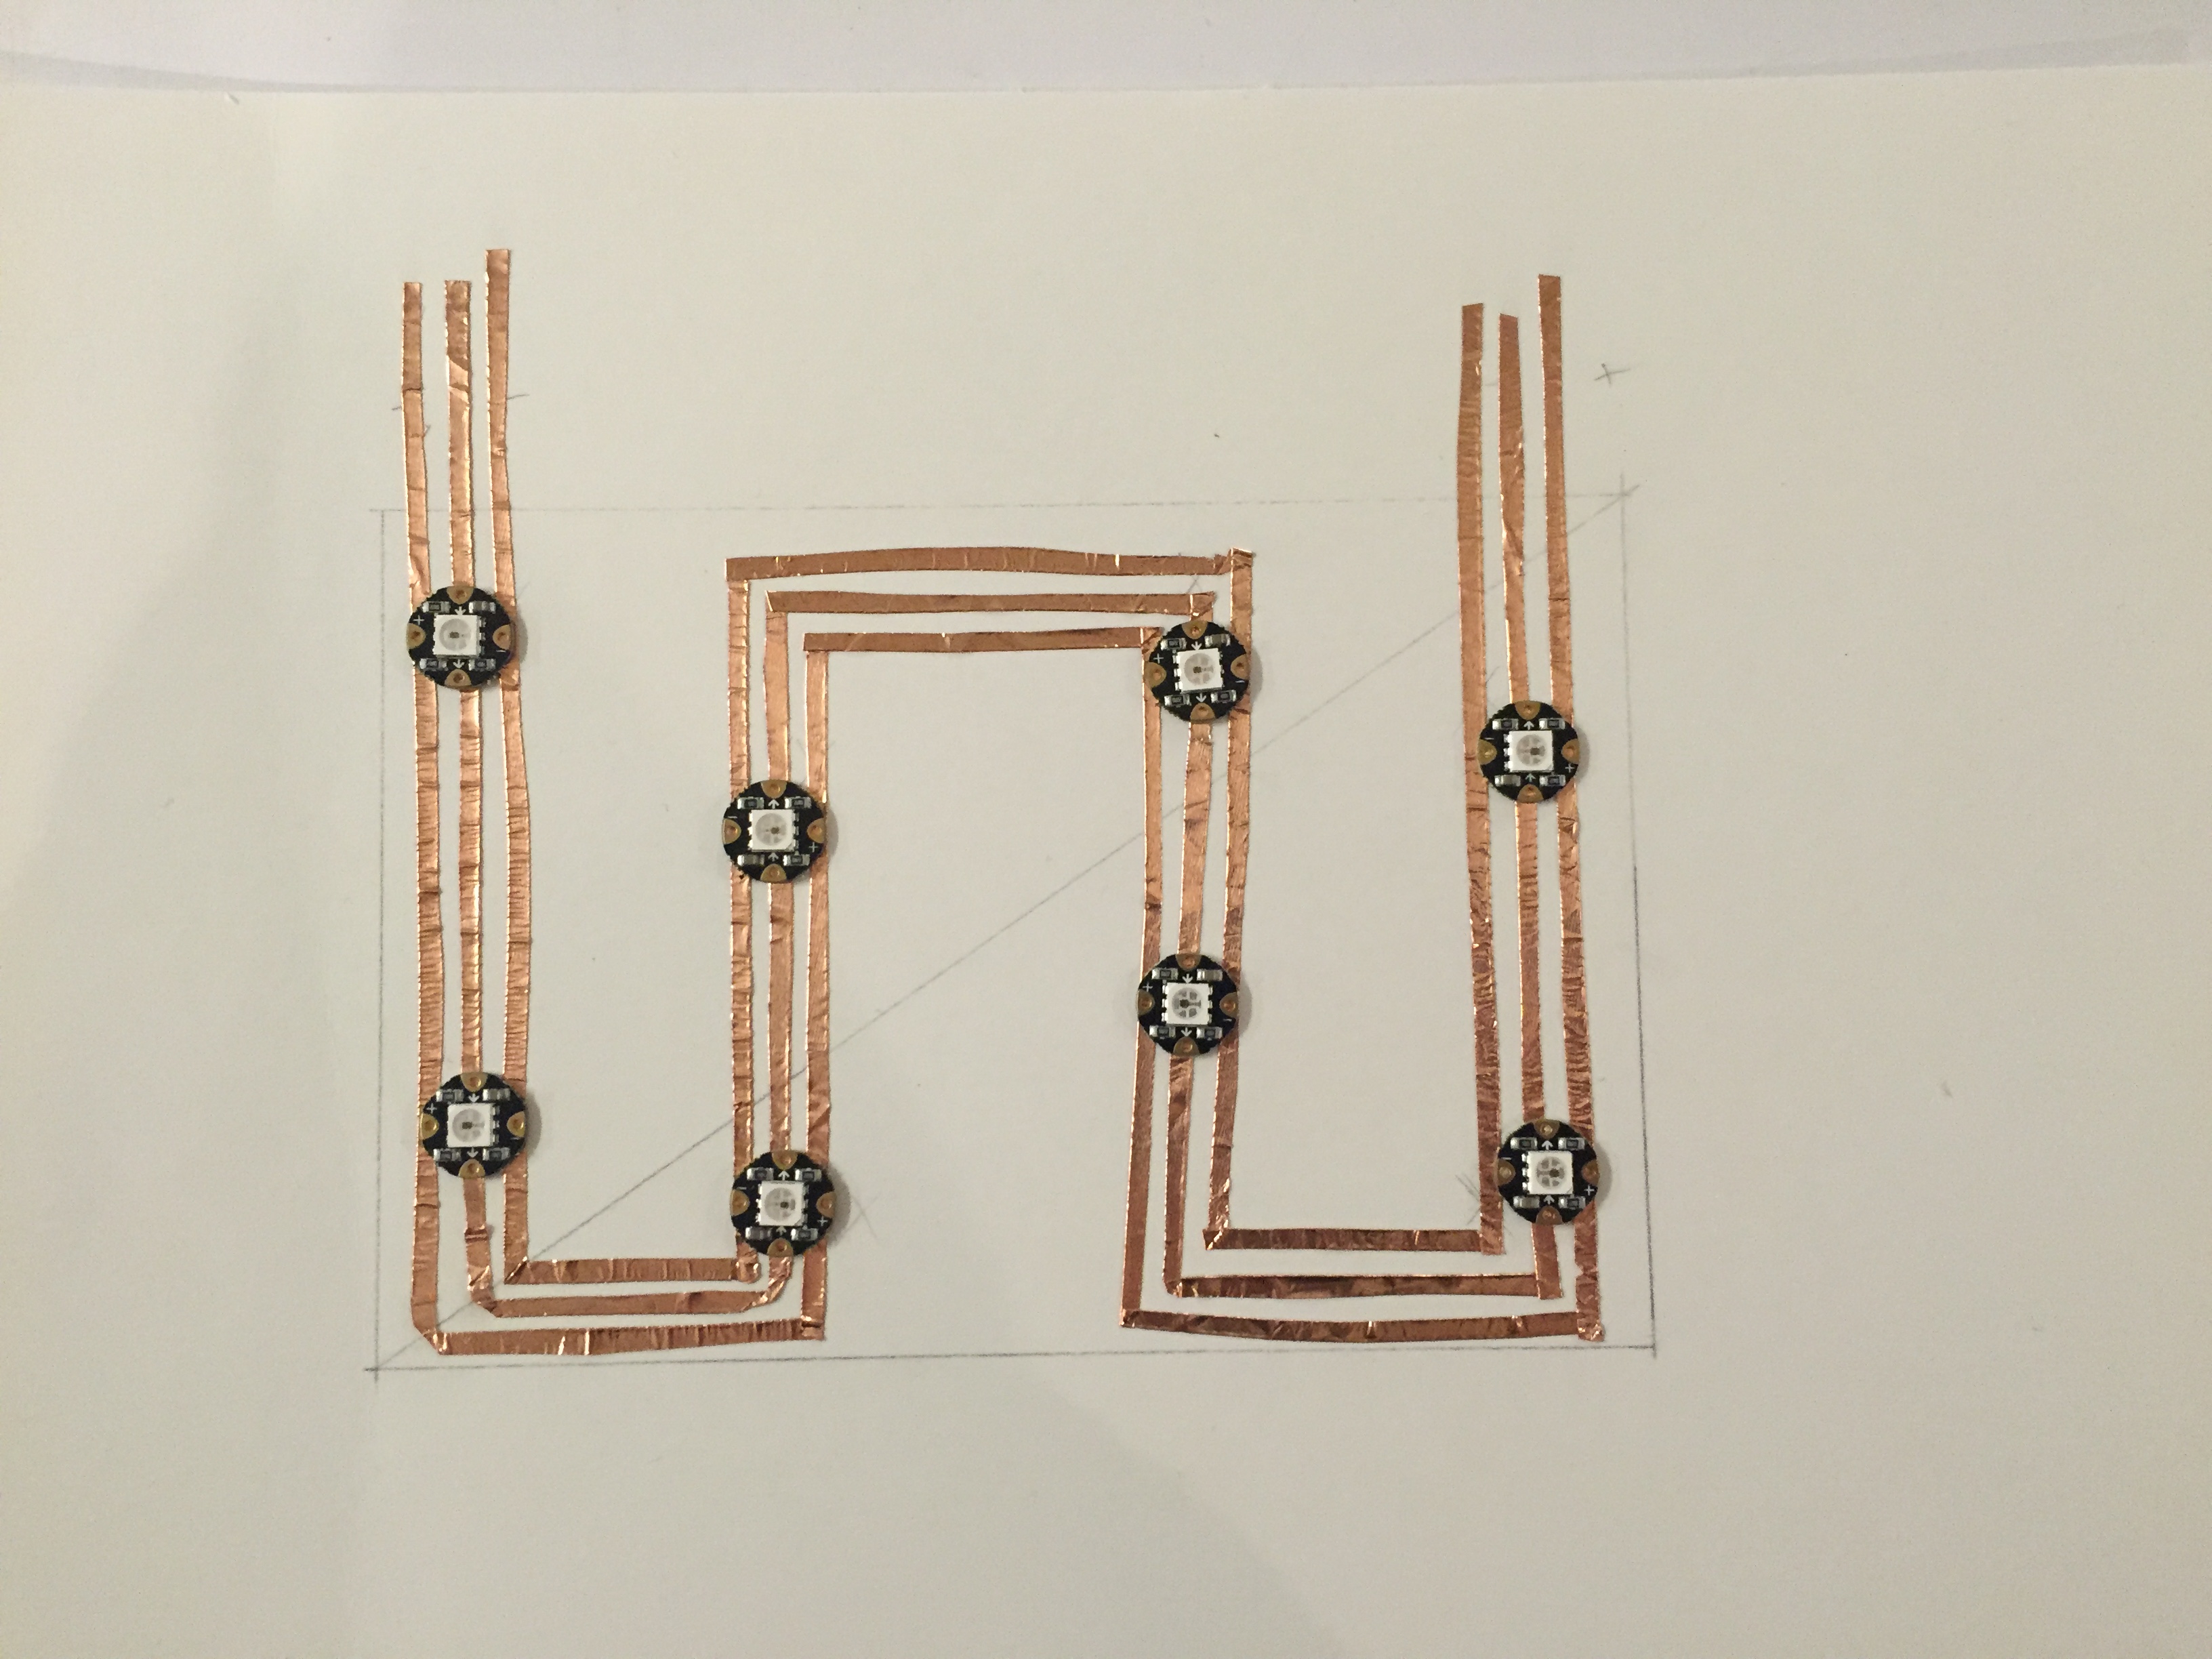
Then I thought about doing a copper prototype, but abandoned the idea because of time and just went straight to sewing them to fabric.
ITERATION 5:
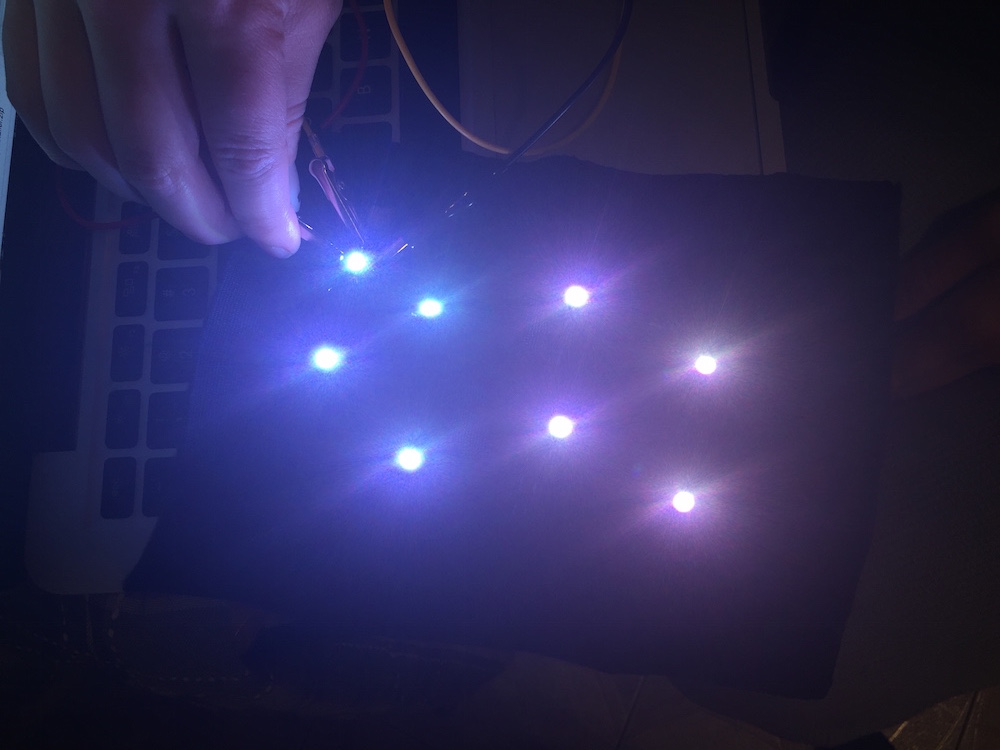
I went back to my basic gemma/neopixel circuit and added a second neopixel and was able to successfully run the strand test.
With that, I went about sewing my LEDs. However, my first soft circuit was less successful.
I took it to Kate Hartman and she explained that I needed to loop the thread multiple times, to ensure the connections would happen. I also needed more space around the circuit to more easily attach to jacket.
ITERATION 6:
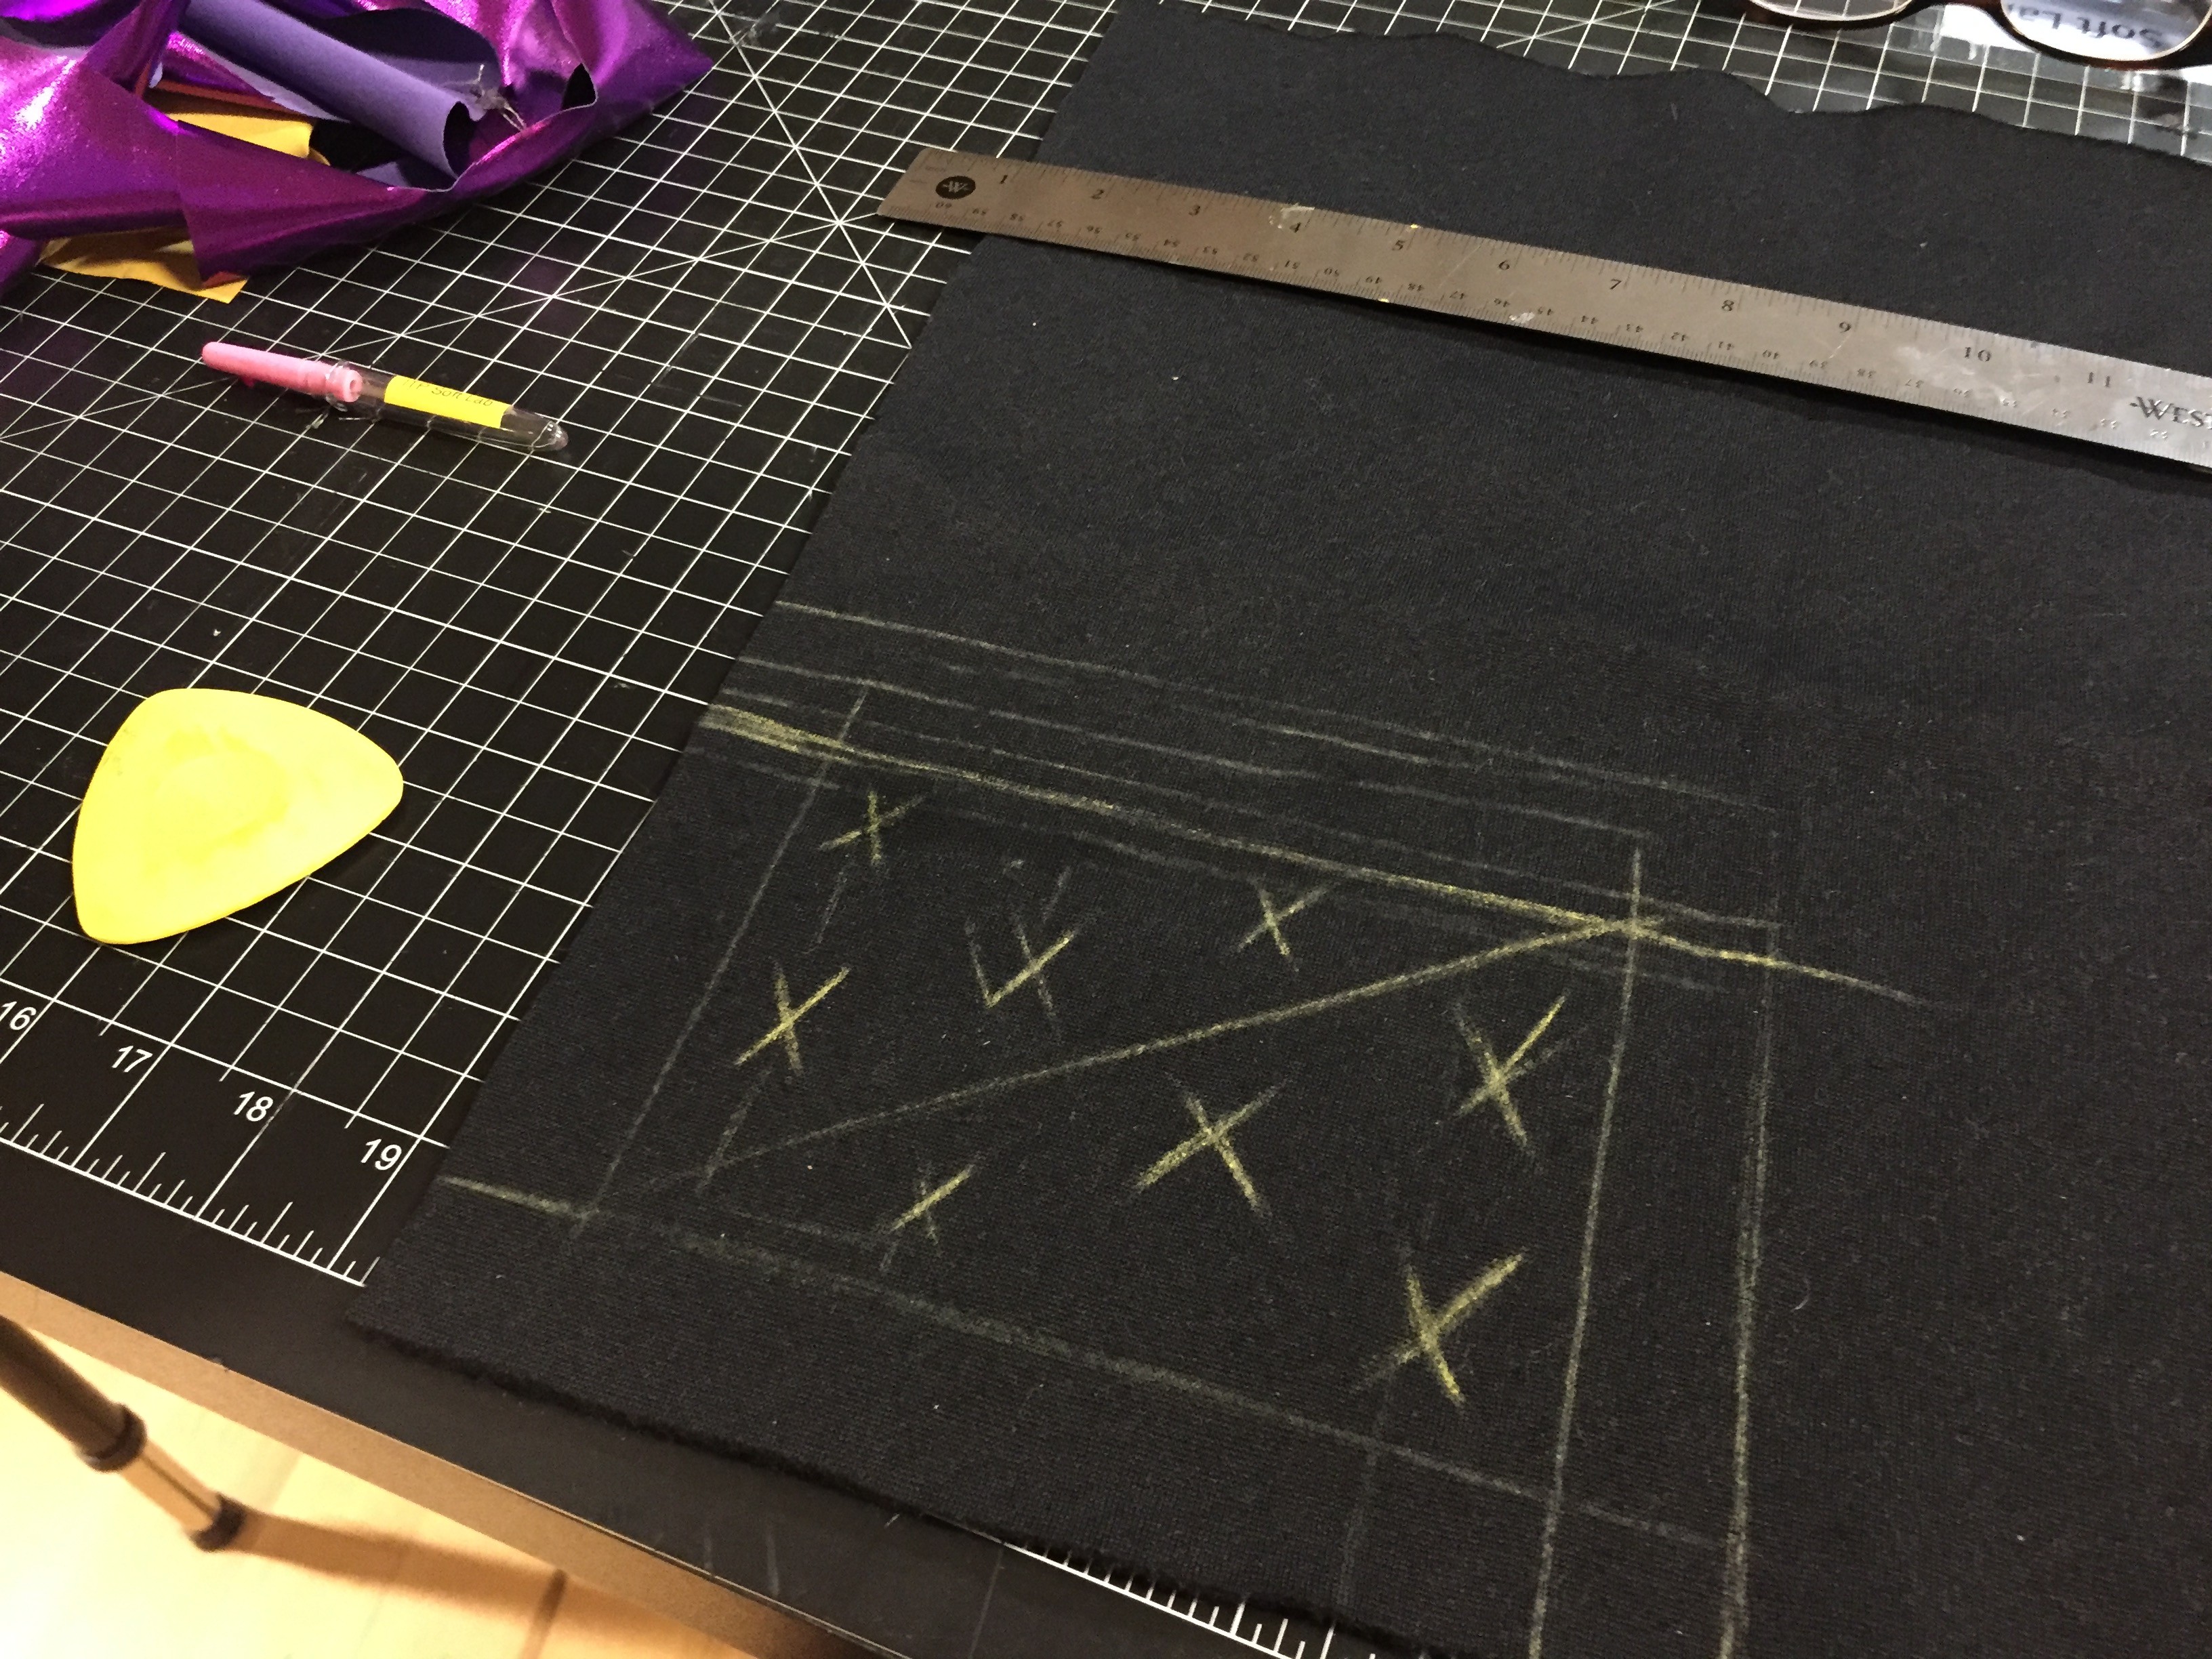
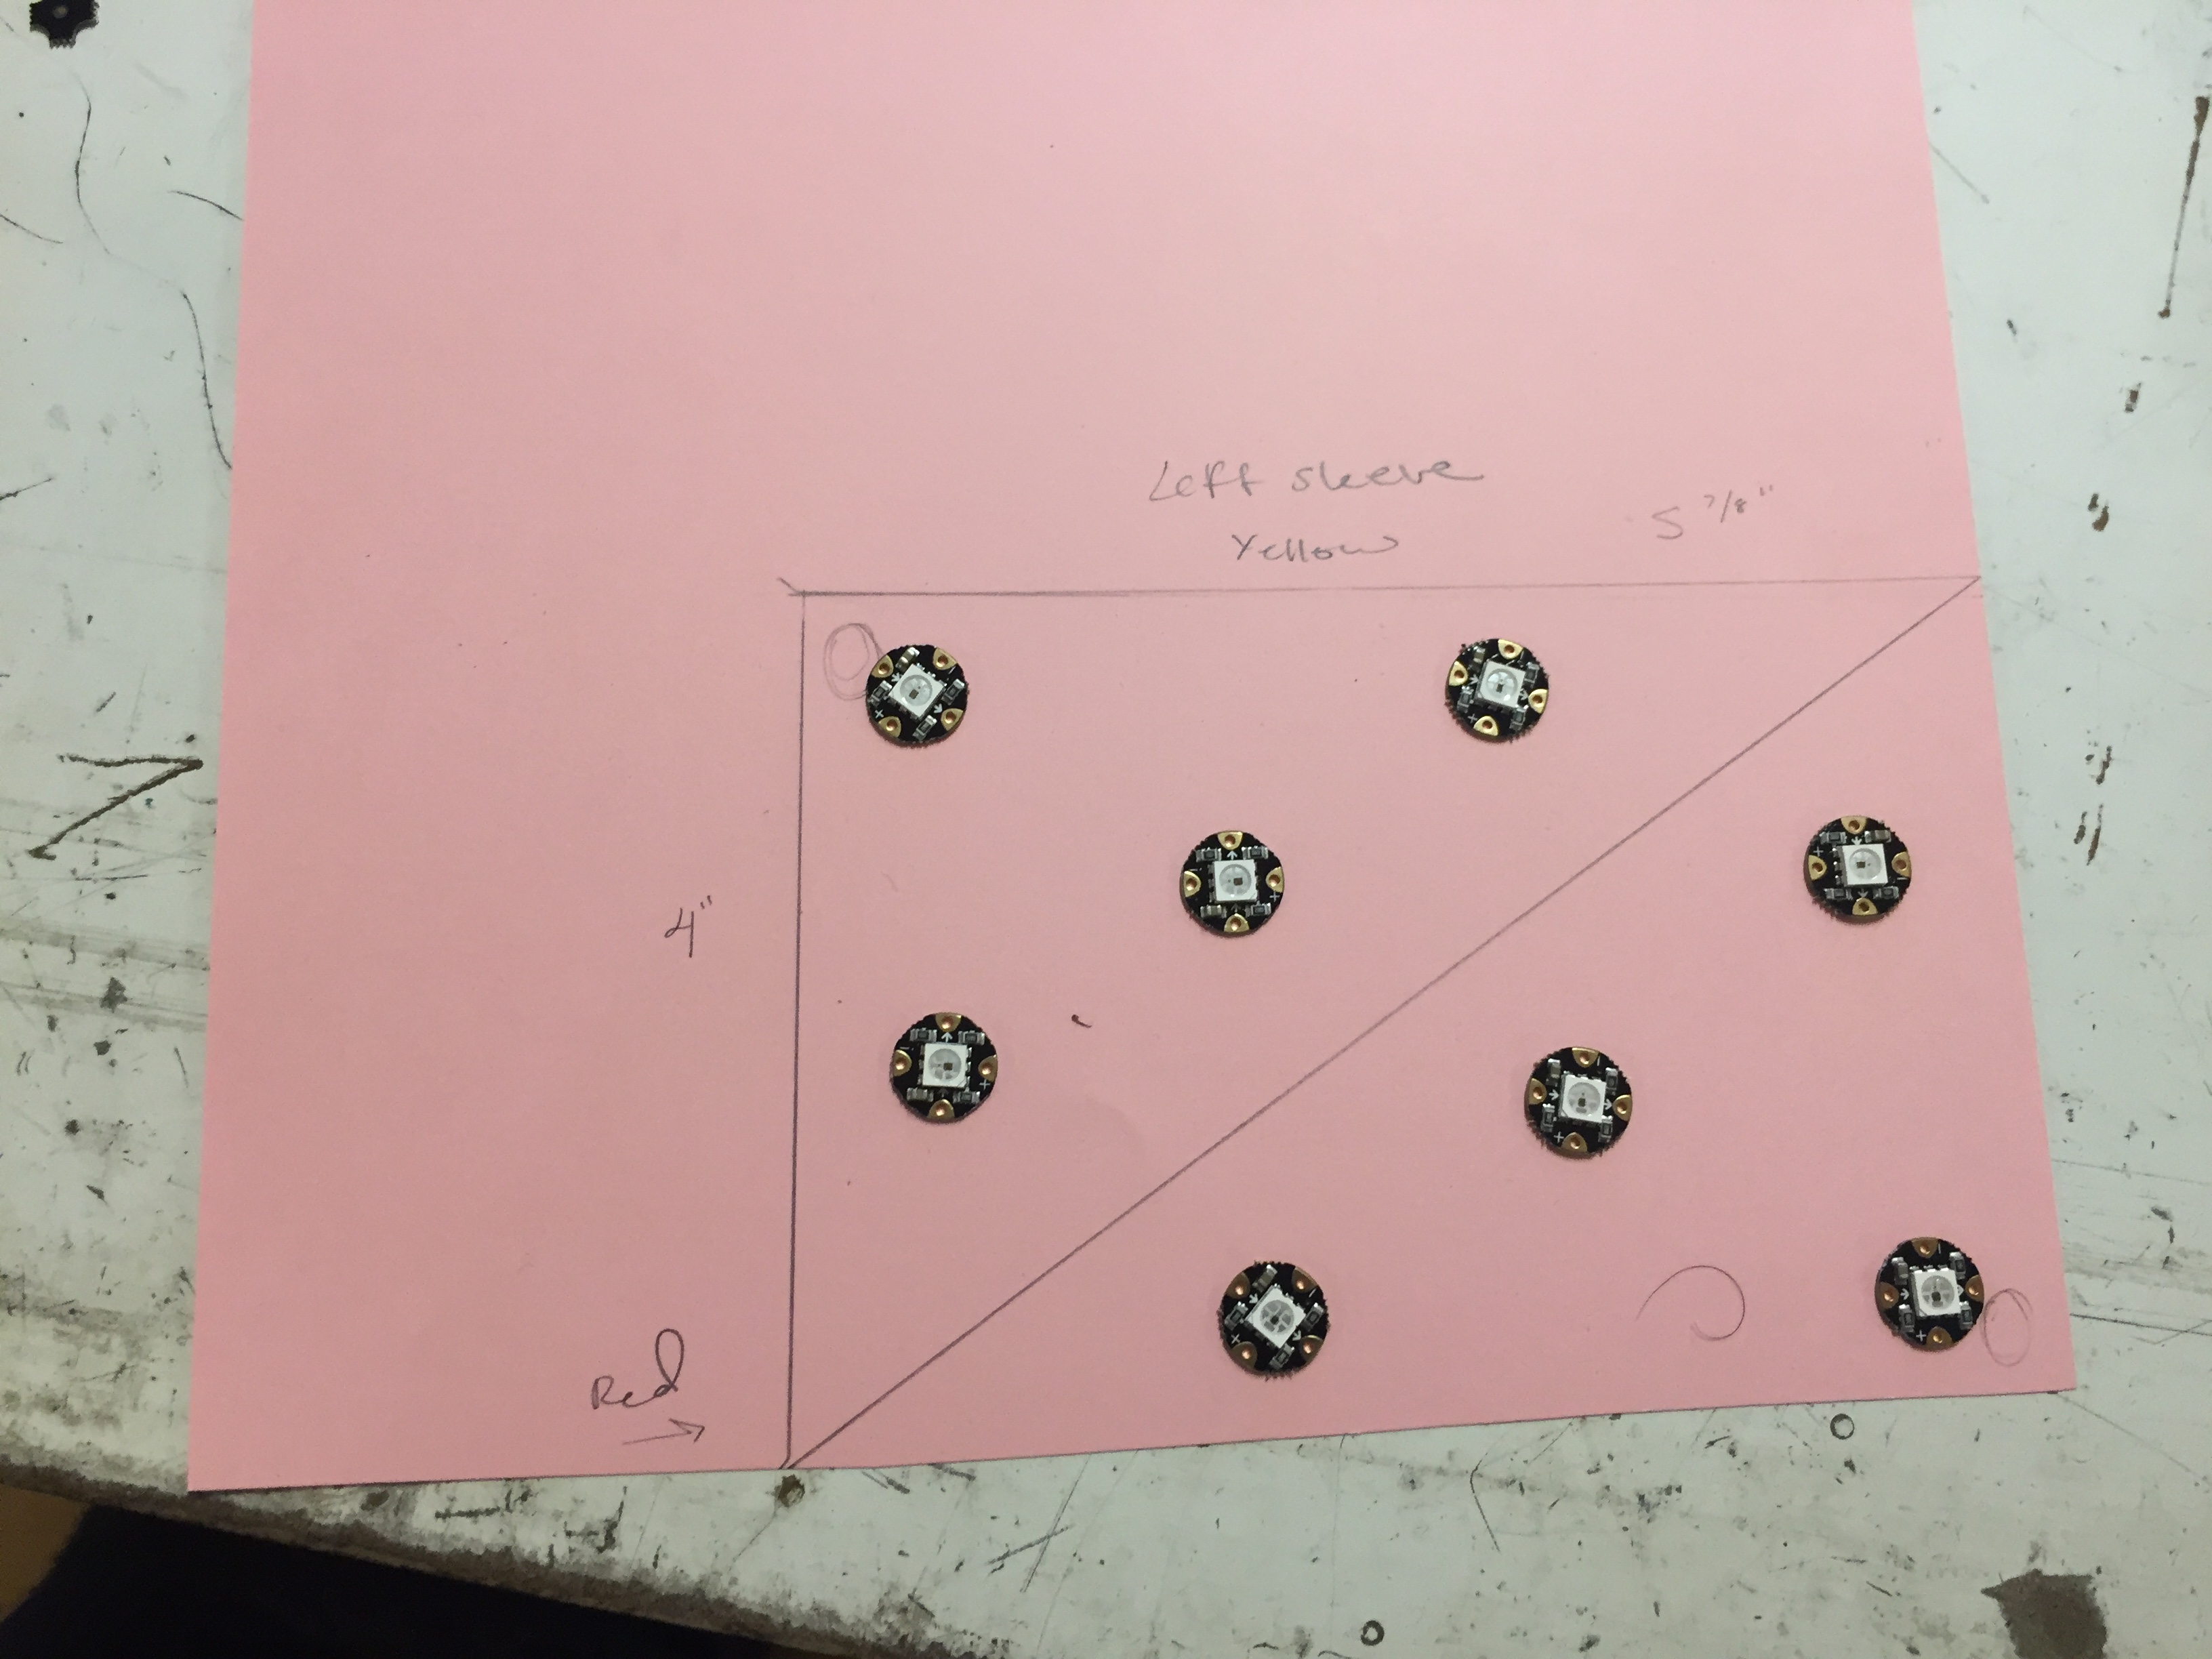
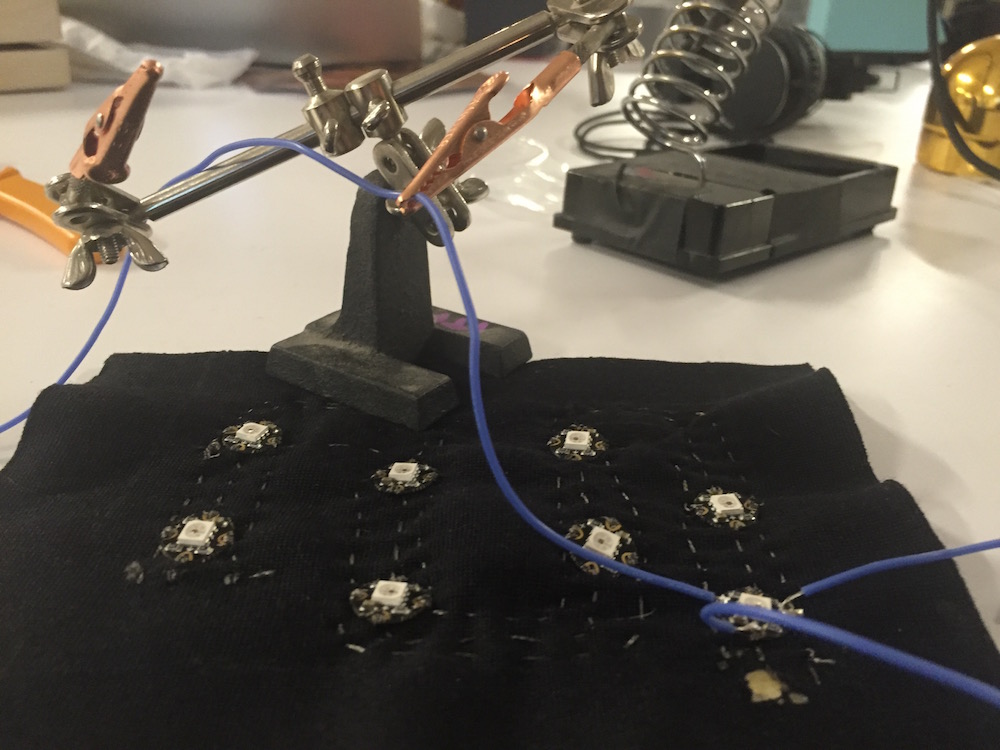
I cut out two new squares of fabric, adding an inch to each side of my original measurements (4-6″ became 6-8″). Using a chalk marker, I marked out the placement of the LEDs and the pathway for the stitches. I took a lot of care with sewing my second circuit, this time making sure to loop about four times on each connection. Consequently, it took me over two hours to sew the entire thing.
After I finished the second circuit, I almost caused a small fire in my bed trying to power it at 3am and forgetting to trim thread. Fire averted. Short averted by cutting strings and applying clear nail polish. Also learned that beeswax is good for frayed thread, applied that in parts as well. because I randomly had beeswax (gotta love local farms!).
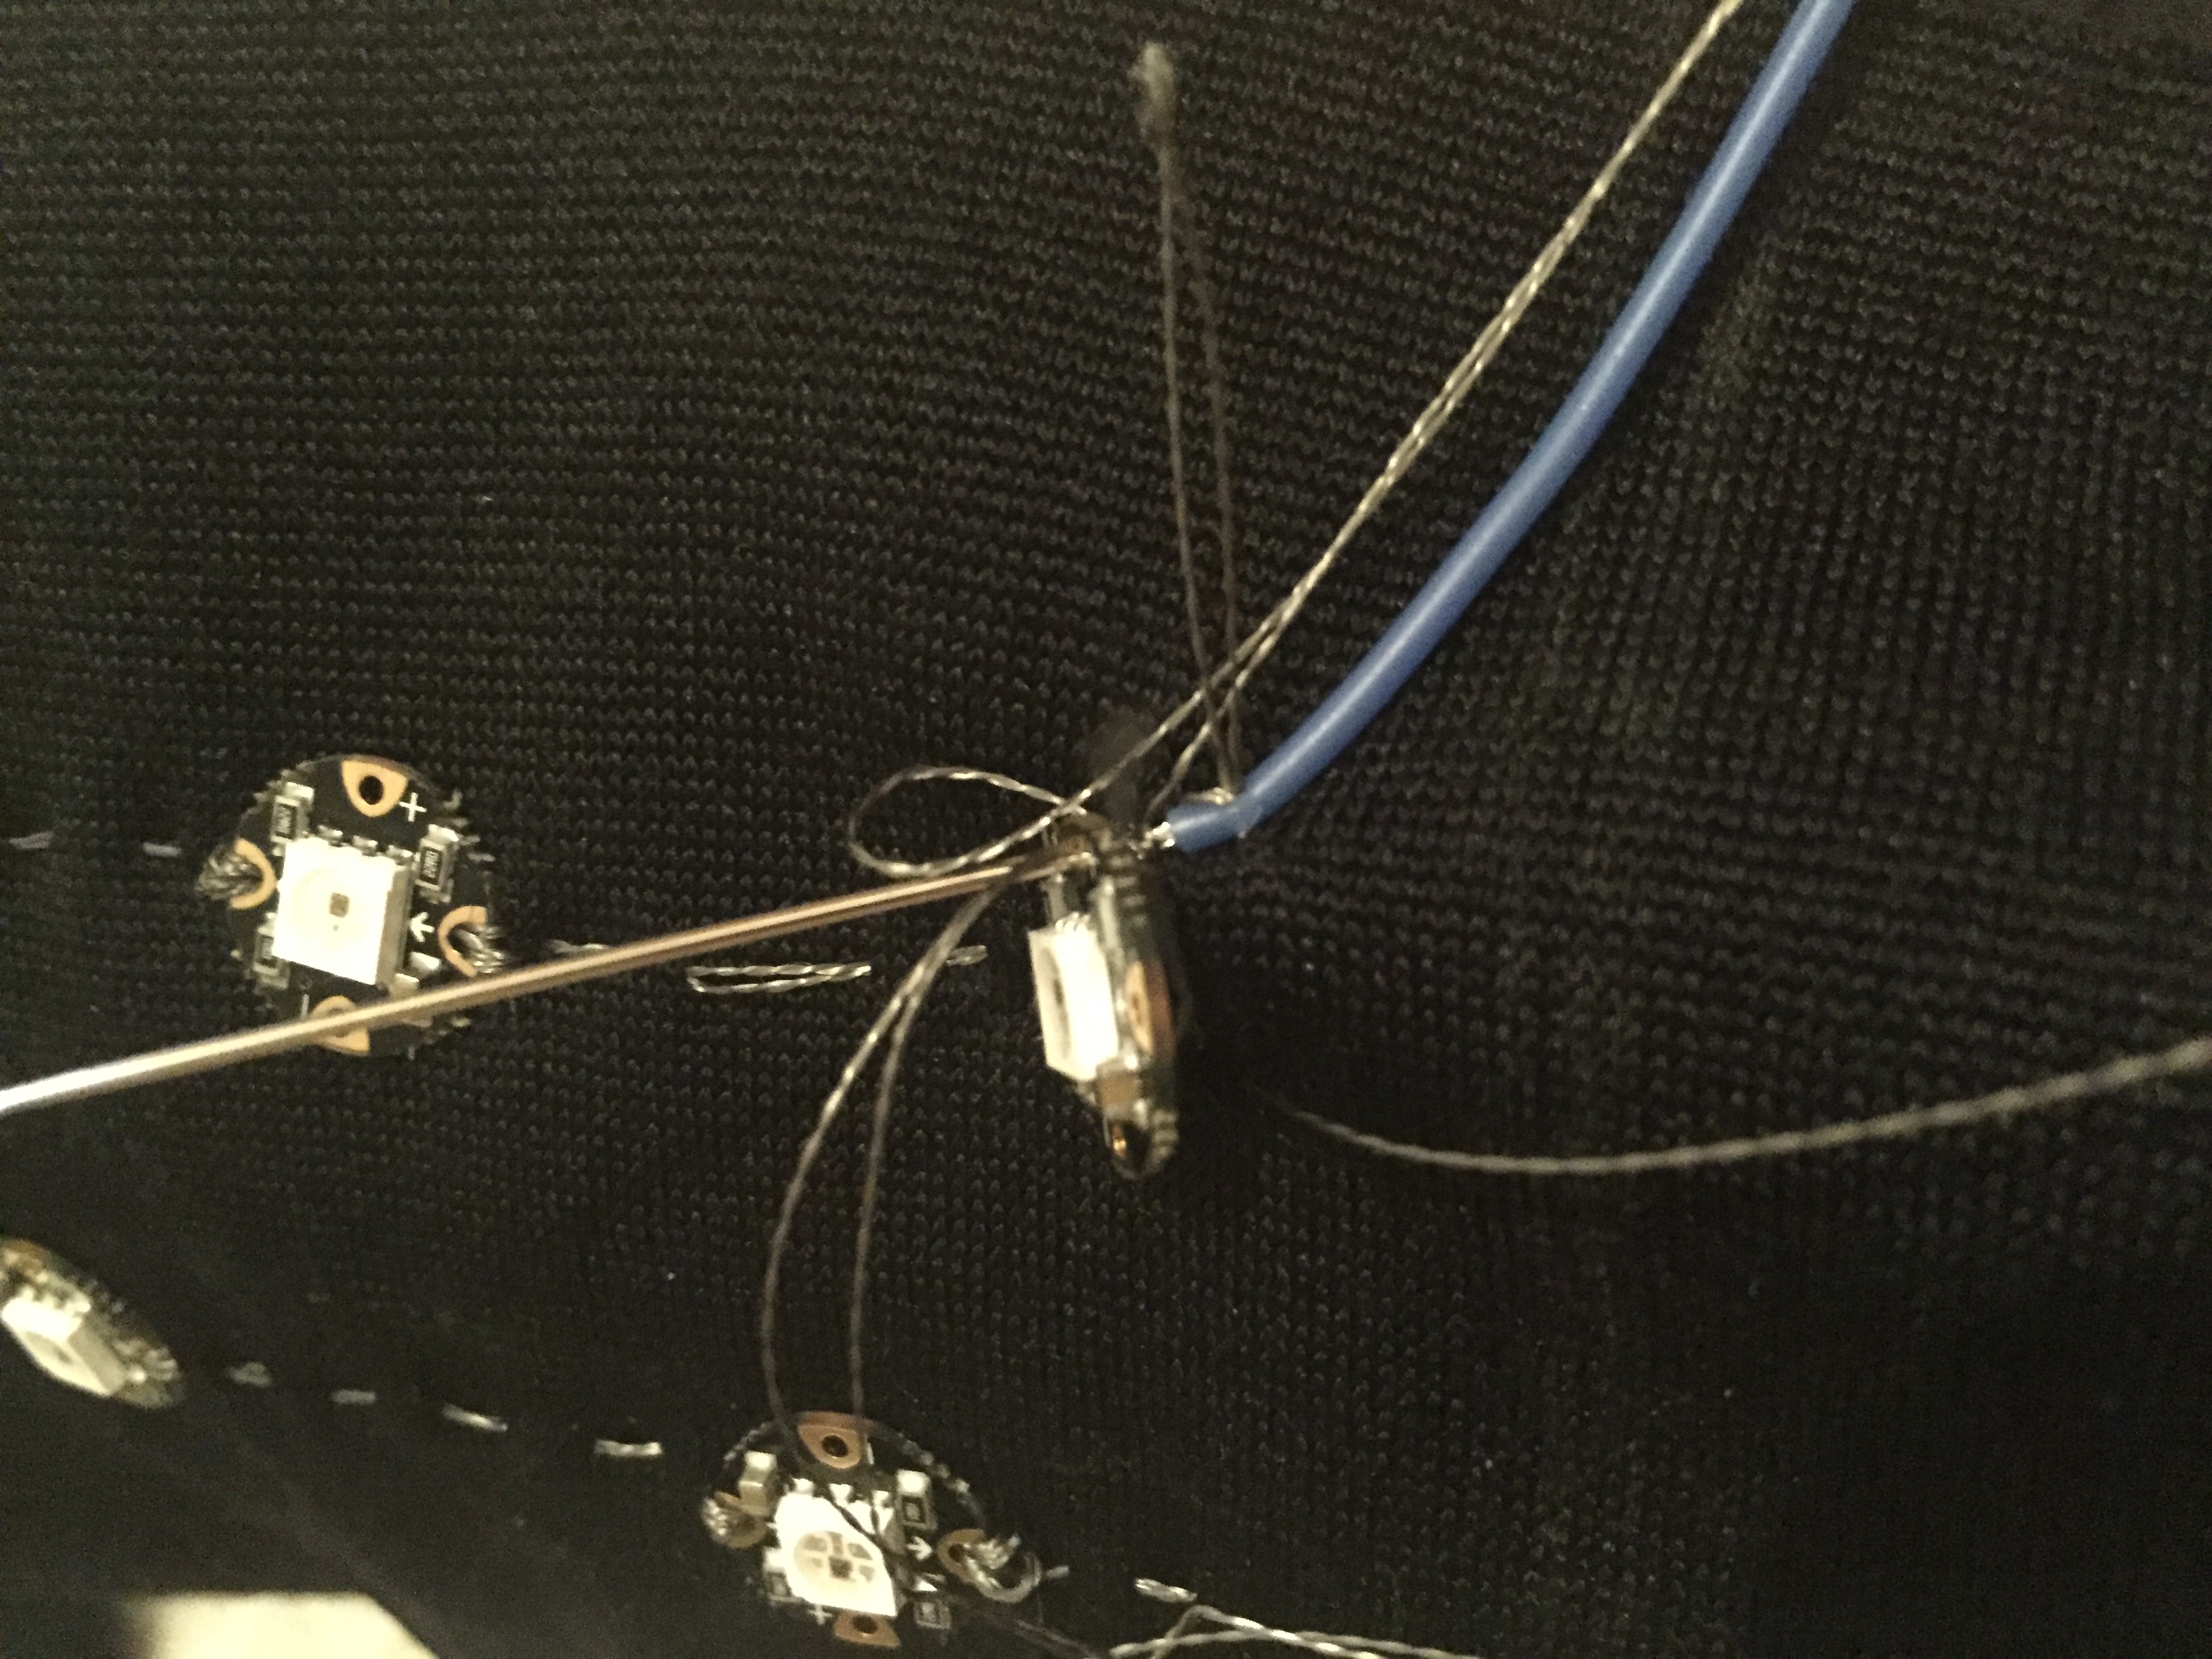
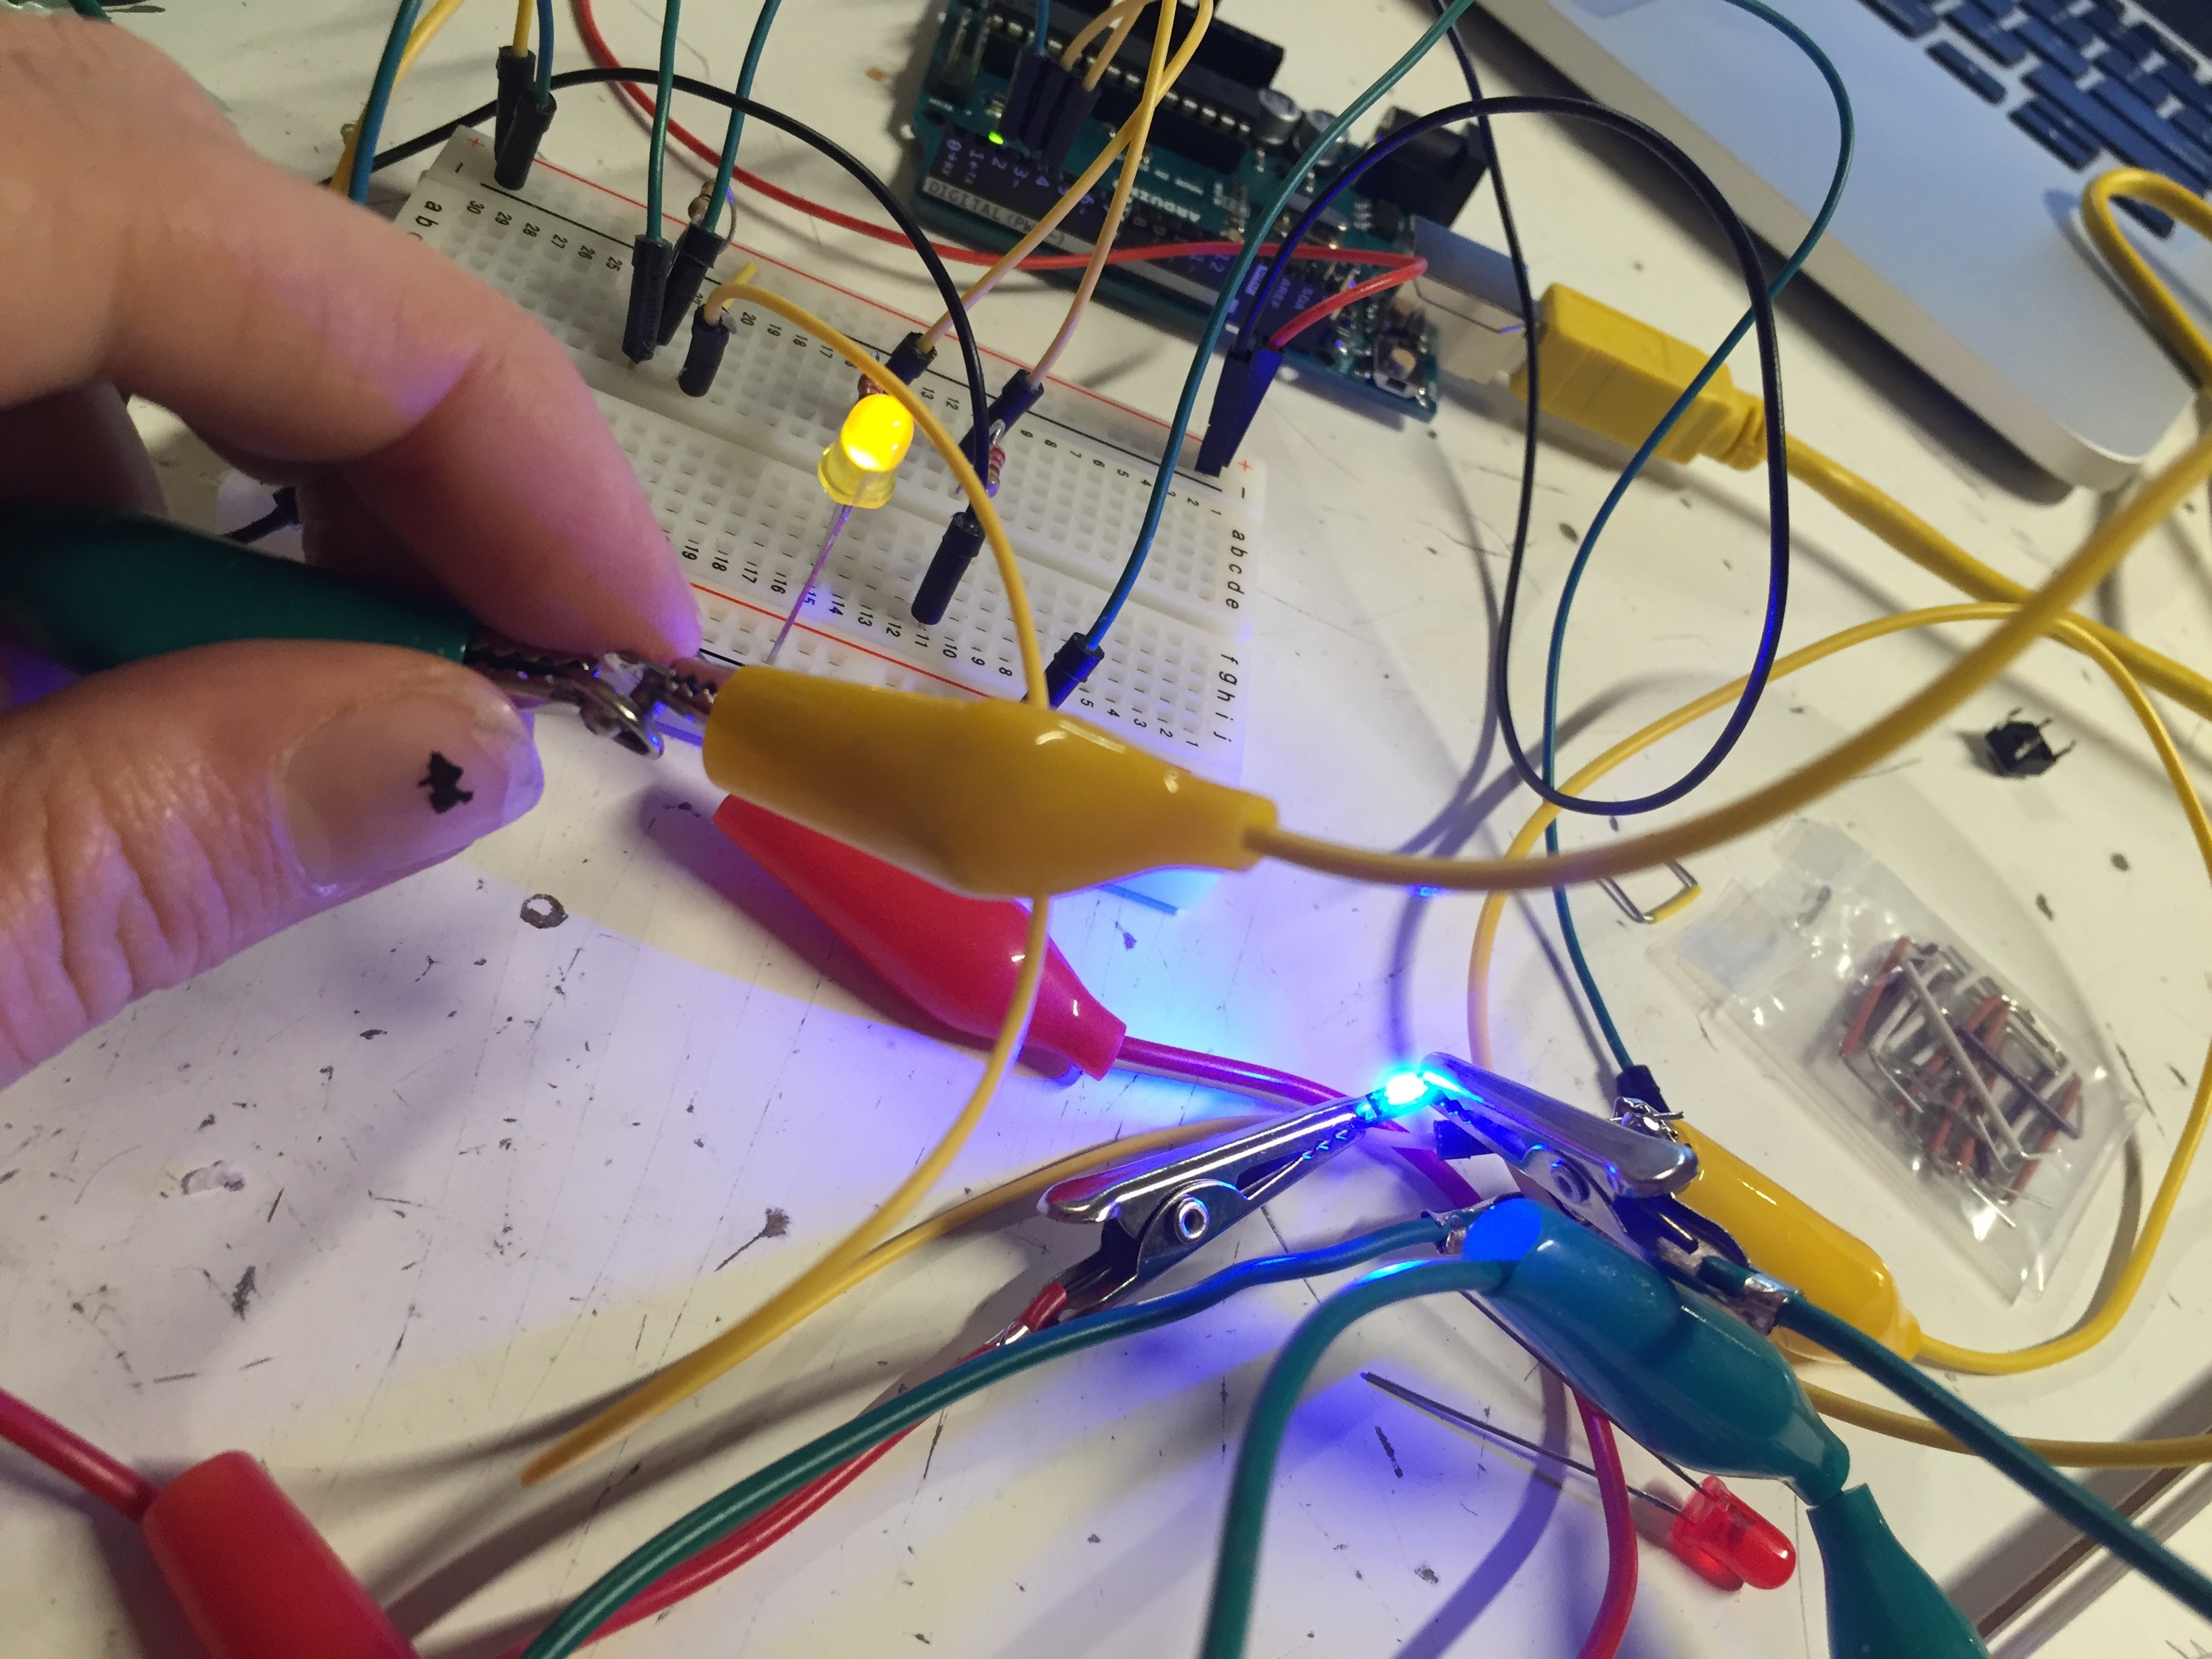
I hooked up alligator clips and sort of got the string test to work? All LEDs came on and changed color, so it seemed like power and ground were working.
But it was difficult with the alligator clips, so I decided to solder (first time ever!) the silicone coated wires. Not the best soldering work, so that seemed to be why the connection wasn’t right.
Aaron helped me fix the soldering, but once it was finished it still wasn’t working – possibly blew the first neopixel? and maybe second?
ITERATION 7:
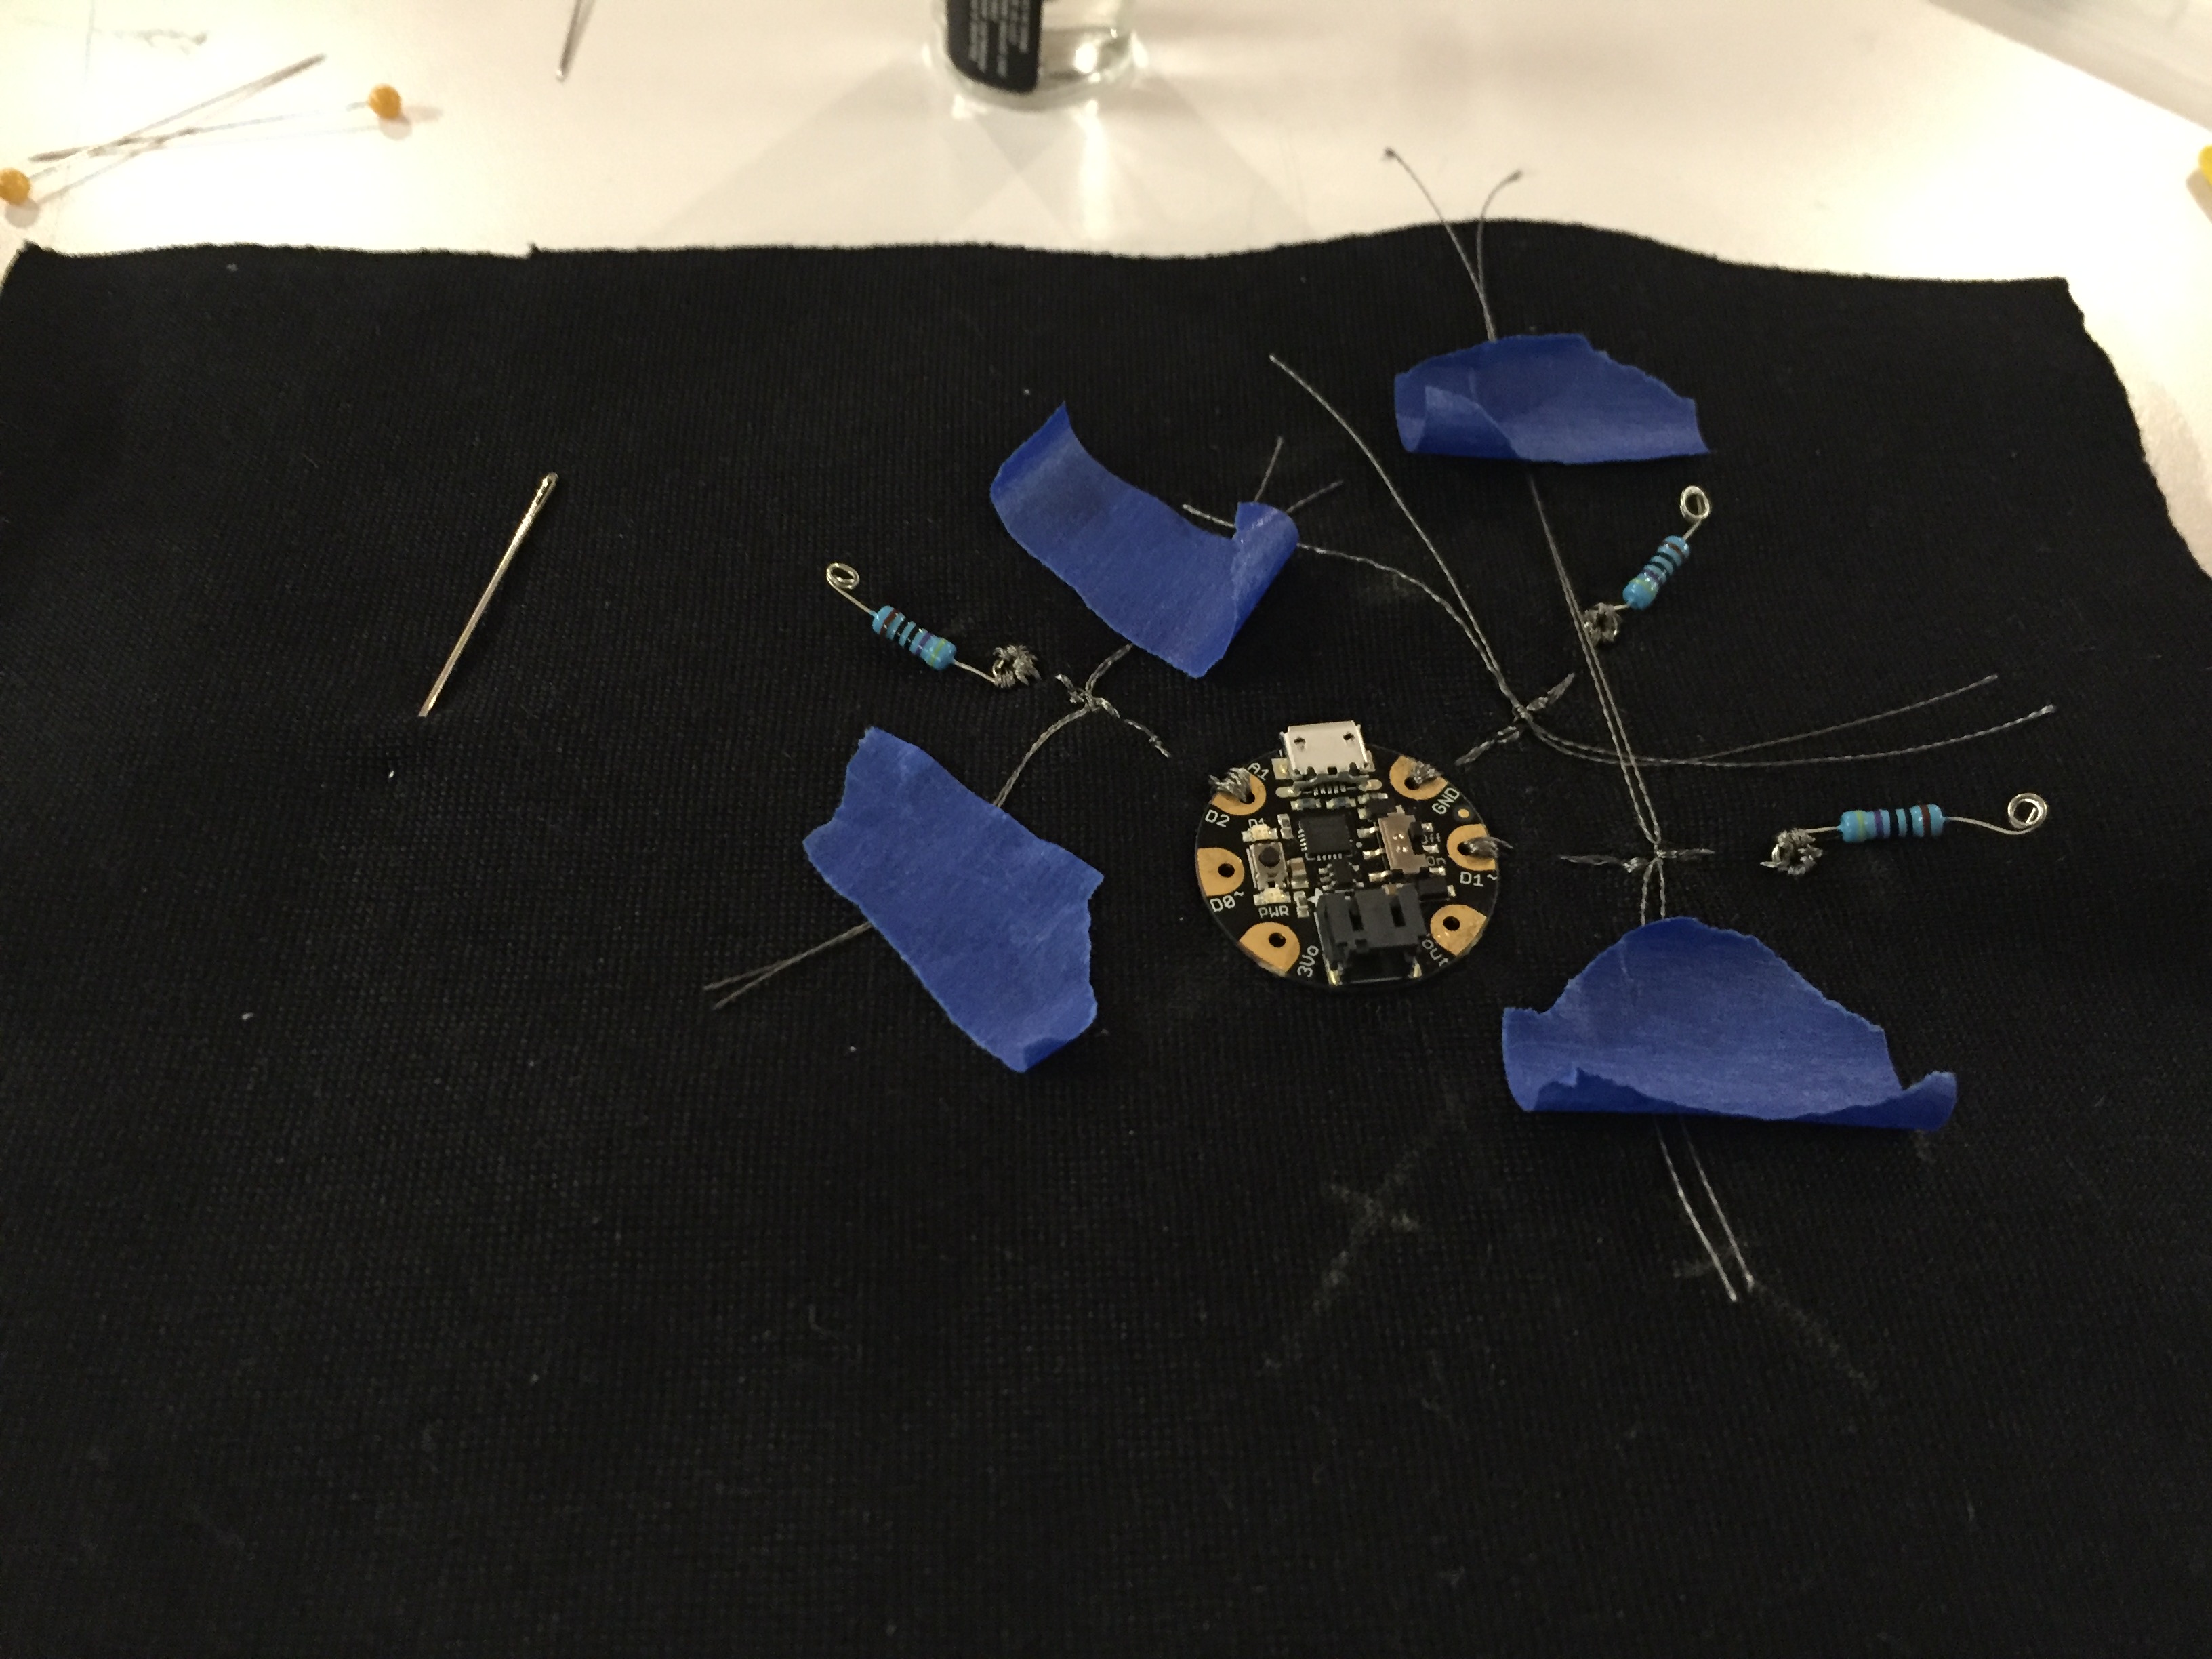
So stitched a third version and feel like I have a good method now for attaching the neopixels. I also tried stitching the wires into the circuit using the thread.
I’m now terrified of blowing the neopixels, so I bought a couple of 1000uf/25V capacitors and ~470 resistors, which is what adafruit recommends to prevent blowouts on their neopixel strips. I talked with Teresa and she said she’s never used resistors or capacitors and it’s difficult to find much documentation about similar situations online. I tried hooking up the circuit with the resistor on the data line but no, still dead.
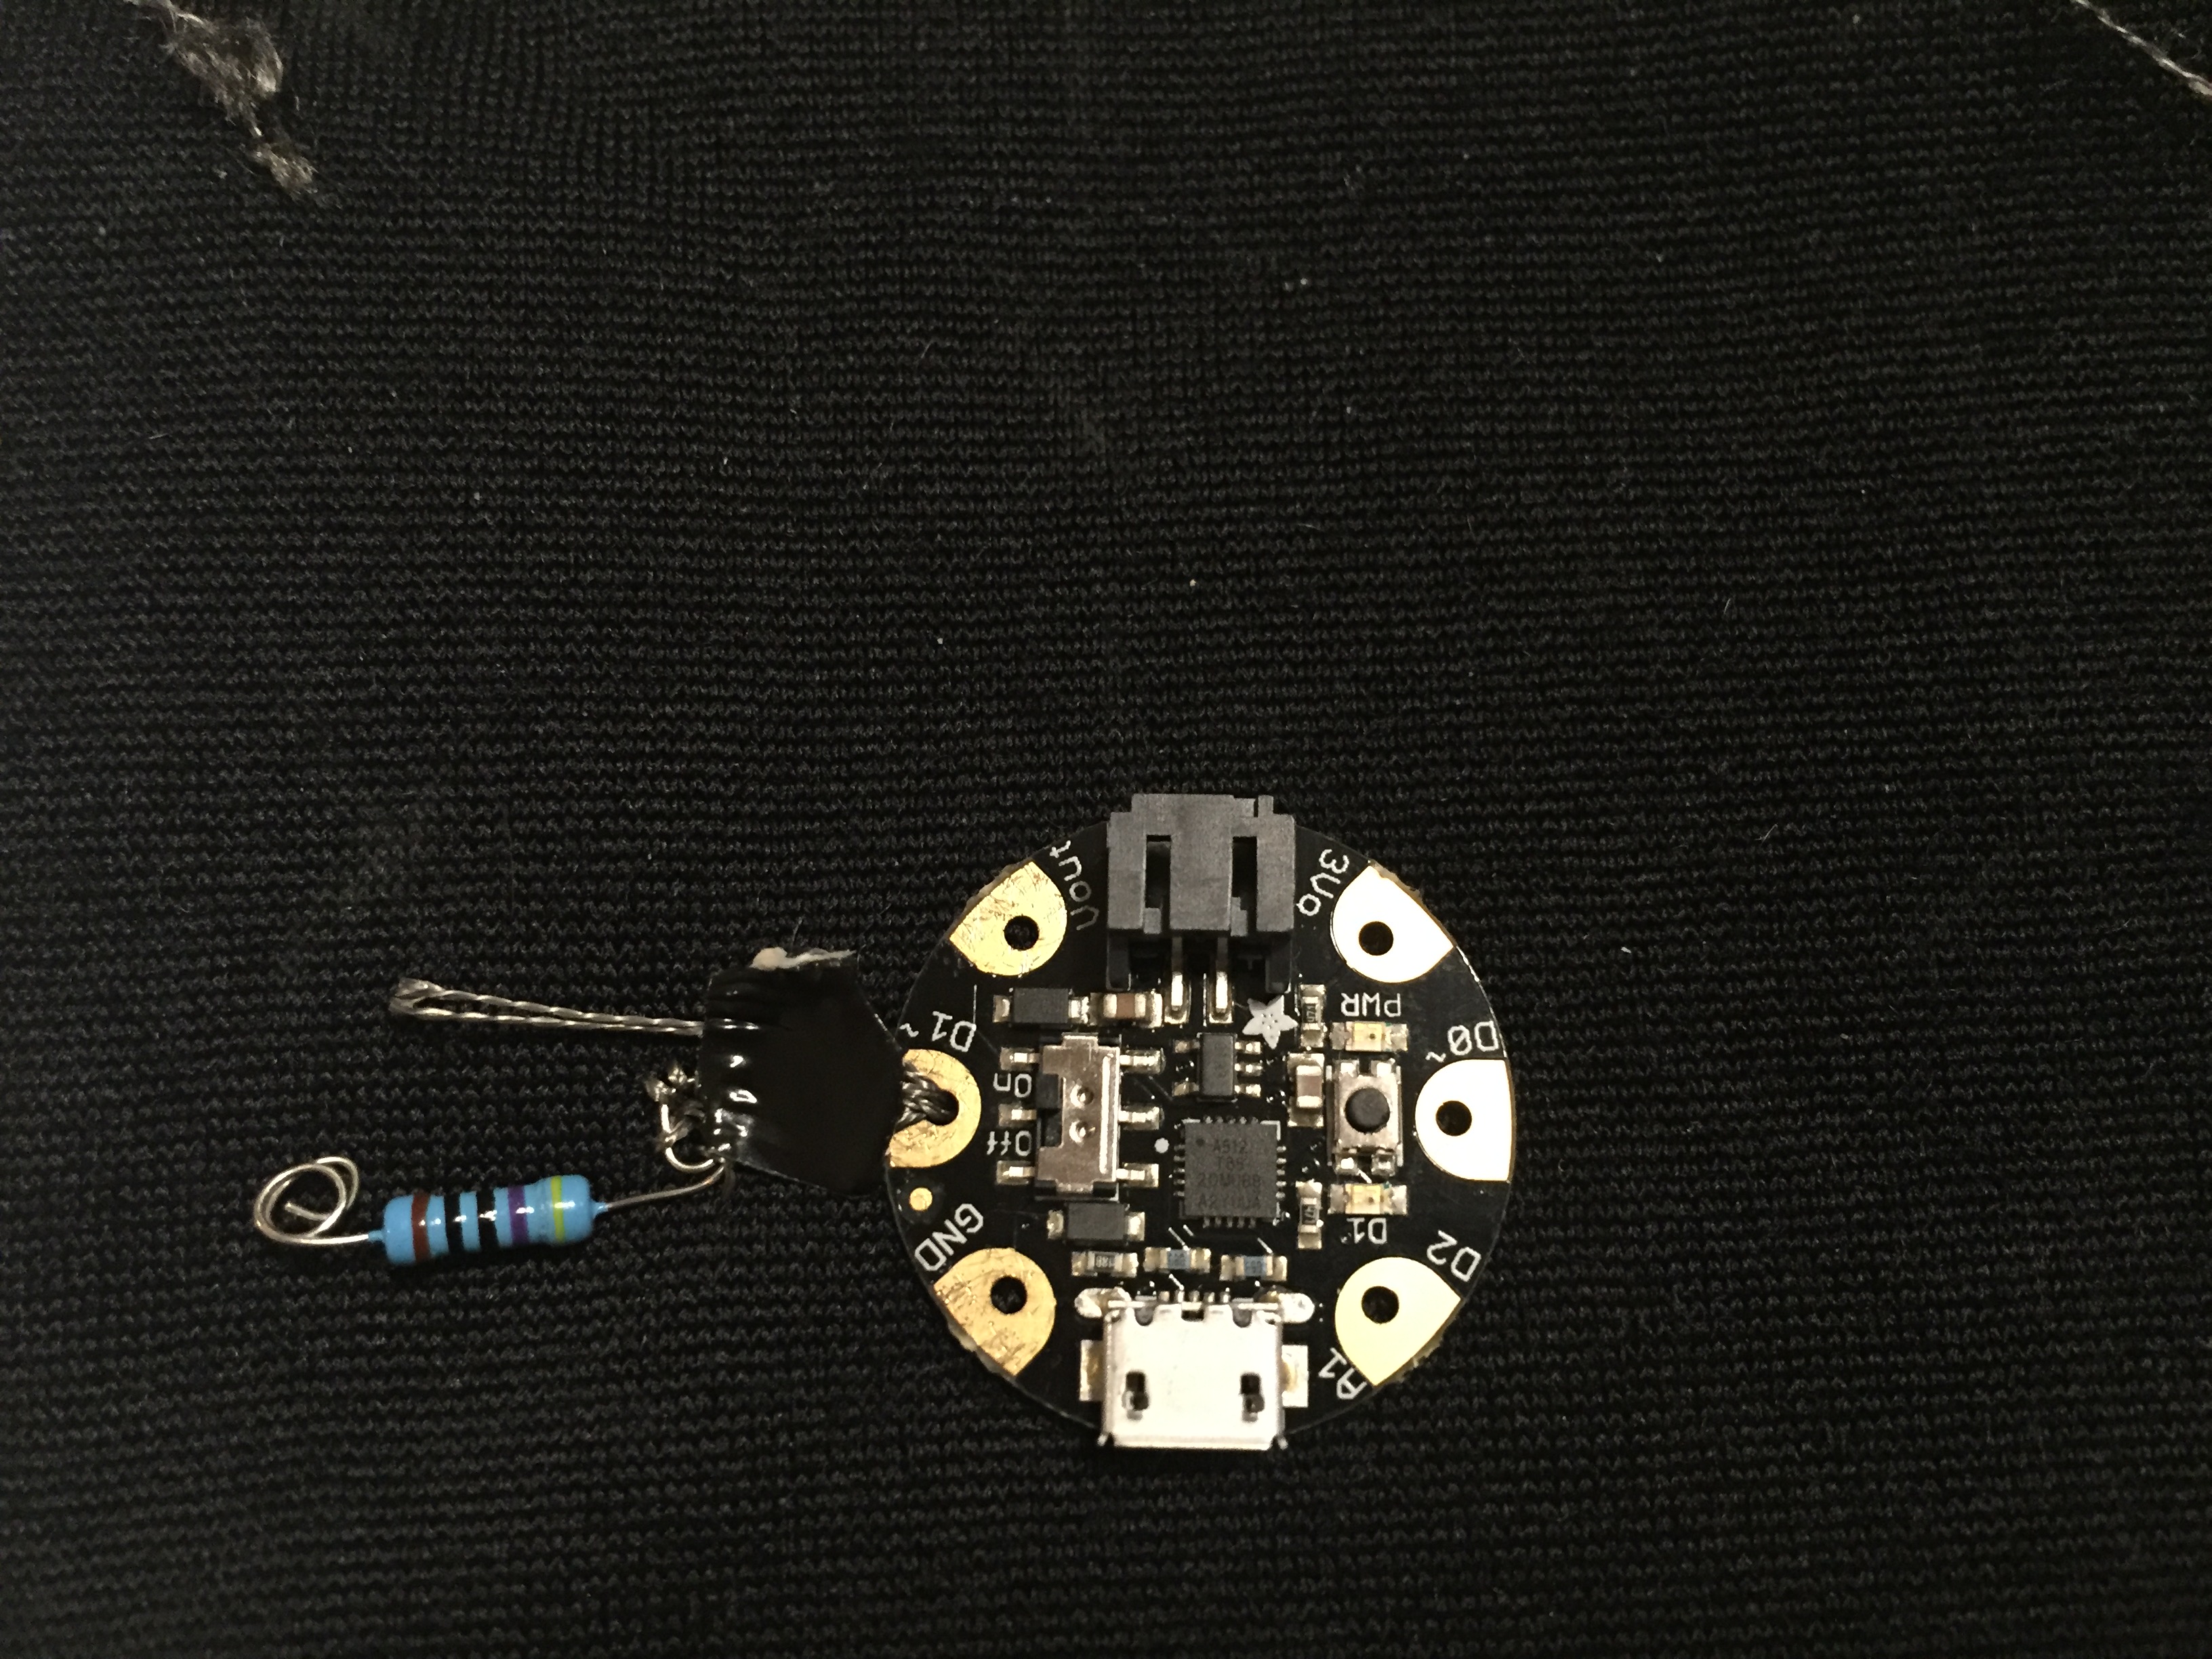
So for my next version, I’m going to add the capacitor and loop the silicone wire rather than stitch/with it. Hopefully this will prevent further neopixel blowout and get me a working circuit.
PComp, Week 13: Semaphore Jacket – Progress, Pt. 1
In the first part of the process, I started with basic breadboard components and circuitry that mimic my design then step-by-step swapped out components to those that I’d use in the prototype.
ITERATION 1:
I started off with doing the basic physical computing digital input/digital output lab. I hooked up two regular LEDs to the breadboard, along with a button.
ITERATION 2:
I switched out one of the regular LEDs for a Flora NeoPixel LED that I hooked up with alligator clips. I also switched out the button for a snap.
ITERATION 3:
Then I switched out the uno for the Adafruit Gemma micro-controller. Disregarding much of what I’ve been told about new components, I just simply tried to run the code. Obviously this didn’t work. So then I dutifully did my research and went to the Adafruit website where there is a TON of very-thorough documentation.
Went through the process of installing the library and was able to get a snap to turn the onboard LED on the Gemma on and off.

ITERATION 4:
Hooked up a single neopixel to the gemma. Got it to turn on.
Was also able to partially do the strand test, but then got this weird warning related to my USB and it shut off.
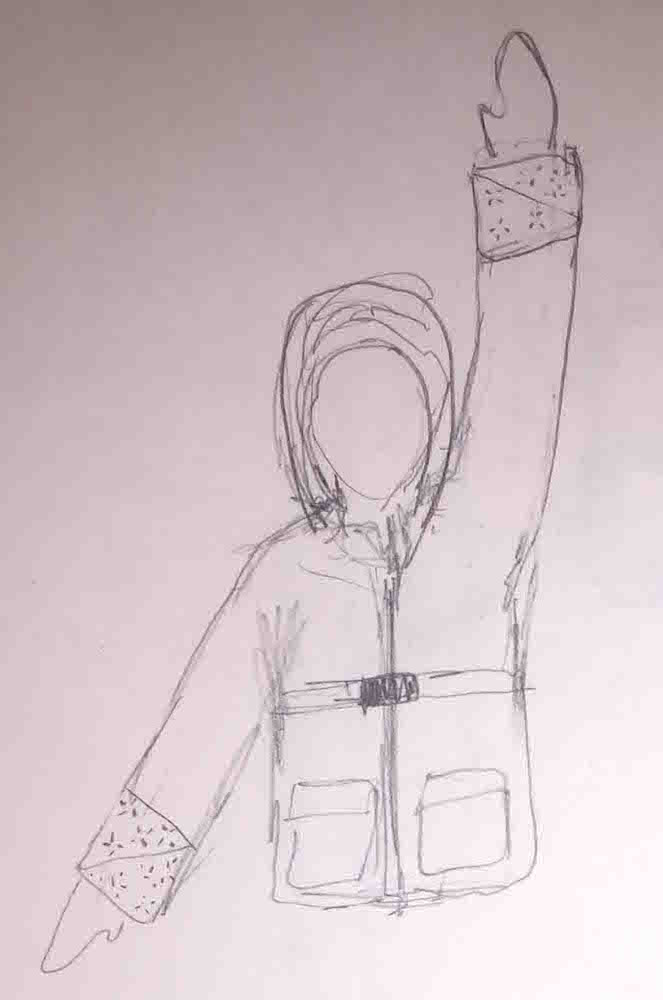
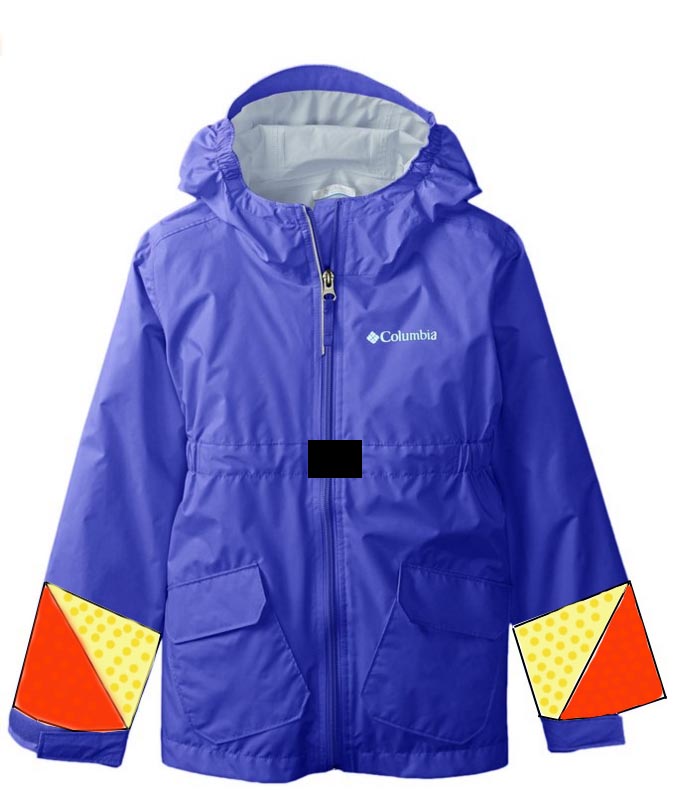
PComp, Wk 13: Semaphore Jacket – Design
Below are some of the sketches I’ve done of the Semaphore Jacket, including object/circuit design and sketches of the user experience.
OBJECT DESIGN:
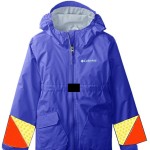
Front of the jacket – with LED sleeve panels and snap switch. Silicone wire will travel from the circuit, up the sleeve and around to the back.

Back of jacket – backpack that holds the micro-controller and battery, wires connect up and back.

USER EXPERIENCE:
User puts on the jacket:
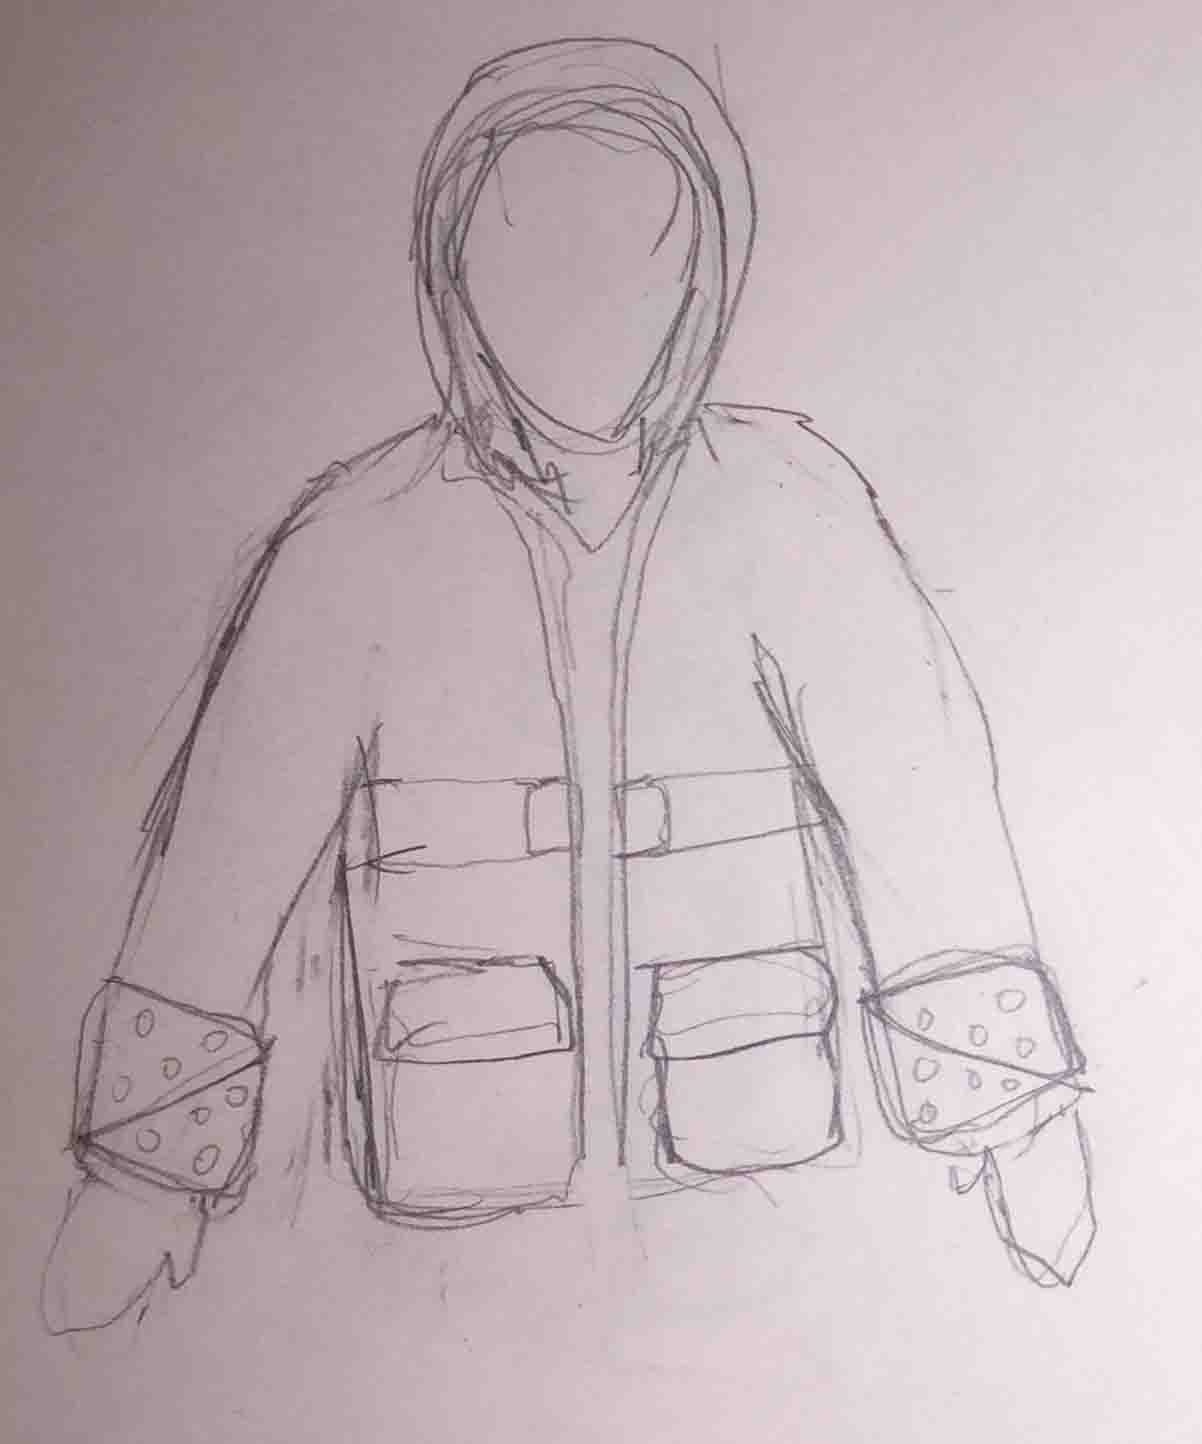
User closes the snap switch:
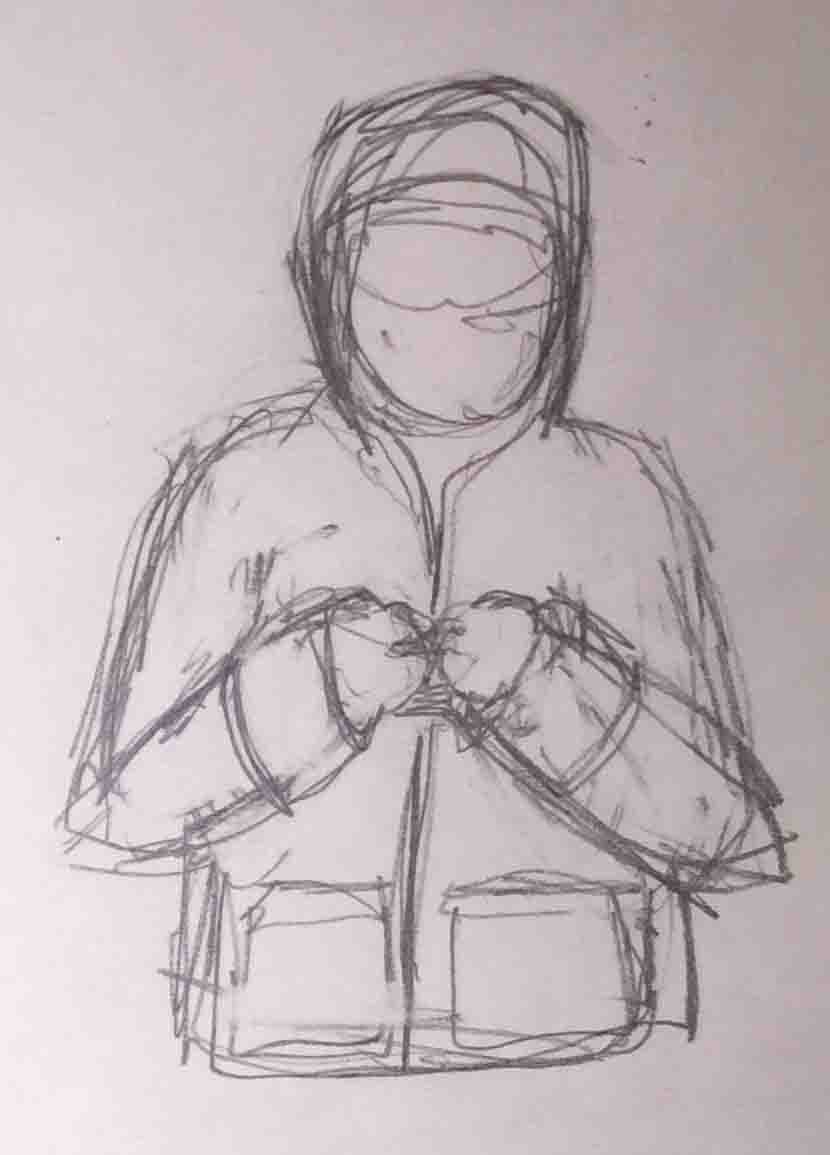
LED lights turn on, User can communicate in semaphore:
CIRCUIT DESIGN:
Laying out the NeoPixels to figure out spacing and circuit design:
Sketch of LED circuit layout:
Prototype with copper wire:
Animation, Wk 3: “Coffee” Stop-Motion
So both Jonnie and missed the first class of animation, so when we heard we had to do a stop-motion assignment we decided it had to be simple and easy to execute. We came up with the idea of creating abstracted visuals for a one-minute portion of a song, so we wouldn’t have to deal with plot-lines, creating characters, etc.
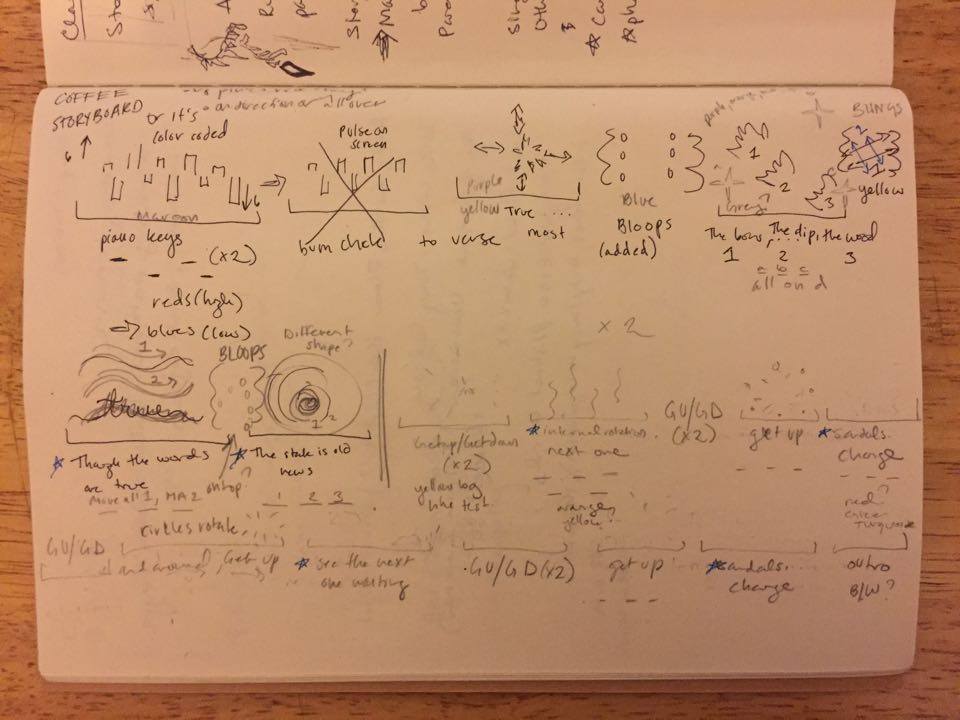
However, our project wasn’t as simple as we thought. While it was easy enough to think up different visuals that could correspond to different moments in the song (we chose “Coffee” by Sylvan Esso, which Jonnie edited down to bring out the best bits of it), the timing in relation to the rhythm of the song was so impossible. First, we struggled with the relation of the frame rate to the beat of the song. Eventually, when we got into post-production we played around with the timing features and edited different clips to the correct pacing.
In terms of the animation itself, we decided to go with cut-paper and some beads and yarn. I had done a cut-paper animation with my elementary students and have always enjoyed the aesthetic of artists like Matisse. In fact, I think I accidentally was very inspired by Matisse’s shapes, particularly the yellow starts and more globule, seaweed like shapes.

It’s very playful and I think fits well with the song, which features lots of electronic bleeps and bloops. Check it out for yourself!
https://www.youtube.com/watch?v=13O2Xhn6p2E&feature=youtu.be
PComp, Week 12 – Final: Semaphore Jacket
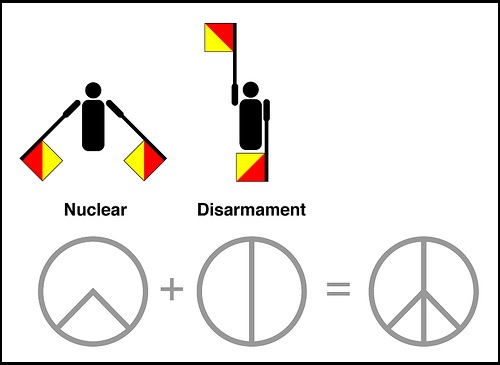
I want to make a rain jacket that has LED semaphore flags sewn onto the sleeves. I’ve been thinking a lot about the refugee crisis, and the recent email to the ITP4SC got me thinking about how we can design things…. In my brainstorm I thought about how refugees and their allies are trying to communicate the idea of “we come in peace” and the different ways one could non-verbally illustrate that…like the act of waving a white flag. Communicating with flags reminded me of semaphors, which seems somewhat appropriate given that most refugees are crossing via boats and it’s a maritime communication form. I did some research and found out that the peace sign actually came from the semaphor letters N and D (for nuclear disarmament), circumscribed by a circle. I also learned that semaphore is a programming term relating to control of access – quite appropriate, given the current discussions surrounding quotas – or straight up refusal to let refugees into a country.
The jacket would have the flags at the bottom of the sleeves, so a person could move their arms to communicate in semaphore. The LEDs are off unless the switch is turned on, which I’m thinking about doing with a zipper pull or a snap.
Obviously, this is not necessarily the best design or object for someone living through this predicament. I more see it as a symbolic way to speak to the current situation, the difficulties we still encounter with communication/understanding, which I found leads to a lack of empathy for those we see as “others”. Semaphores is a sort of ridiculous way to actually communicate, yet if we think about crossing over into a foreign land – perhaps universal, visual languages can be a tool.
Something about the jacket feels like it could work as a costume for a performance piece…rows or people in a public space doing choreographed semaphore messages about peace.
PComp, Wk 10: BOM
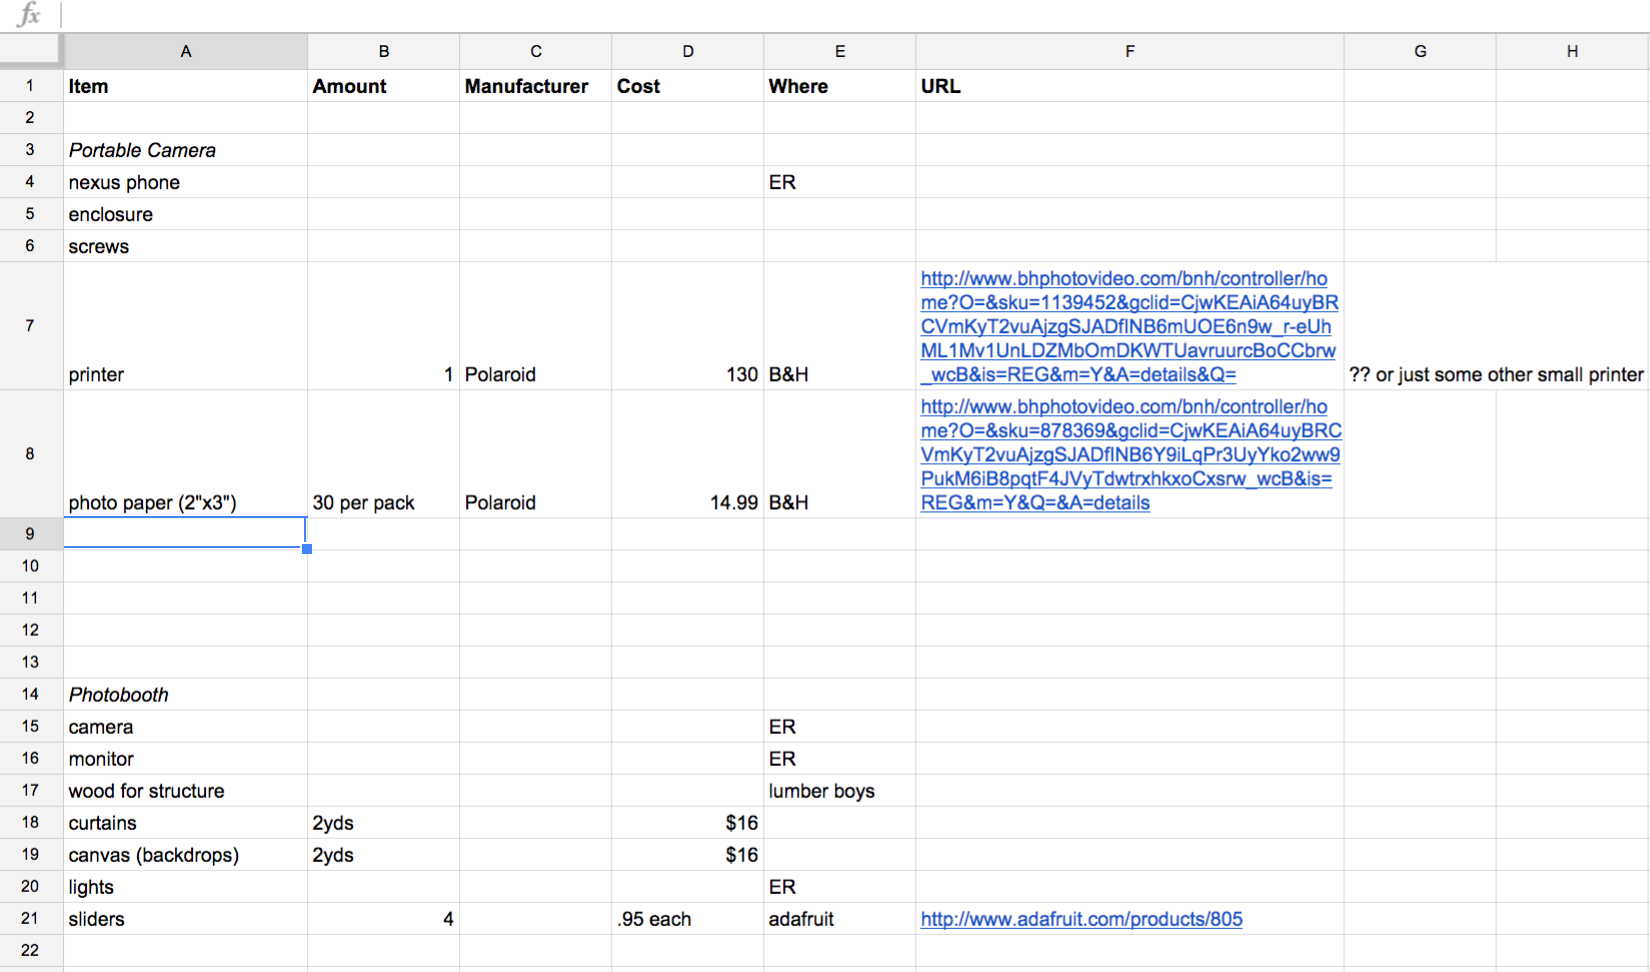
This is still something that needs to be finalized. In truth, we only finalized our project idea this week so had to rethink our systems diagram and BOM. The Systems Diagram can be found on Melanie’s Blog.